Google Pixel File Transfer: How to Transfer Files from Pixel to PC
Organizing a Google Pixel mobile with a mouse and keyboard on a larger, high-resolution screen is completely different from managing data directly on the phone. For the former, you can transfer files from Pixel to PC/Mac as you like to prevent data loss or just manipulate Pixel content with an Android optimizer. Now that we mentioned these, it's necessary to know how to connect Pixel to a computer and then transfer files across.
OK, we'll cover those in the following. And after going over this passage, you can choose the most satisfying solution out of the 4 ways below.
![]()
Method 1: How to Transfer Files from Google Pixel to PC via AutoPlay
As an inbuilt function of Windows OS, AutoPlay can help users access Google Pixel from PC before moving photos/videos from Pixel to computer. There are slight differences in Win7, Win8, and Win10 while carrying out tasks with it. Now, let's take Win 7 as an example to explain:
How to transfer files from Google Pixel to PC with AutoPlay?
- Connect Pixel to a computer with a USB cable. Your computer will then automatically install the mobile driver and identify the phone.
- Swipe down from the top of the Google Pixel screen and choose "Media device(MTP)" or "Camera(PTP)" under the "Connect as" section.
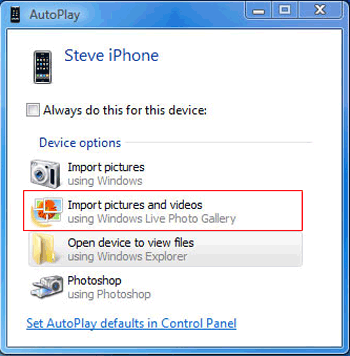
- Make sure you have successfully downloaded the Pixel drivers on this computer. Then a window will pop up on your computer automatically.
- Choose "Import pictures and videos". Then go with the hints on the screen to transfer media files from Pixel to PC.
Tips: If the AutoPlay doesn't appear automatically, just enable it by going to Start > Control Panel > Hardware and Sound > AutoPlay > check the box "Use AutoPlay for all media and devices".
People Also Like:
- How to Transfer Files Between Google Nexus and Pixel
- How Can I Transfer Files from Computer to Google Nexus
Method 2: How to Transfer Files from Pixel to PC/Mac with Assistant for Android
If you want to transfer Android content other than media files, there's nothing AutoPlay can do. At this point, you need a professional Google Pixel manager - MobiKin Assistant for Android (Win and Mac). Besides performing Google Pixel file transfer between a phone and a computer, it helps simplify Android data management on PC/Mac. For instance, with it, you're allowed to add, edit, delete contacts, mass text your friends, resend, forward messages, and install or uninstall apps, etc.
A brief introduction to MobiKin Assistant for Android:
- Transfer contacts, SMS, call history, photos, videos, music, apps, and more between Android and PC/Mac selectively or in bulk.
- Back up and restore Android devices with simple clicks, and all the files can be saved in the original format.
- Manage all your Android content on your computer without limitation.
- Two connection modes (USB and WiFi), easy to use, and quick transfer.
- Work well with various Android devices, including Google Pixel 5/5a/5 XL/4/4 XL/4a/3/3 XL/3a/2/2a/2 XL, and other popular phone brands like Samsung, Huawei, Xiaomi, Sony, LG, Motorola, HTC, etc.
- Your privacy will always be well protected.
- It comes with a free trial.
How to transfer files from Pixel to PC via Transfer for Mobile?
Step 1. Connect Google Pixel to computer
Download the right version of this software for free on a computer before installing and starting it. Attach the Pixel to the computer via a USB cable. Then, do as the screen says to get Pixel recognized by the tool.
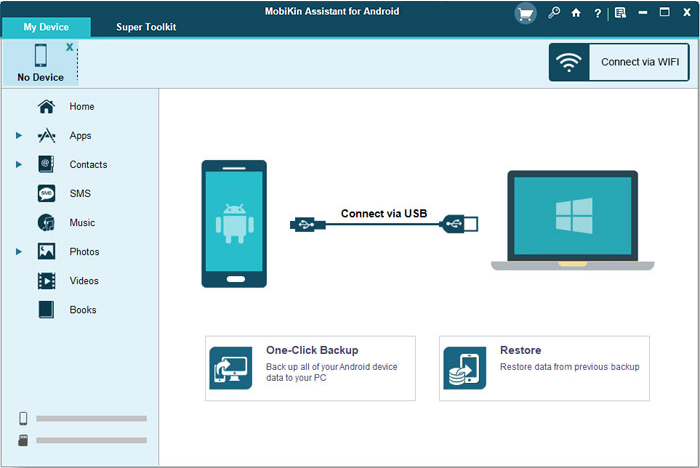
Tips: The USB cable is not available now? Simply check the link: how to connect Android phone via WiFi to have Pixel connected wirelessly.
Step 2. Choose your desired files to transfer
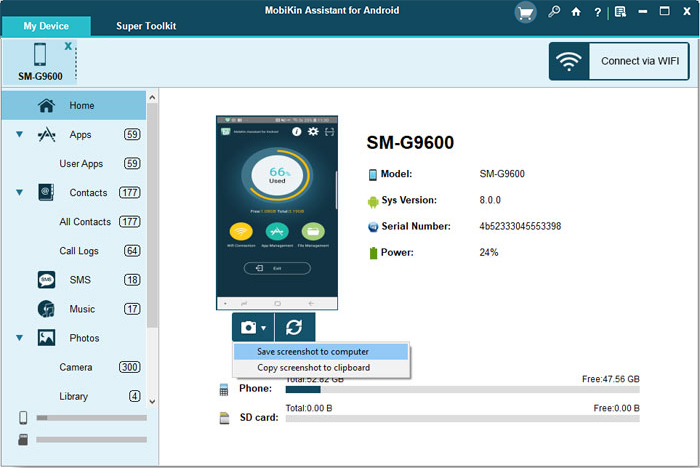
After the detection, your Pixel files will be listed on the main screen. Choose the data type(s) from the left panel. Subsequently, preview and mark the specific items on the right pane.
Step 3. Start to transfer files from Pixel to PC/Mac
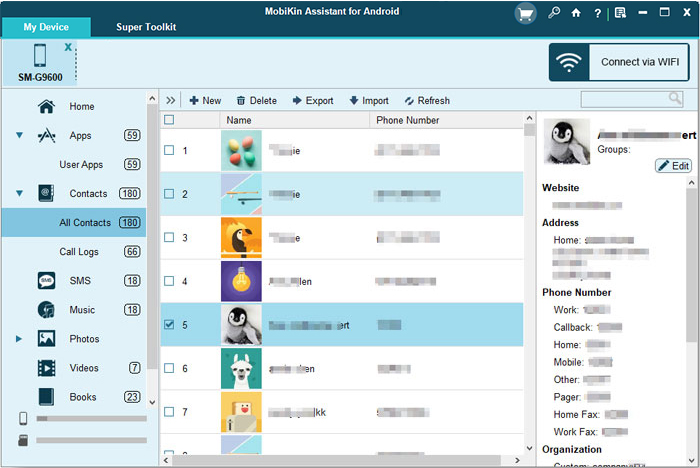
Click the "Export" button from the top menu to start to transfer them from Pixel to this computer. You can get them stored in the proper location on your PC/Mac.
Back up Pixel to PC with 1 click:
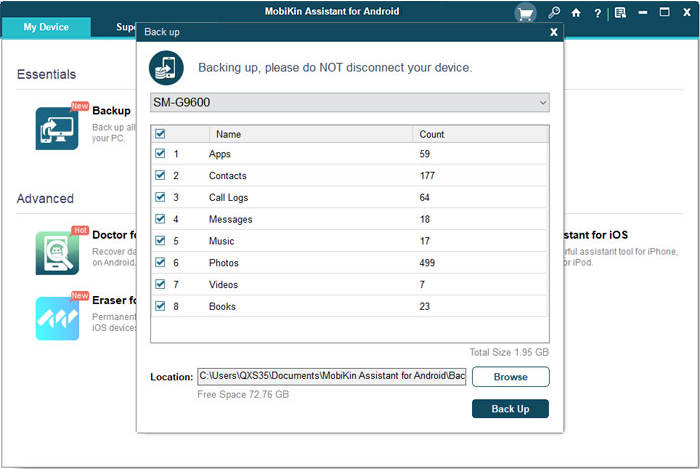
Only need to move all the content of some data types instead of specific files? You can complete this through its 1-click Backup & Restore feature. (Quick navigation: go to Super Toolkit (nearby "My Device") > Backup > select file type(s) > Back Up.)
Method 3: How to Transfer Files from Google Pixel to Computer via Google Account
Google account is an important configuration for managing Google Pixel. With it, you can let Pixel transfer files to your computer in batches. Alternatively, if you want to transfer specified photos or videos, just do that with the Google Drive app and the Google Drive website.
How to transfer files from Google Pixel to computer with Google account?
1. On your Google Pixel device, Launch the Gmail application, head to its Settings > Backup & Sync, and choose to sync Pixel with your Google account. (from the Backup & Sync screen, you can select what you want to include or exclude before the sync)
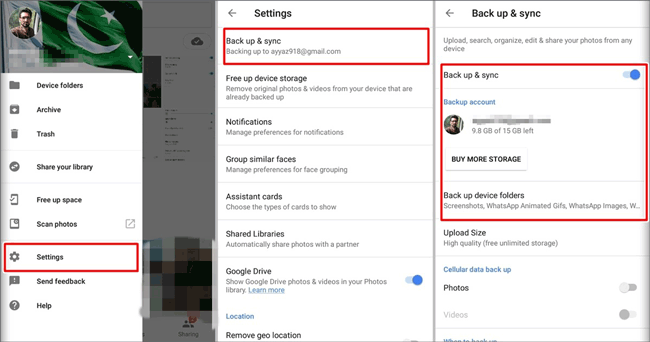
2. Once done, install the Google Backup & Sync desktop app on your PC/Mac. Run the app and log in to the same Google account to access the synced files. Then, download your needed stuff from the account.
Can't Miss:
- How to Recover Deleted Text Messages on Google Pixel?
- [Specific Introduction] How to Use Google Drive on Android & PC?
Method 4: How to Transfer Data from Pixel to PC/Mac over Bluetooth
We just talked about using WiFi and USB cables to get the Pixel linked. Well, do you know how to connect Pixel 2/3/4/5 to a computer over Bluetooth? Next, we'll illustrate this and specify how to transfer Pixel files to PC/Mac with this feature.
(The tutorial is simple and intuitive, but it is only suitable for moving a small amount of content because of its low efficiency.)
- How to transfer files from Pixel 2/3/4/5 to PC via Bluetooth?
1. On the Pixel phone, go to its Settings > Bluetooth to turn on the function. Then, ensure your device is discoverable.
2. On the Windows PC, enable Bluetooth by heading to Start > type in "Bluetooth" > Bluetooth Settings. Next, search for the Pixel before pairing the Pixel and PC.
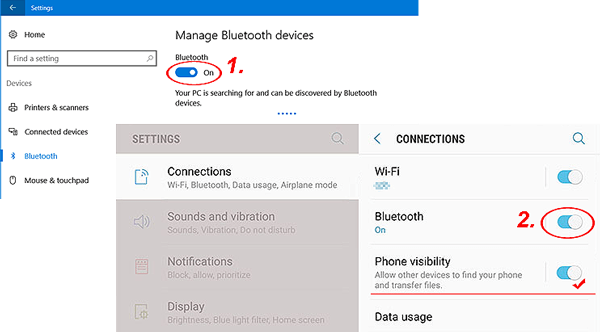
3. Once they are matched successfully, you should make your PC capable of receiving files by going to Settings > Devices > Bluetooth & other devices > Related settings > Send or receive files via Bluetooth.
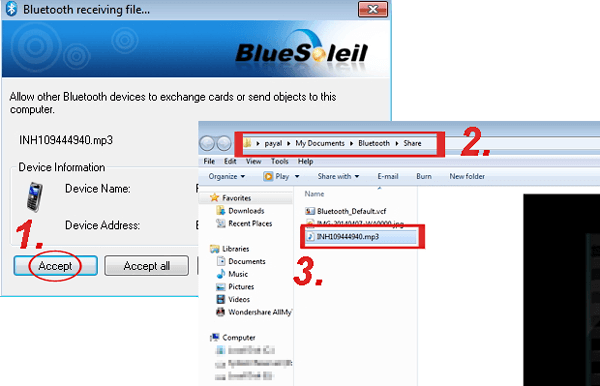
4. Handpick your wanted files from Pixel and touch Share > Bluetooth to transfer them to this computer. Finally, click on "Accept" or "Accept all" on PC to save the data.
- How to transfer files from Google Pixel to Mac via Bluetooth?
1. Follow step 1 we previously mentioned to enable Bluetooth on your Pixel phone.
2. On your Mac, tap the Apple Menu > System Preferences… > Sharing > check the "Bluetooth Sharing" box.
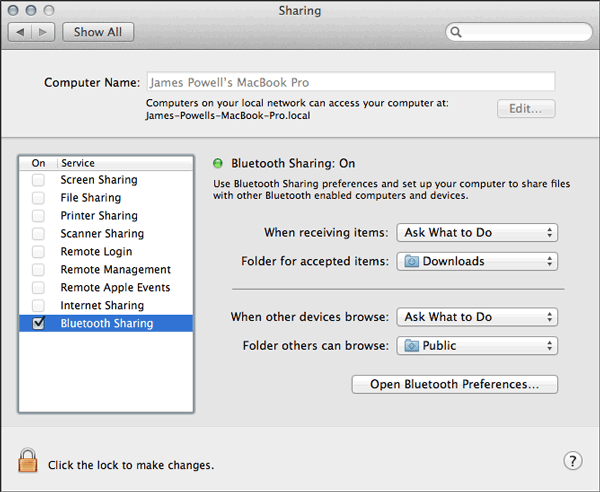
3. Go back to "System Preferences" and select "Bluetooth". Switch on Bluetooth and tap "Pair" to have Pixel and Mac connected.
4. Press and hold a file on the Google Pixel device. Then, select Share > Bluetooth and choose your Mac as the recipient. At last, just accept the incoming files on your Mac.
The Bottom Line
Okay, that's all. The 4 ways described above can transfer files from Pixel to PC/Mac in general. You can pick by the data you want to transfer, the expected transfer efficiency, etc.
Finally, as a digression, in terms of Google's software design, it always brings surprises, but its hardware is really a headache. Take Google Pixel 5 as an example, it is equipped with a mid-end Snapdragon 765 processor, and its front camera has only 8 MPx...; not long ago, it was exposed to collective complaints due to its hardware issues.
Want to make your Pixel data more secure? Just use MobiKin Assistant for Android, the most reliable and state-of-the-art software, to transfer your files to PC/Mac for regular backups.
Related Articles:
How to Copy Content from iPhone to Google Pixel?
Essential Tutorial about Google Pixel Backup and Restore (Ins and Outs)
Google Pixel Data Recovery: Recover Deleted Files on Google Pixel
How to Transfer Data from Samsung to Google Pixel [Practical Guide]
How to Transfer from Android to iPhone? [7 Proved Ways]
Best 10 Android Desktop Managers to Manage Your Android Devices


