How to Get More Storage on iPhone? Top 9 Free Solutions are Here
Are you running out of space on your iPhone? Many users keep their iPhones for two or three years or even longer, which can lead to storage issues as their devices accumulate more data over time. Fortunately, upgrading your device isn't always necessary when you run into these storage issues. With a few practical strategies, you can get more storage on iPhone and continue using it just like before - without having to delete your cherished photo library or other important files.
In addition, if your iPhone says that the storage is full, but there seems to be some free space, there are solutions that can resolve this discrepancy that iPhone says not enough storage but there is.
- Part 1: How to Check Storage on iPhone?
- Part 2. How to Get More Storage on iPhone without Paying
> Method 1: Transfer Large Files to Computer
> Method 2: Clear Browser Cache
> Method 3: Delete Apps Cache
> Method 4: Offload Unused Apps
> Method 5: Delete Unnecessary Apps
> Method 6: Remove Downloads Folder
> Method 7: Organize Your Media Files
> Method 8: Delete Message Attachments
> Method 9: Factory Reset Your iPhone after Backup - Part 3. How to Buy More Storage on iPhone
- Part 4. FAQs on Getting More Space on iPhone
Part 1: How to Check Storage on iPhone?
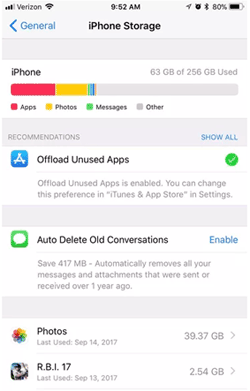
To check how much storage space is being used on your iPhone, navigate to "Settings" > "General" > "iPhone Storage". This section gives you a quick overview of your device's storage usage and helps you identify what's taking up space.
Start by opening the "Settings" app and going to the "General" section. From there, select "iPhone Storage".
At the top of the screen, you'll see a bar that displays the available storage space and the storage space currently being used. The bar is color-coded to show different types of data. As you scroll down, you'll see a list of apps and their storage usage. By selecting an app from this list, you can see detailed statistics on how much space the app itself is taking up, as well as any related documents and data.
Understanding iPhone storage usage is a prerequisite for managing and freeing up iPhone storage.
Part 2. How to Get More Storage on iPhone without Paying
How to get more storage on iPhone for free? If you're looking to get extra storage on iPhone, there are several methods you can take that require only a bit of your time, without costing you anything.
Method 1: Transfer Large Files to Computer
To get more storage on iPhone without paying, you can transfer various types of files, such as pictures, videos, documents, audio files, and messages, from your iPhone to your computer. While moving photos and videos is simple, managing other large data can be a bit more complicated.
For a reliable solution, consider using a reliable iPhone data transfer program - MobiKin Assistant for iOS, that allows you to back up your iPhone without relying on iCloud or iTunes. This tool allows you to easily transfer all your data from your iPhone to your computer, helping you manage your storage more efficiently.
As a specialized tool for iOS, it also offers the capability to:
- Back up all or specific data from iPhone to your computer.
- Back up 14 types of files, including videos, photos, music, ebooks, contacts, text messages, notes, Safari, voice memos, etc.
- No data loss occurs during the transferring process.
- Transfer and manage iOS data on computer.
- Fully compatible with iPhone 15/14/13/12/11/X/8/7/6, iPad, iPod touch, etc.
How to use Assistant for iOS to transfer files from iPhone to computer:
Step 1: Connect your iPhone to PC
Connect your iPhone to your Windows or Mac computer using a USB cable. Launch MobiKin Assistant for iOS, and it will automatically recognize your device.

Step 2: Select the files you need
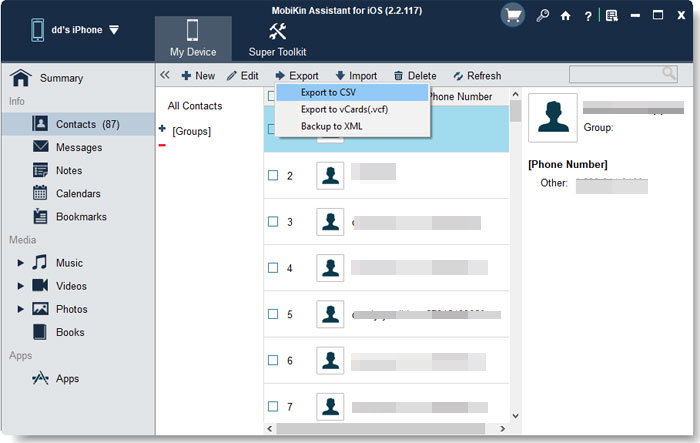
From the left side menu, select the types of files you want to export and specify the destination for the exported data.
Step 3: Finish transfer files from your iPhone to PC
Click the "Export" button to quickly transfer your iPhone files to your computer. Once the transfer is complete, you can view, edit, save, or delete the files as needed.
Video guide:
Method 2: Clear Browser Cache
If you've never cleared your iPhone's cached data, you might be surprised at how much cached data it can accumulate. Especially the browser cache, which stores various elements of the websites you've visited. Over time, this cached data can take up several GB of storage space. Clearing your browser cache not only frees up space, but also removes outdated information on websites you no longer visit.
How to clear Safari's browser cache to get more GB on iPhone:
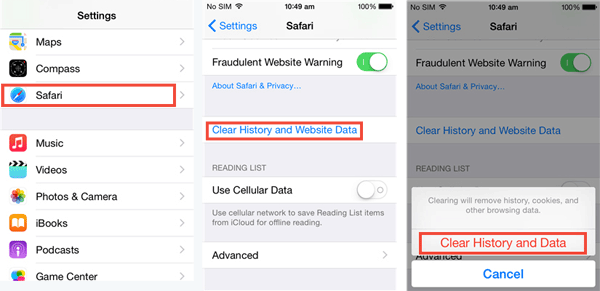
- Open the Settings app and scroll down to select Safari.
- In the Safari settings menu, scroll down and tap "Clear History and Website Data."
- Select "Clear History and Data" again to confirm the action.
Method 3: Delete Apps Cache
Just like your web browser, installed apps on your iPhone also accumulate cache data. Social media apps like Facebook, Instagram, Snapchat, and TikTok are some of the biggest culprits since they handle a lot of image and video content.
The process for clearing an app's cache varies depending on the app. Here's how to do it with Facebook as an example:
- Open the Facebook app and tap the Menu icon in the lower right corner.
- Scroll down and expand "Settings & Privacy," then select "Settings."
- Under the "Preferences" section, choose "Browser."
- Next to "Your browsing data," tap "Clear" to delete the cached data.
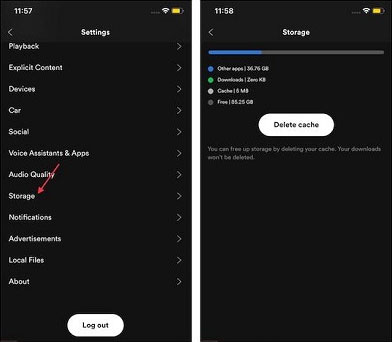
In addition to this method, you can clear an app's cache on your iPhone by deleting and reinstalling the app or using third-party tools. Regularly check which apps are consuming the most storage and clear their caches accordingly to free up space.
Method 4: Offload Unused Apps
Apps are often downloaded, used briefly, and then forgotten, yet they continue to take up storage space. You can free up some space on your iPhone by enabling the "Offload Unused Apps" feature.
When this feature is activated, it automatically removes apps you rarely use while retaining their data and files on your device. This allows you to easily reinstall the app with just a tap whenever needed.
Here's how to enable this feature:
- Open the Settings app and select "General".
- Tap "iPhone Storage", where you'll see "Offload Unused Apps" under the "Recommendations" section. (You may need to tap "Show All" next to Recommendations to see it.) The feature will also display how much space can be saved.
- Tap "Enable" to turn it on.
If you prefer to offload specific apps manually, follow these steps:
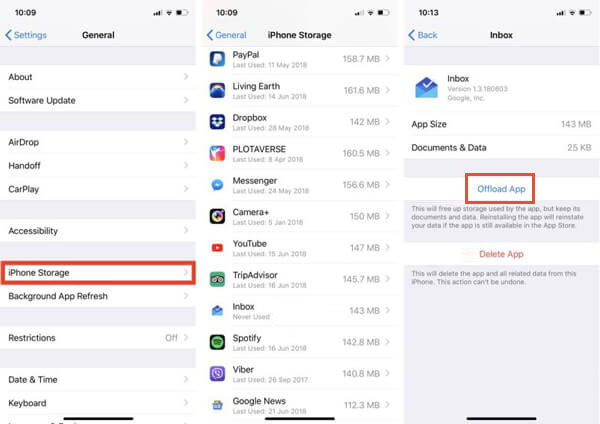
- Go to "Settings > General > iPhone Storage" and select the app you want to offload.
- Tap "Offload App", then confirm by tapping "Offload App" again.
- Repeat these steps for any other apps you wish to offload individually.
Method 5: Delete Unnecessary Apps
Apps are notorious for consuming smartphone storage, with some taking up more than 20 GB, especially after updates. To reclaim valuable space, it's a good idea to delete apps you no longer need.
Here's how to remove apps from your iPhone:
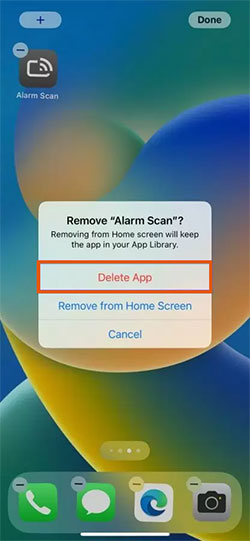
- On your home screen, press and hold the app you want to remove until a menu appears.
- Tap "Remove App" from the menu.
- Confirm by selecting "Delete App".
Method 6: Remove Downloads Folder
The Downloads folder on your iPhone can quickly fill up with unnecessary files. You might download a file or image, use it briefly, and then forget it's there, taking up storage space. Other downloaded temporary files can also accumulate over time.
To check and clear your Downloads folder:
- Open the Files app on your iPhone.
- Tap "iCloud Drive" to view files stored in the cloud, or select "On My iPhone" to view files stored locally.
- Navigate to the "Downloads" folder to view its contents.
- To delete items, select the files you want to delete, tap the three dots in the upper-right corner, and select "Select". You can select individual files or tap "Select All".
- Tap the "Delete" (trash can) icon to delete the selected files.
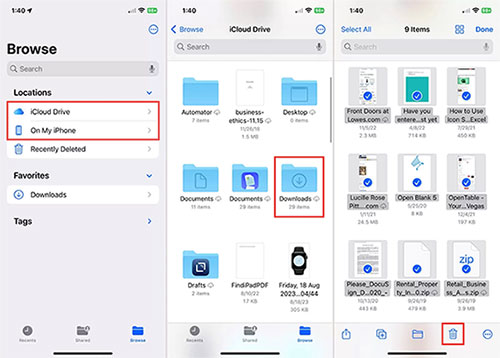
Remember, you won't be prompted to confirm once you delete a file, so double-check before proceeding.
Method 7: Organize Your Media Files
Photos and videos are some of the biggest space-hogs on your iPhone. You can free up space by making a few tweaks.
Merge Duplicates
iOS 16 introduces the Merge Duplicates feature, which helps you merge identical or nearly identical photos and videos. This reduces clutter and lets you have just one version instead of multiple copies.
- Open the Photos app and go to "Albums".
- Scroll down to "Utilities" and select "Duplicates". Here you'll see a list of all duplicate files with their dates and sizes.
- To merge duplicates individually, tap "Merge" next to each group.
- To merge all duplicates, tap "Select (X)" at the bottom, then tap "Select All" in the top-left corner, then tap "Merge X Duplicates" or "Merge X Exact Duplicates" in the top-right corner.
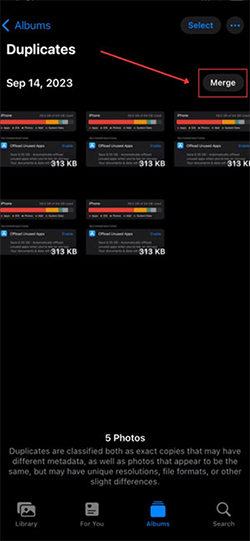
Once merged, the duplicates are deleted and moved to the "Recently Deleted" folder, where you can restore them if needed. (How to delete duplicate contacts on iPhone?)
Optimize Photos
Another way to save space is to store your photos in iCloud and optimize device storage. Your media will still be accessible, but high-resolution files are stored in iCloud instead of on your iPhone.
- Open the Settings app and tap your username to access iCloud settings.
- Select "iCloud", then tap "Photos".
- Switch to "Sync This iPhone".
- Scroll down and select "Optimize iPhone Storage".
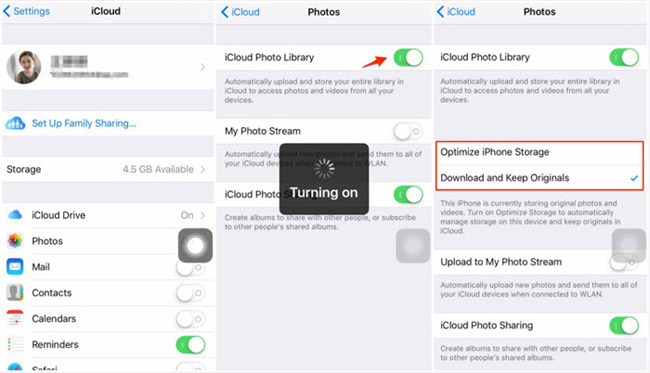
By enabling iCloud Storage and Optimization, you can reclaim much-needed space on your iPhone while keeping your photos and videos accessible.
Method 8: Delete Message Attachments
One of the great things about the Messages app is the ability to easily share files, videos, and photos with friends and family. However, these attachments can quickly take up space on your iPhone. You can free up some storage space by deleting large attachments from Messages.
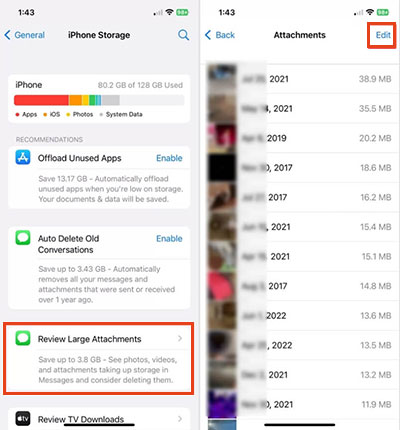
- Open the "Settings" app and select "General".
- Tap iPhone Storage and then find View Large Attachments under the Suggestions section. Here you'll see how large these attachments are and how much space you can free up.
- Tap "View Large Attachments" to see a list of items with their size and date.
- Tap "Edit" at the top and select the circle next to each attachment you want to delete.
- Tap the "Delete" icon in the top-right corner to delete the selected attachment.
Method 9: Factory Reset Your iPhone after Backup
If you're looking for a bold solution to clear up space, performing a factory reset is the way to go. Before doing this, create an iCloud backup of your essential files. Once the reset is complete, you can restore your iPhone using the backup and only reinstall the important apps and data.
Be aware that this process will erase everything from your device except what you've backed up to iCloud. Take care to ensure that you've backed up all critical files to avoid losing anything important.
Here's how to get more space on iphone by factory resetting your device after making backup on iCloud:
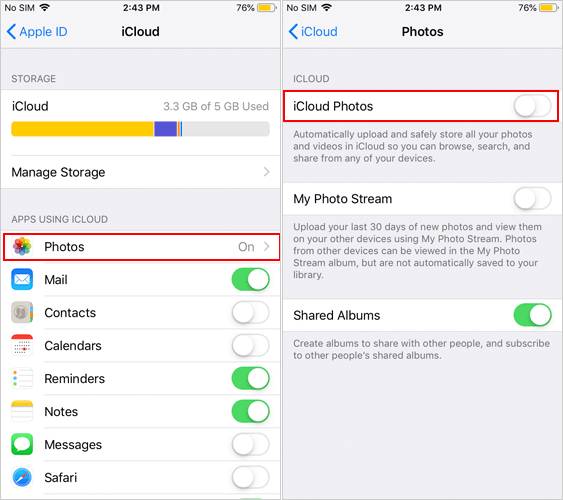
- Open the Settings app and tap your Apple ID at the top.
- Select "iCloud".
- Tap "Show All" under "APPS USING ICLOUD".
- Ensure that all the apps and data you want to back up are enabled by toggling on "Sync this iPhone" for each. Once done, tap "iCloud" in the top-left corner to return to the iCloud menu.
- Select "iCloud Backup" under the "DEVICE BACKUPS" section and turn on backup. Wait for iOS to confirm that the backup is complete.
- After the backup is finished, return to the main Settings menu and choose "General".
- Scroll to the bottom and select "Transfer or Reset iPhone".
- Tap "Erase All Content and Settings".
- Confirm by selecting "Continue".
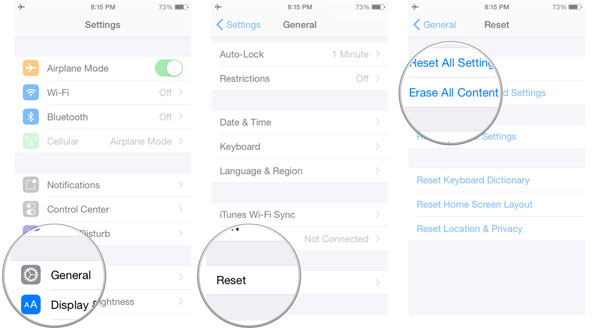
Once the reset is in progress, allow it to finish without interruptions. When you reach the Apps & Data or Transfer Your Apps & Data page during setup, select Restore from iCloud Backup to recover your data.
Part 3. How to Buy More Storage on iPhone
If the previously mentioned methods aren't freeing up enough space on your iPhone, you might want to consider upgrading your iCloud storage. With iCloud, you can back up your device, store photos and videos, keep passwords secure, save messages, and much more. Apple offers iCloud+ plans with additional storage to help protect your important data.
When you sign up for iCloud, you receive 5 GB of free storage. However, you can upgrade to plans offering 50 GB, 200 GB, or even 2 TB of storage.
Here's how to upgrade your iCloud storage:
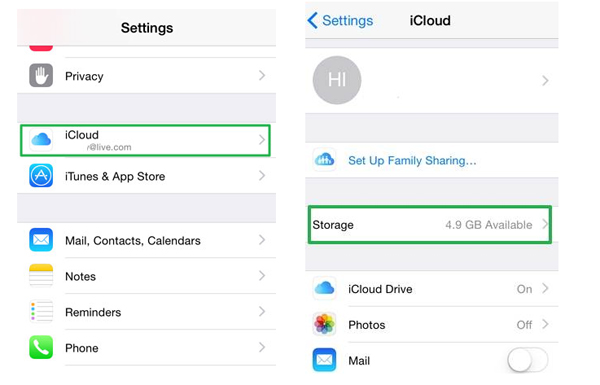
- Open the Settings app, tap your username, and select "iCloud". You'll see a chart at the top showing your current storage usage.
- Tap "Manage Account Storage" below the chart.
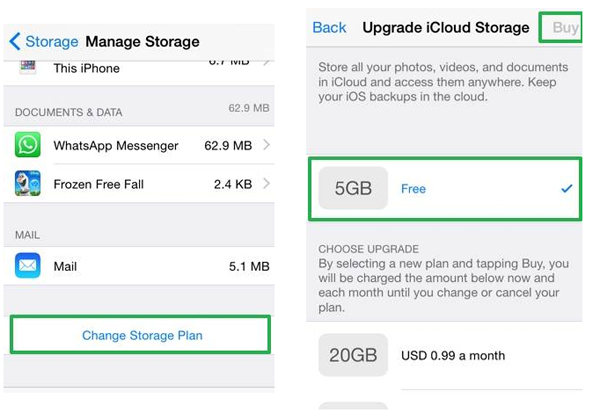
- Under "Change Storage Plan", you'll see your current storage amount. Tap this option to view available upgrades.
- Choose the plan you want to purchase, tap "Buy", and follow the on-screen instructions. If you have an Apple One plan, you can also tap "Change Apple One Plan" at the bottom.
Part 4. FAQs on Getting More Space on iPhone
Q1: What happens when your iPhone runs out of storage?
When your iPhone's storage is full, several issues can occur, such as slow performance, app crashes, and the inability to take new photos or download apps. Managing storage effectively using the tips mentioned in this guide can help avoid these interruptions.
Q2: Can I increase my iPhone's storage capacity?
No, you can't expand the physical storage of your iPhone as it comes with a fixed amount of internal storage. The best way is to maximize the available storage by organizing your files, apps, and data more efficiently.
Q3: How to have more iPhone storage without deleting anything?
One way to free up iPhone storage without deleting files is to use an external USB flash drive designed for iPhone. These drives connect directly via the Lightning or USB-C port, allowing you to easily transfer files like photos and videos from your phone to free up space.
The Bottom Line
You can choose one of the free methods described above to get more space on iPhone, or try a combination of them. Then, check how much storage space you have reclaimed. It's best not to wait until your device is overloaded with unnecessary data before you think about clearing space. Instead, make a habit of clearing out excess data regularly, preferably every two to three weeks. And it's not enough to just delete images and videos, be sure to manage caches, attachments, and other accumulated items.
Related Articles:
4 Solutions to Erase All Content and Settings from iPhone
[Full Guide] How to Erase iPhone without Password Permanently
How to Delete Google History on iPad 10/9/8/Pro/Air/mini/4
How to Delete Viber Messages on iPhone 15/14/13/12/11/Xs/8/7


