How to Transfer Photos from ZTE Phone to Computer [Fixed!]
Over the years, ZTE gadgets rank among the top 5 phones in the U.S., Aus, RUS, etc. ZTE, mainly focuses on affordable models, without a high level of phone memory. Yet actually, its camera configuration is really commendable, compared with its counterparts. Many ZTE enthusiasts like to take photos with this portable "camera", but they need to put them to computer to maintain the performance of the phone or simply for safety. OK, how to transfer photos from ZTE to computer can be an urgent matter for some users.
If you're gonna move pictures to computer from ZTE phone, but wondering how to do that securely and efficiently, then just check this easy tutorial with us now.
- Method 1: How to Transfer Photos from ZTE Phone to Computer with Assistant for Android
- Method 2: How Can I Transfer Pictures from My ZTE Phone to My Computer via Android Backup & Restore
- Method 3: How to Back Up Pictures on ZTE Using Photos App (Windows 8/10)
- Method 4: How to Transfer Photos from ZTE to Computer over a USB Connection
- Method 5: How to Transfer Photos from ZTE Phone to Computer with Google Drive
Method 1: How to Transfer Photos from ZTE Phone to Computer with Assistant for Android
Photos in ZTE phone are often stored in "camera roll", "screenshots", "tmp", "magazine", etc. At present, there are not many programs that are able to transfer these kinds of images to computer. MobiKin Assistant for Android (Win and Mac) is just one of the best utilities. Before ZTE file transfer, you're allowed to make general management for those items. Besides, it gives you the freedom to manipulate other contents like contacts, SMS, music, app on computer as well.
Why do I recommend Assistant for Android in the first place?
- Transfer photos, music, videos, contacts, call history, SMS, apps, and documents between Android and Windows/Mac computer.
- Enable you to add, delete, export, copy, and move Android photos on computer.
- Manage overall Android files on desktop/laptop as you wish.
- Back up and restore your Android phone/tablet in 1 click.
- It never interferes with your privacy at all hours.
- Clean interface, easy to use and fast transfer.
- You are allowed to connect your Android phone via Wi-Fi or a USB cable.
- Work well on nearly all Android devices, including ZTE Axon 11/11 SE/10/10 Pro/9/9 Pro/8/8 Pro/7/7 Pro, ZTE Blade V10/V8/V7/A7/V6/A5/L5, U V880, U V960, U X850, U8120, PM1107, Racer, Sapo a5, SGH t989, etc.
Let's see how to transfer photos from ZTE phone to computer with Assistant for Android:
Step 1. Connect ZTE device to computer
Open Assistant for Android program on computer after you download and install it. You'll get into the initial interface of the program. Then attach your ZTE phone to this computer using the supplied USB cable.
Step 2. Get the main interface of the tool
Go with the hints on the screen to let the program recognize your phone. After that, the main interface of the utility will appear, with all the scanned files displayed on the left menu.

Step 3. Preview and select pictures for transfer
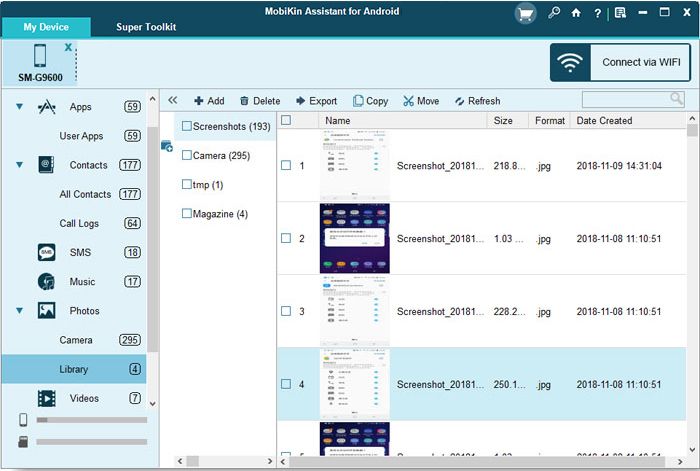
From the left panel, click on "Photos" > "Camera" or "Library". You'll then get access to all the images on ZTE phone from the right column. Now, just preview and tick off the one(s) for transfer as per you needs.
Step 4. Transfer photos from ZTE phone to computer
After the selection, simply tap "Export" from the top to put the chosen photos on computer right now.
Tips: You can also transfer photos from ZTE phone to computer with one click by going through Super Toolkit > Backup > Select the photos you need > tap on Back Up to save all photos on computer instantly.
Video Guide:
Method 2: How Can I Transfer Pictures from My ZTE Phone to My Computer via Android Backup & Restore
Do you want to transfer all the stuff on your ZTE phone to computer in one go? MobiKin Backup Manager for Android can assist to fulfill that easily with its backup feature. After that, it also allows you to restore the content from computer to ZTE phone anytime, anywhere. This great software lets you do ZTE file transfer without any trouble, working for contacts, call logs, SMS, media files, apps, etc. Plus, it is convenient and practical, for it runs smoothly on almost all computers and mobiles.
How can I transfer pictures from my ZTE phone to my computer via Android Backup & Restore program?
Step 1. Download Android backup & Restore utility on computer. Then install and launch it before linking ZTE phone to computer via a USB cable. Here, you should get ZTE recognized by referring to the easy instruction on the interface.

Tips: Want to know how to connect ZTE phone to computer via WiFi? Just click this page for a reference.
Step 2. Once the connection is generated, you should tap "Backup" option from the main screen. The incoming window will then show you all the types of data. Just mark your desired file categories to back up.

Step 3. Tap "Browser" to locate a folder to store the backup files. Afterwards, simply click "Back Up" button on the bottom right to transfer photos from ZTE phone to computer.
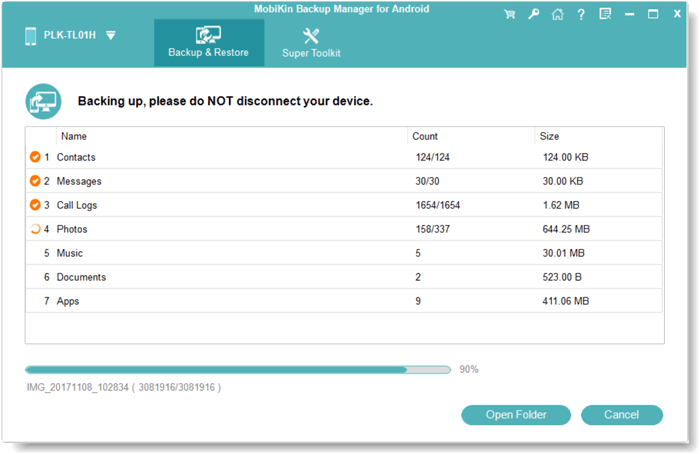
The progress bar will display the status of the task. After the procedure, the USB cable between the phone and computer can be disconnected.
You May Be Interested in:
- How to Backup and Restore ZTE Phone? 4 Reliable Ways Here!
- How to Transfer Data from ZTE to Motorola
Method 3: How to Back Up Pictures on ZTE Using Photos App (Windows 8/10)
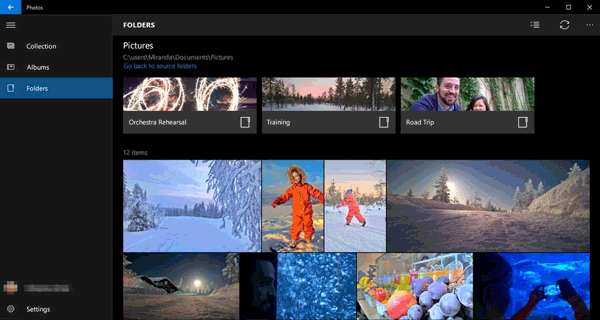
Photos app is a built-in feature in computer running on Windows 8 or Windows 10. If you only want to back up the photos in the Camera Roll of your ZTE phone, then this is a no-nonsense way for you.
Here's how to back up pictures on ZTE with Photos app on Windows 8/10:
- Connect ZTE phone to computer via a USB cord, and choose "MTP"/"Transfer files" mode from the notification area.
- Start Photos app from "Start" menu on computer. And go to the app commands by swiping from the bottom edge.
- Choose "Import" to opt for your ZTE phone to import from. The app will automatically search for all the pictures that haven't been imported, and then select them.
- You can also select the images from the folder manually as required. And finally, tap "Import" to commence.
Pictures cannot be viewed from ZTE phone's Gallery? Just refer to the post - Cannot view pictures in Android gallery? 2 ways to fix it! for more details.
Method 4: How to Transfer Photos from ZTE to Computer over a USB Connection
It is also a common way to transfer photos, videos, music and other multimedia files to computer with an applicable USB cable. After connecting ZTE to computer, set the USB connection mode, find the folder that contains photos, and copy them to computer then. It is not convenient to manage those photos, though it is a simple means.
To transfer photos from ZTE phone to computer over a USB connection:
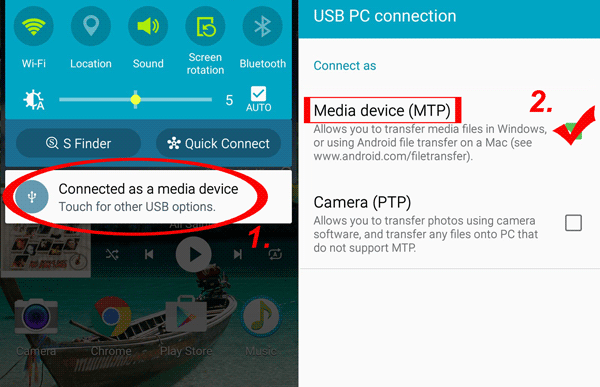
- Attach ZTE phone to computer via a USB cable. Swipe down the phone to choose "Media device (MTP)" from the notification bar.
- This option will enable you to transfer photos, videos, etc. from ZTE phone to computer. Now, go to "This PC"/"My computer" to find the name of your ZTE mobile.
- Double-click the phone's icon to enter the internal storage. You can see your photos in either the "DCIM" or "Pictures" folders.
- Select the images you want to transfer. Then, copy & paste them into a location on your computer.
See Also:
- Method to Transfer Data from ZTE to Samsung
- 7 Ways to Transfer Photos/Pictures from Computer to Mobile
Method 5: How to Transfer Photos from ZTE Phone to Computer with Google Drive
Google Drive offers 15GB of free storage currently. While trying this solution, make sure that the available WiFi network is stable. Next, you should upload ZTE photos to the Drive first. The images are visible in the cloud, then just download them from this cloud to computer.
Below is how to transfer photos from ZTE to computer using Google Drive:
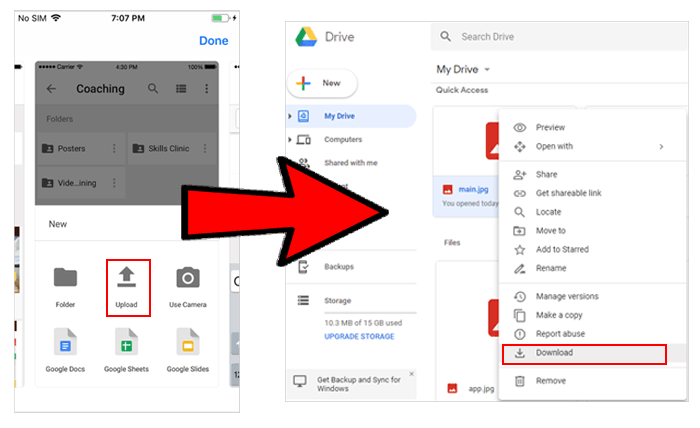
- Launch the Google Drive app on ZTE phone, and click the "+" icon at the bottom.
- You'll be prompted to choose the types of data to add. Then just select the "Upload" option.
- Head to the folder where photos are stored on your phone, and upload them to Google servers.
- Visit drive.google.com and sign in with your Google account to go to the folder containing pictures.
- Make the wanted selections, and download them from Google Drive to computer.
Note: If the content you plan to back up is private, it is recommended that you turn to either of the first 2 methods, for they can ensure your privacy at any time.
Ending Words
There you go! In general, each of the above 5 methods can work out the ZTE photo transfer. You can make a comprehensive comparison among them. Hope you have a pleasant experience!
Last but not least, here's an extra tip. Some people in Android forum said ZTE would automatically install unknown apps at times. To avoid wasting unnecessary data traffic without a sign, you can go to "Settings" > "More Settings" > "System Security" to disable "Allow installation of apps from unknown sources" option. Then go to "Security & Privacy" to enable "Check external source apps" button.
Related Articles:
BackupTrans Review: Is BackupTrans the Best WhatsApp Transfer Tool?
Contacts Recovery for ZTE Phones - Recover Deleted ZTE Contacts
How to Transfer Data from ZTE to HTC Phone
How Do I Transfer Contacts from My ZTE Phone to My Computer?
ZTE Recovery Software - Recover Deleted Contacts/Messages/Photos on ZTE


