[Solved] How to Fix Android System Recovery 3e and Recover Lost Data?
Every one of you may have encountered the situation when your Android acts strangely, for example, no responding. You find it hard to get it recovered to the normal state. In that case, you should try entering recovery mode. Wonder what is the Android system recovery mode and how it works to help you? We will tell you the answers. Besides, in case that your Android phone gets stuck in recovery mode unfortunately, we provide you 4 solutions to fix it.

- Part 1: What is Android System Recovery Mode & What Can It Do for You?
- Part 2: How to Boot into Recovery Mode?
- >> 2.1 Boot into Recovery Mode on Samsung Galaxy
- >> 2.2 Boot into Recovery Mode on Google Pixel/Nexus Device
- Part 3: How to Fix Android Phone Stuck in Android System Recovery?
- >> 3.1 Take Out the Phone Battery and Re-insert It
- >> 3.2 Perform A Factory Reset
- >> 3.3 Fix Stuck in Android System Recovery without Data Loss (For Limited Old Samsung)
- >> 3.4 Free One-Stop Solution to Fix Android System Issues Easily (For New Samsung Generations)
- Part 4: Back Up and Restore Android System with Recovery Mode
Part 1: What is Android System Recovery Mode and What Can It Do for You?
What does Android Recovery Mode mean? Android System Recovery Mode refers to a special bootable partition containing an installed recovery application. It is a built-in feature on your Android devices which can be used to diagnose and fix some problems on Android phones or tablets, such as system crash, stuck on the boot screen, or other issues.
When you boot into the Recovery Mode on your Android, you can reboot the system, update software, wipe data or factory reset your phone, wipe cache partition and update information from external storage.

Part 2: How to Boot into Recovery Mode?
Now you know how useful the recovery mode can be, and you may wonder how to make use of this feature to tackle your Android system issues. Accessing Android recovery mode varies from device to device. The process of booting into recovery mode on Android devices is similar, but you need to press different keys. Here are the detailed guides for booting into the recovery mode on Samsung Galaxy and Google phones.
If you need to know more about other brands of Android phones, you can go to Google search.
>> 2.1 How to Boot into Recovery Mode on Samsung Galaxy?
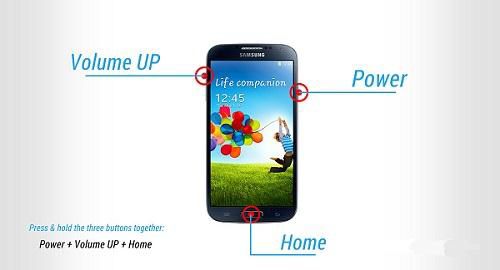
If you use Samsung phones like Samsung S10/S9/S8, Note 9 or others, you can follow the steps below to get to the Android system recovery mode.
- Power off your Android by pressing the Power key.
- Select "Power Off" from the options on the screen.
- Hold and press the Power key, the Volume Up key, and the Home/Bixby button. Do not release them until the Samsung Logo appears.
- After the Android Recovery Mode menu appears, you can navigate your options with the Volume Keys and select an option with the Power Key.
>> 2.2 How to Boot into Recovery Mode on Google Pixel/Nexus Device?
To enter the recovery mode on a Google phone, you need to:
- Hold down the Power key and choose "Power Off". If your device is unresponsive, you can keep pressing the Power key for a few seconds until the device turns off.
- Press and hold the Power key and the Volume Down key.
- You will see a bunch of information about your device. Choose "Start" on the top of the screen.
- Navigate to the "Recovery Mode" option with Volume Up and Volume Down keys, and select it with the Power key.
- Tap the Power key and the Volume Up key for several seconds, and then release the Volume Up key.
- Keep holding the Power key until you see the Android System Recovery options.
- Use Volume and Power keys to enter into Android system recovery.

Part 3: How to Fix Android Phone Stuck in Android System Recovery?
Although Android System Recover is useful when Android errors appear, some of you may unfortunately have your phone stuck in the process. You may fail to power on or off the device. This situation often takes place. To get out of Android System Recovery, you have some ways available.
Check the Phone Buttons to See If They Work Normally
When your device is stuck in the Android System Recovery, the first thing you need to do is to check your phone buttons, seeing if they are working normally, because sometimes the keys will be stuck and can't move. You need to activate them. When your phone buttons are working properly, you may press the Power key to reboot your device.
>> 3.1 Take Out the Phone Battery and Re-insert It
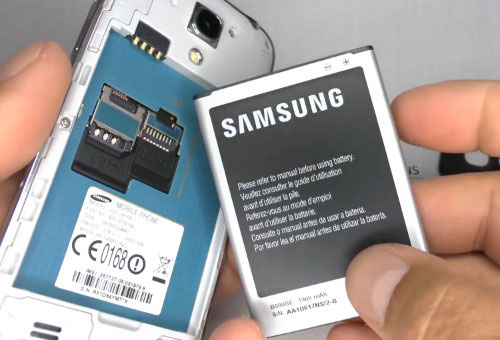
If there is no problem with your buttons, and you just can't power on or off your phone, you can take out your phone battery and re-insert it. Wait for a few minutes and then power on your device to check whether it can work out. But notice that some Android phones may have a built-in battery which can't be taken out.
>> 3.2 Perform A Factory Reset on Your Android Device
To fix your Android phone with Android System Recovery mode, you can choose to wipe all the data and reset your phone.
Navigate through the options with Volume keys and choose "Wipe Data/Factory Reset" with the Power key. After that, on some Android devices, you need to press Volume Down to select "Delete All User Data" and tap on the Power key to confirm it. Then reboot your Android phone into normal mode.
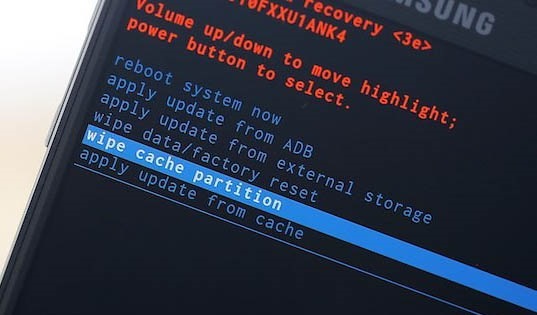
A factory resetting will wipe off all the data and phone settings on your Android phone. If you haven't created a backup for your Android device, you will lose files. If you don't want to suffer from data loss, you can use Broken Android Data Recovery to fix the stuck phone and recover data from a broken/dead Android phone.
>> 3.3 Fix Stuck in Android System Recovery without Data Loss
If you want to get out of the Android System Recovery without data loss, using the 3rd-party software called Broken Android Data Recovery is your best choice. This software can help you retrieve data from a broken/dead phone.
The Key Features
Support to extract the existing data like contacts, SMS, call logs, photos, music, WhatsApp, videos, etc. from damaged phone internal and SD card;
Fix Android system issues and get your device back to the normal state, such as virus attack, black screen, system crash, phone frozen, phone drown, password forgot, etc.
However, it only supports a part of Samsung phones, including Samsung S6/S5/S4, Note 5/4/3, and Tab Pro 10.1. If you use a supported Samsung phone, you can download this software and fix your Android system issues.
Wonder how to use this software to get out of Android System Recovery without data loss? Follow the instructions below to complete the task.
Step 1: Connect your Android to a PC.
- Install and launch Broken Android Data Recovery on your PC.
- Choose "Broken Android Data Extraction" tool.
- Connect your Android to the PC with a USB cable.
Step 2: Choose an appropriate mode for data transfer.
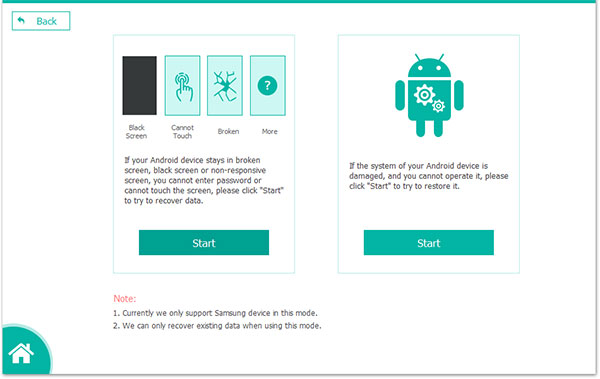
Now, choose an appropriated mode on the interface to recover your data according to your Android problem and click on "Start".
Step 3: Match your device info with the program.
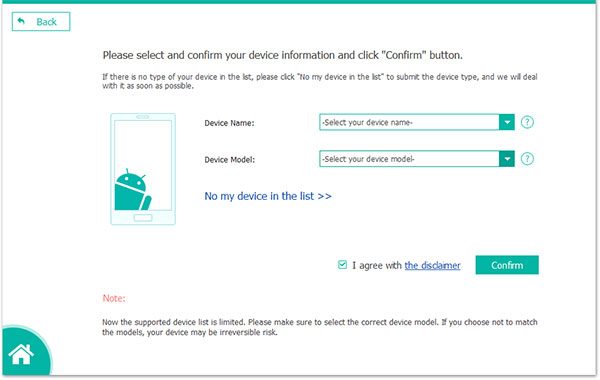
Choose your device name and device model from the drop-down menu. You will get the interface as below.
Step 4: Enter the download mode to make the data scannable.
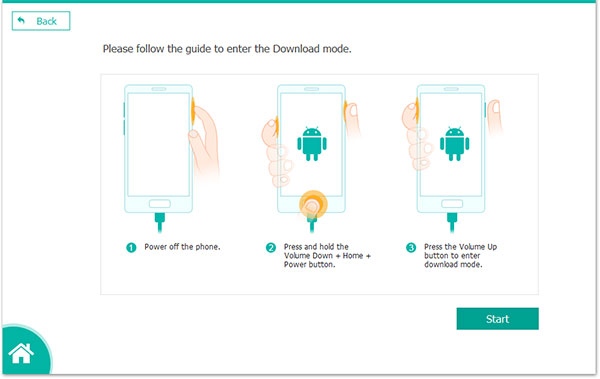
- Enter the download mode with prompts, and a customized repair package will be downloaded to get out of "Android system recovery 3e" error.
- You need to enter the download mode and make your data scannable as below:
(1) Power off your Android.
(2) Press and hold the "Volume Down" + "Home" + "Power" button at the same time.
(3) Hold the "Volume Up" button to enter the download mode.
Step 5: Preview, select and recover data from stuck Android.
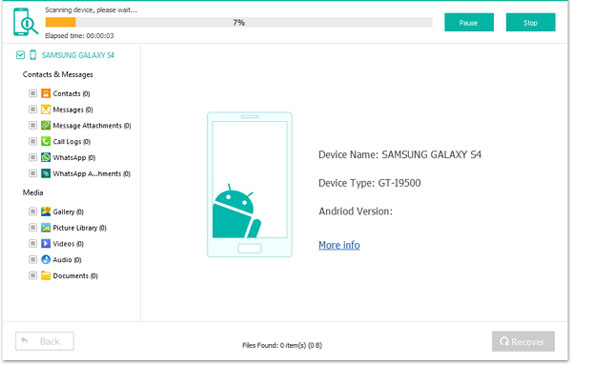
- After fixing and scanning, Choose the data you want to extract from the left penal.
- Click the "Recover" button to save them on your PC.
Pros: You can fix the Android system recovery 3e error without data loss.
Cons: The software only works on limited older generations of Samsung Galaxy.
>> 3.4 One-Stop Solution to Fix Android System Recovery 3e Error Easily
If you own a new generation of Samsung Galaxy and it stucks at Android system recovery, like Galaxy S10/S9/S7, etc., you can download this Android System Repair tool - Android Repair to fix your Samsung Galaxy.
The Highlights of Android Repair
- Fix multiple kinds of Android system problems, including black/dead screen, Android won't turn on or off, the apps are crashed, Android OTA update failure, stuck in boot screen, Android system is crashed, bricked Android phones/tablets.
- Offer customized fix package for your Android model to remove the Android issues.
- Support AT&T, Verizon, T-Mobile, Sprint, Vodafone, Orange, etc.
- Widely support Samsung Galaxy S10/S9/S8/S7/S6/S5, A8/A7/A6/A5/A3, J8/J7/J6/J5/J4/J3, Note 10.1/9/8/7/5/4, Tab 4/3/2/A/S/PRO, etc.
You can download it and have a try.
Here are the steps to repair your phone/tablet stuck at Android system recovery.
Step 1. Launch the app and select the "Repair" button.

Step 2. Connect your Android phone/tablet to a PC and tap on "Android Repair" from the left panel. The program will show you the issues it can fix. You can have a quick look and click on "Start" to go on.

Step 3. Fill in your Android phone info to the blank. You can open the drop-down menu to select the detailed info, including your device's brand, name, model, country, and carrier. You need to offer detailed info to the program so that it can offer a customized fix package to repair your phone.
Then read the "Note" and confirm the warning. After that, tap on "Next".

Step 4. The program will wipe off all data on your Android device. If you are ready to proceed, type in "000000".

Step 5. Boot your Android device to download mode. Here are two situations.
#1. Your device is equipped with a Home button hardware.
- Power off your Android phone/tablet.
- Long press the Home, Power key, and Volume Down for 5s to 10s.
- Release all buttons, and hold the Volume Up button to enter the download mode.

#2. Your device doesn't have a Home button.
- Power off your Android phone/tablet.
- Long press the Bixby key, Power key, and Volume Down for 5s to 10s.
- Release all buttons, and hold the Volume Up button to enter the download mode.

Step 6. Click on "Next" to download the firmware for repairing. When the downloading is finished, the program will start to fix your Android device.

Step 7. You need to wait for the repairing process to complete. And your Android phone will be fixed.

Pros: Widely support new Samsung Galaxy phones and tablets.
Cons: It will erase all of your Android data. You have to backup your Android phone/tablet at first. And it only supports Samsung Galaxy at present.
Read Also:
How to Delete SIM Card Contacts on Android Permanently?
[Fixed] Samsung Phone Stuck on Odin Mode, How to Fix It
Part 4: Back Up and Restore Android System with Recovery Mode
For your Android system's security, it is important to know how to back up and restore your Android device system. Here is the guide.
Back up your Android system
- Enter Android recovery mode using the method in Part 2.
- Use the Volume and Power keys to select the "Backup & Restore" option on the screen.
- Choose the "Backup" option either by tapping on the screen or by using keys. Then your system will be backed up to your SD card.
- After backing up, choose "Reboot" to restart your Android.
- Check your backup on SD card.
Restore your Android system
- Repeat step 1 and step 2 in "Back up your Android system".
- Choose "Restore" to begin recovering your Android system from the backup file.
- You will be notified when the system restore is complete.

The Bottom Line
In this article, you may find the contents you are curious about. Does it expel your doubts about Android system recovery? If you have problems with your Android system, pick the method we provide and try it on your phone. However, you need to know, no one can ensure 100% security when recovering data, you'd better back up your Android data regularly.
Related Articles:
Android SMS Transfer - 4 Ways to Transfer Text Messages from Android to Computer
Tips & Tricks to Remove Swipe Screen to Unlock Android Phone
3 Ways to Recover Deleted Contacts from Android (#1 is Awesome)
Android Message Recovery - How to Retrieve Deleted Text Messages on Android
3 Ways to Delete Photos from Samsung Galaxy Permanently in 2019


