How to Recover Data from Bricked Android Phone in 3 Ways [with Troubleshooting Tips]
The advent of touchscreen phones brings both satisfaction and new challenges for users. One common headache is the unresponsiveness of Android phones to commands, known as a bricked Android phone. This issue prevents access to the phone, rendering all files inaccessible. Consequently, many individuals are concerned about how to recover data from bricked phone. Well, here you'll find comprehensive information to assist you in recovering and repairing your bricked phone effectively.
- Part 1: What Is a Bricked Android Phone
- Part 2: What Causes a Bricked Android Phone
- Part 3: How to Get Data from Bricked Android via ADB
- Part 4: How to Recover Files from Bricked Android Phone via Google Drive Backup
- Part 5: How to Recover Data from Bricked Phone without Backup [High Success Rate]
- Part 6: How to Unbrick Android Phone in 4 Easy Ways
- Extra Tips to Keep Android Phone from Getting Bricked
Part 1: What Is a Bricked Android Phone
Typically, a bricked Android device becomes completely unusable, failing to boot correctly. There are two different types of bricking: Soft Brick, where the device shows signs of life but fails to boot up completely, and Hard Brick, where the device is totally damaged and shows no signs of life. (What's the difference between soft brick and hard brick?)
Part 2: What Causes a Bricked Android Phone
Some factors can lead to your Android device getting bricked. Understanding the potential causes is crucial for resolving the issue. Here are common ones:
- Flashing Incorrect ROMs or Firmware.
- Interrupted Software Updates.
- Rooting Gone Wrong.
- Custom Recovery Installation Issues.
- Incompatible Mods or Tweaks.
- Hardware Failures.
- Failed Rooting Attempts.
- Malware or Viruses.
- Overclocking.
- Failed Modem Firmware Update.
Part 3: How to Get Data from Bricked Android via ADB
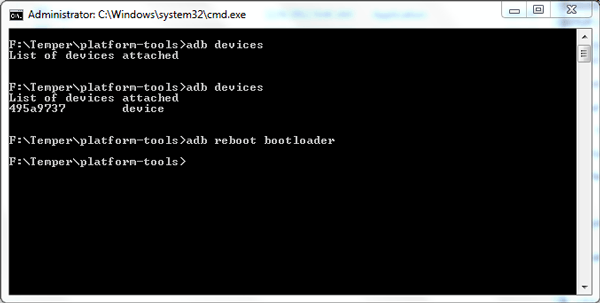
Before accessing your content on a bricked Android phone using ADB, please download the ADB tool to your computer, ensure USB debugging is enabled on the locked Android phone, connect the phone to the computer, open the ADB folder, and enter recovery mode. Here's how to retrieve data from bricked Android using ADB:
- Restart the Android phone into recovery mode.
- Use a USB cable to link the device to the computer with the ADB tool installed.
- Open the ADB folder and right-click while holding "Shift".
- Select "Command Window". Enter the command: adb shell rm /data/system/gesture.key and press "Enter".
- Reboot the Android device, and it will start without a locked screen.
- Go to your phone's "Settings" to create a new password.
You Might Also Like:
Part 4: How to Recover Files from Bricked Android Phone via Google Drive Backup
If you've previously stored essential content on Google Drive, you can recover data from soft/hard bricked Android by following these steps. Please note that you have to do this on another phone.
- Open the Google Drive app on another device.
- Log in to your Google account using the same credentials used for the backup.
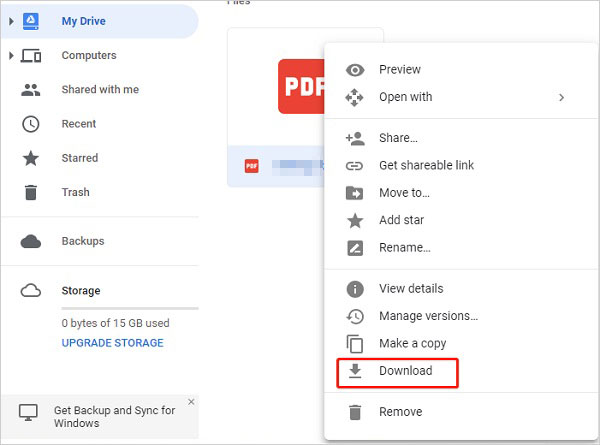
- Click on "My Drive" to view the uploaded items.
- Select the items you want to restore and right-click on the selected items.
- Choose the "Download" option. And that is how to recover data from a bricked/flashed Android phone via Google.
Part 5: How to Recover Data from Bricked Phone without Backup [High Success Rate]
Performing Android data recovery for bricked phones is not easy for green hands. It's a wise move to use Broken Android Data Extraction to restore content from your unresponsive Android phone. This tool restores your bricked phone, allowing direct retrieval of your personal information, even without a backup. The program scans and previews files, enabling selective recovery based on your preferences. Whether you need to recover specific data or perform a complete recovery, it offers a customized solution.
Why Pick Broken Android Data Extraction?
> Effective on bricked Android data recovery caused by various reasons.
> Restore items from both internal memory and SD cards on Android.
> Recover various data types such as contacts, texts, photos, videos, audio, WhatsApp, documents, and call logs.
> Currently, it retrieves data from Samsung devices, including Samsung Galaxy S6/S5/S4, Galaxy Note 5/4/3, Galaxy Tab Pro 10.1/SM-T525, and more.
> 100% safety and freedom from viruses.
After the free and secure download, follow the guidelines below to see how to use it to recover data from a bricked Android phone with simple clicks:
Step 1: Connect - Once Broken Android Data Extraction is installed, choose the "Broken Android Data Extraction" tool and connect your disabled phone to a PC using a USB cable.
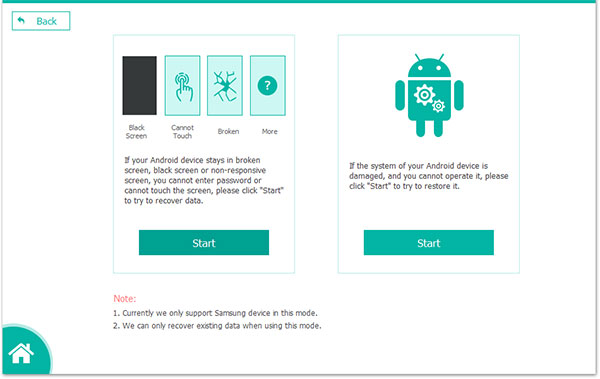
Step 2: Select mode - On the window, carefully read the instructions and choose a mode based on your phone issue for data recovery. If you're dealing with a black screen, cracked screen, or unresponsive touch, click the "Start" button to proceed.
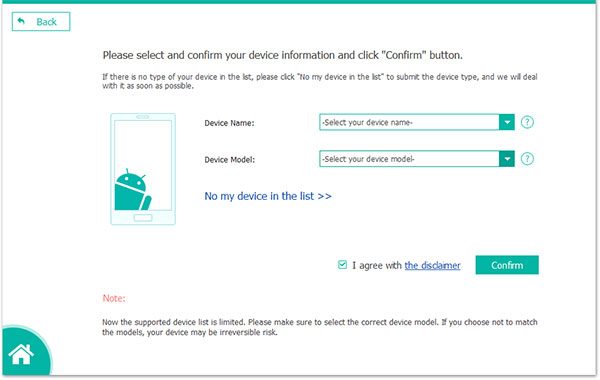
Step 3: Match info - Select your device name and model from the drop-down menu in the provided interface. Check the attached table for supported devices and models.
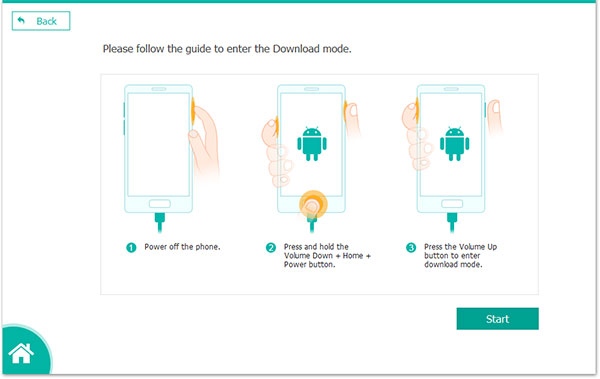
Step 4: Enter download mode - Follow the on-screen prompts to enter download mode. The software will download a repair package to fix your phone issue, allowing it to scan existing data. Power off your phone, then press and hold the "Volume Down" + "Home" + "Power" buttons simultaneously. Hold the "Volume Up" button to enter download mode.
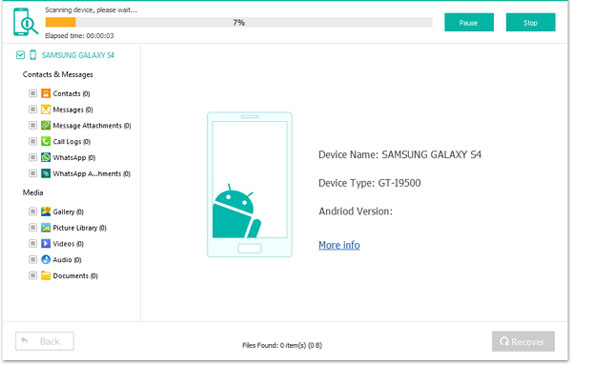
Step 5: Recover data - After successful fixing, the program will scan your device. Once complete, you can preview and choose the data to extract. Lastly, click "Recover" to save them to your computer.
Part 6: How to Unbrick Android Phone in 4 Easy Ways
Trick 1. Flash a New ROM
The automatic activation of recovery mode on your phone could be due to problems with the flashed ROM. In such instances, reflash the ROM from the beginning to recover a bricked Android. Here's the full guide for how to falsh an ROM to an Android device.
If you've installed a new ROM, allow 10 minutes for the phone to adapt. If the phone is unresponsive, remove the battery and reset it by holding down the "Power" button for at least 10 seconds.
Trick 2. Wipe the Cache & Data
If your phone is still bricked after flashing a new custom ROM, it may be due to improperly cleared cache files from the previous ROM. To address this:
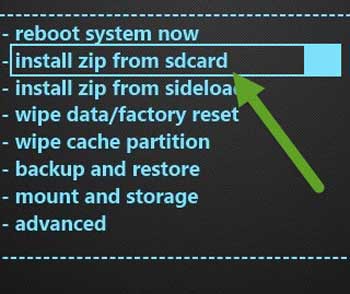
- Power off your Android and boot it into recovery mode (usually by holding the "Power and Volume Down" buttons, then select "Recovery Mode" with "Volume Up/Down" buttons).
- In recovery mode, choose "Advanced > Wipe Dalvik Cache".
- Return to the main window and select "wipe cache partition".
- Finally, choose "Wipe Data/Factory Reset" to delete all settings and apps.
- Reboot your Android phone.
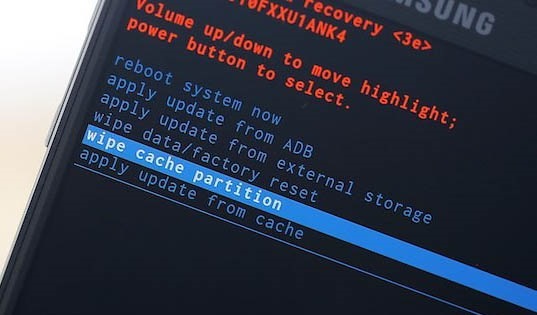
Trick 3. Disable Xposed Modules
If facing boot loops post Xposed module installation, consider this method. While Xposed Framework simplifies phone modding, it poses risks. Easily installed modules, often available on the Play Store, create a false sense of security. Learn how to recover a bricked Android phone by disabling Xposed Modules:
- Power off your Android device.
- Simultaneously press and hold the "Power and Volume Down" buttons until the device enters recovery mode.
- Use the volume buttons to move through the recovery menu.
- Locate an option related to Xposed or modules.
- Within the Xposed Modules section, find the list of installed modules.
- Navigate to each module you wish to disable and select the appropriate option to deactivate it.
- Once you've disabled the desired modules, confirm your choices.
- Reboot your device from the recovery menu.
You Might Also Enjoy:
Trick 4. Contact the Service Center
If your mobile device won't power on, doesn't respond to commands despite pressing the power button, and is deemed hard-bricked, it's advisable to take it to a repair shop or just contact the service center. Here's the guide:
- Find the authorized service center for your device.
- Verify warranty status for potential free repairs.
- Gather proof of purchase.
- Explain the issue to customer support.
- Submit the device for inspection, repair, or replacement.
- If possible, back up data before repairs.
- Inquire about repair costs if out of warranty.
- Check the status within the repair timeframe.
Extra Tips to Keep Android Phone from Getting Bricked
This article serves as a thorough guide, offering a detailed exploration of the definition, causes, repair solutions, and recovery methods for a bricked Android phone. Please feel free to explore specific sections based on your interests and needs.
Last but not least, recovering data from a bricked Android phone is a big headache, for there's a risk of permanent data loss. Therefore, you're advised to take preventive measures to avoid bricking your phone by considering the following tactics:
- Charge your phone fully before custom ROM installation to avoid interruptions.
- Enable USB debugging on your regular PC, a crucial step for many bricked phone solutions.
- Familiarize yourself with ADB commands and fast reboot for effective device recovery.
- Always back up your device to safeguard against data loss.
- Learn the hard reset method for freezing issues.
- Choose a custom ROM compatible with your Android phone.
- Do not download apps from unknown sources.
Related Articles:
11 Proven Methods to Unbrick Android Devices in Seconds
5 Easy Ways to Get Pictures off a Broken Phone That Won't Turn on
How to Avoid iPhone Turn to a Brick When Updating Apple OS?
Android Phone Keeps Turning/Shutting Off? You Can Now Fix It Like a Pro
How to Root Android Devices: All You Want to Know About Rooting
Can You Transfer Data from Android to iPhone 15/iOS without Reset? [6 Techniques]


