Can I Delete Songs from iPhone But Keep Them on iTunes? Of Course You Can!
"How do I remove songs from my phone, without permanently deleting them from my iTunes library?"
Posted on discussions.apple.com
Many people ask this question: If I delete music from my iPhone, will it stay on iTunes? Well, deleting songs from iPhone is never a difficult task, but when you delete songs from iPhone, you will find that these songs are also deleted from the iTunes library. Sometimes, you don't want to delete songs from the iTunes library. Then the question is coming, how to delete music from iPhone but not iTunes?
If you want to delete a song from your iPhone without deleting it from the iTunes library, we have four methods to help you achieve it.
- Method 1: How to Delete Music from iPhone But Not iTunes Using iOS Transfer [HOT!]
- Method 2: How to Delete Music on iPhone But Not iTunes via Settings
- Method 3: How to Delete Songs from iPhone But Keep Them on iTunes Using Music App
- Method 4: How to Remove Music from iPhone But Not iTunes via iTunes
Method 1: How to Delete Music from iPhone But Not iTunes Using iOS Transfer
iOS Transfer is a powerful program to help people manage any iOS devices like iPhone, iPad and iPod. By using this software, you can delete multiple or specific music files from iPhone and 100% ensure that they are not deleted from iTunes library. In addition to music, iOS Transfer can also delete other types of data from your iPhone, including contacts, SMS, videos, documents and so forth.
Highlights of iOS Transfer - iPhone Music Manager:
- You can delete all songs at once, or you can select individual songs you want to delete.
- Export music from iPhone to computer for backup.
- Import music files from computer to your iPhone.
- Apart from music, photos, contacts, messages, apps, documents and other more data can also be managed on iOS Transfer.
Below is a step by step tutorial showing you how to remove downloaded music from iPhone but not iTunes with the help of iOS Transfer:
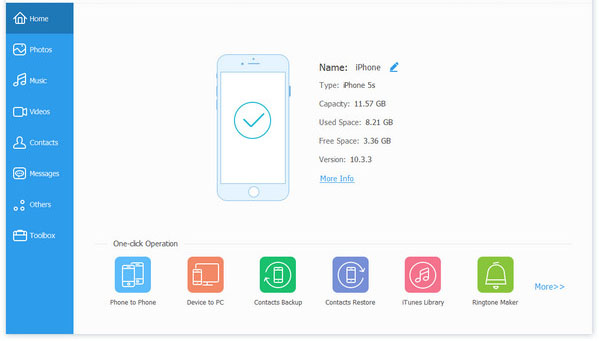
Step 1. Download, install and launch iOS Transfer on your computer. Connect your iPhone to the computer and then the program will detect your iPhone and show you an interface like below:
Step 2. Choose "Music" option on the left of the main interface and all the music files in your iPhone will be loaded on the program. You can see that all songs on your iPhone have divided into different categories, such as Music, iTunes U, Podcasts, Audiobooks, Ringtones, and so on.
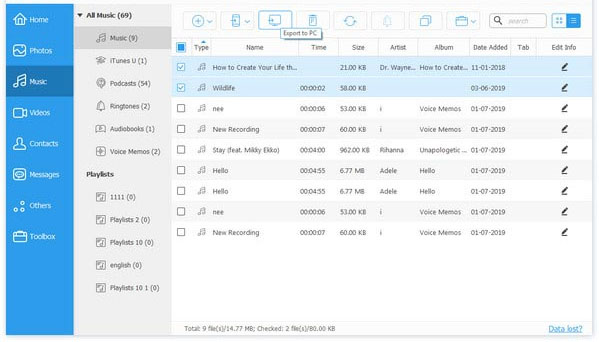
Step 3. Preview the music files and tick off the ones that you want to delete. Then, click on the Trash icon from the top menu to delete them from your iPhone. All the selected songs will be removed from your iPhone but still stay on iTunes.
If you accidentally deleted important music files from your iPhone and wish to get them back again, here is an efficient and simple solution to help you recover deleted music from iPhone.
Method 2: How to Delete Music on iPhone But Not iTunes via Settings
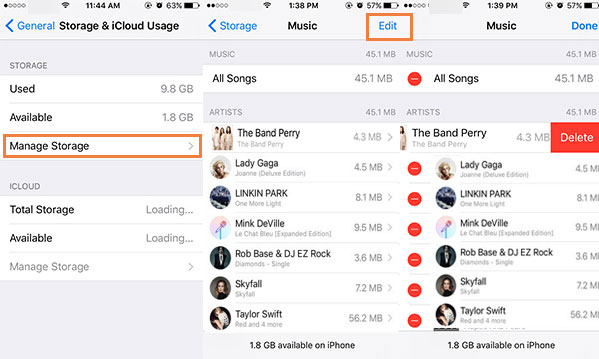
How do I delete songs from my iPhone but keep them on iTunes without installing additional software? You can choose to delete songs from iPhone via settings directly. In this way, you can remove specific or entire songs from your iPhone.
Step 1: Unlock your iPhone and go to "Settings" > "General".
Step 2: Choose "Storage & iCloud Usage" > "Manage Storage" and scroll down the screen to click "Music".
Step 3: Tap on the "Edit" button from the top right corner and delete "All Songs" or a specific song by clicking on the red minus sign. Or you can swipe left on a song to remove it from your iPhone.
How to Delete Songs from iPhone But Keep Them on iTunes Using Music App
Deleting songs from iPhone via Music app according to the album and genre is another approach to delete iPhone music but keep them on iTunes.
Step 1: Unlock your iPhone and run the "Music" app.
Step 2: All music files will be displayed and you can press and hold the song that you want to delete.
Step 3: From the pop-up window, tap on the "Remove" option and this song will be deleted from your iPhone immediately. Again, it will be still kept in your iTunes library.
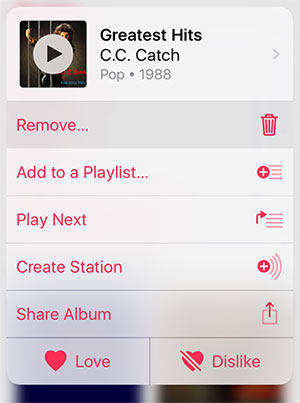
We can see that deleting iPhone songs from Settings or the Music app only allows you to delete one song at a time, which is undoubtedly a waste of time and energy. In order to save your time, please choose the most simple and convenient method 1.
Guess you like:
- Can't Delete Photos from iPhone/iPad? Here are Solutions!
- Different Ways to Delete Music from iPod touch or classic
Method 4: How to Remove Music from iPhone But Not iTunes via iTunes
Few people may know, but in fact the iTunes library has a built-in function that allows you to delete songs from the iPhone instead of deleting songs from the iTunes library. Now follow the steps below to see how to use this built-in feature of iTunes to delete music from iPhone but not iTunes.
Step 1: Connect your iPhone to your computer via a USB cable and launch iTunes on the computer. Make sure you have installed the latest version of iTunes.
Step 2: From the top-left corner of iTunes interface, tap on the "Device" icon and choose the "Music" tab.
Step 3: Tick off the "Sync Music" option and untick the checkbox in front of the songs and albums that you want to delete. After that, click on the "Apply" button.
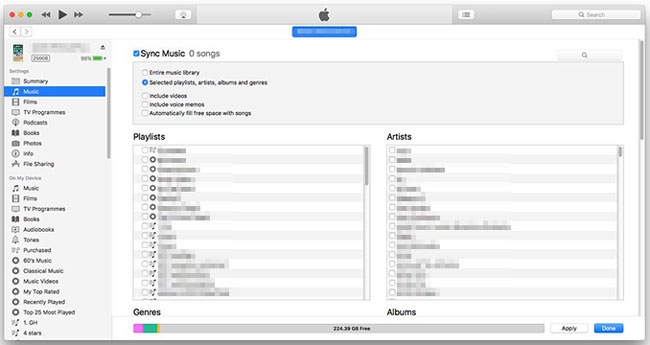
The built-in function of iTunes can help you delete the music you don't want from iPhone but not iTunes, but it cannot let you delete one song at a time, and this method may accidentally delete the data on the iPhone. If you are unable to accept these circumstances, then you'd better go back and choose method 1.
Final Words
Now, you know at least it is possible to delete music from iPhone but not iTunes. The above four methods can help you achieve your goal. There is no doubt that iOS Transfer, which is suitable for all iOS devices, is the most ideal solution. It can help iPhone users to delete unwanted songs in the most effective and easiest way without worrying about losing them from the iTunes library. Download this excellent software now to better manage your iOS data.
Relative Articles:
Top 10 iPhone Data Eraser Software to Erase iPhone Data Permanently
How to Transfer Large Videos from iPhone to PC
6 Ways to Transfer Photos from Computer to iPhone Effectively
Easy Ways to Transfer Files from Lenovo to iPhone


