How to Erase Deleted Files on iPhone Permanently
So, you just bought a new iPhone 14 and you want to sell your old iPhone 11, but in order to prevent personal information from falling into the wrong hands, you first need to learn how to deal with your old iOS device, especially if you want to resell or give the old iPhone to someone else. And the first thing you need to do is to make sure your old iPhone device is secure. You need to delete all content or even erase deleted files on iPhone. Wait, why we need to erase deleted files on old iPhone?
When you delete all the files on the old iPhone, it seems nothing left on the old iPhone, but the deleted data is completely deleted? If I tell you that the deleted data can be recovered by someone else, would you feel panic? If you want to permanently delete the iPhone data, this article will help.
Part 1: Simply Delete and Factory Reset Your iPhone (Data 100% Recoverable)
If you have only a small number of files on your iPhone that you want to delete, you may prefer to delete them one by one manually. However, there are also some types of data that cannot be deleted manually because of certain restrictions. And when you have a large number of items need to be cleaned, you would like to set your iPhone to factory settings directly.
Factory reset your iPhone is the simplest and fastest way to remove everything on your iPhone. Follow the steps below to factory reset your iPhone.
Step 1. Go to the home screen of your iPhone and choose "Settings".
Step 2. Scroll down the list and choose the option of "General".
Step 3. Go to the bottom of the list to choose the options of "Reset" > "Erase All Content and Settings" > "Erase iPhone" in turn.

Part 2: What Happens When You Delete Files on Your iPhone
Do you want to know what happens when you delete files on your iPhone or restore your iPhone to factory settings? In fact, when you delete a folder or file on your device, the data is sent to the deleted file folder. They will eventually be removed from any device they have synced. But that doesn't mean they can't be recovered.
In any case, the importance of protecting documents and privacy will never be overemphasized. This is why it is necessary to delete these sensitive files and delete the deleted files on the iPhone. If you resell your old iPhone without permanently deleting the file, third parties will most likely get sensitive information from your phone, such as your bank account details, social media passwords, sensitive videos and important messages.
Manually delete the data stored on the iPhone, even if you have reset the iPhone to factory settings, others can easily recover deleted data using third-party recovery software tools. Experts remind us that it is best to use the professional iPhone Data Eraser to permanently delete deleted data from the iPhone.
Part 3: Permanently Erase Deleted Files on iPhone by iPhone Data Eraser
Note: in the method described below, once the iPhone data is deleted, it will never be recovered, so you must ensure that you have backed up your iPhone data on your computer or iCloud.
Simple deletion is not enough, you should use the MobiKin Eraser for iOS (Windows/Mac) to erase deleted files on your old iPhone/iPad/iPod permanently. If you have the need to protect your personal information on your iPhone, this software will help you do just that. There are different types of data can be erased by the tool, such as call logs, accounts, browsing history, contacts, messages, photos, videos and many more. It even provides three different erasing levels for your choice.
Eraser for iOS is capable of erasing deleted data on iPhone fully. Once completing the erasing process, nothing can be recovered. That's why I always advise that you back up your important iPhone data beforehand. This software is compatible with almost all generations of iPhone, iPad and iPod, such as iPhone 14/14 Pro/14 Pro Max/14 Plus, iPhone 13/13 Pro (Max)/13 mini, iPhone XS/XS Max/XR, iPhone X/8/8 Plus, iPhone 7/7 Plus, iPhone 6s/6s Plus, iPhone 6/6 Plus, iPad Pro, iPad Air, iPad mini, iPad 2, etc.
Free download the program and keep on reading to see how to use it to erase deleted files on iPhone permanently.
Step 1. Connect your iPhone to computer
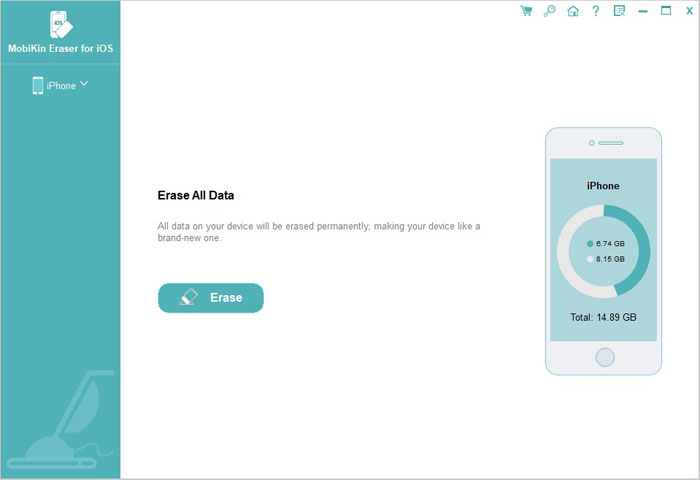
The first step to take is to launch the installed Eraser for iOS on your computer and then link your iPhone to the computer via the USB cord. Once connected, you will find the basic information of your iPhone displayed on the main interface.

Step 2. Select security level you need
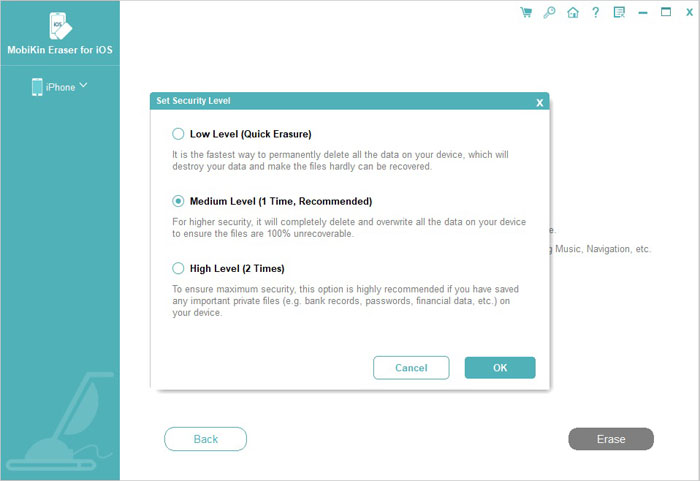
Just tap on "Erase" button on the interface to proceed to the next step. After that, you will be allowed to choose a security level you need by clicking on "Medium", which will bring out a window for you to choose a level: Low - Medium - High.

Step 3. Start to delete ringtone from iPhone
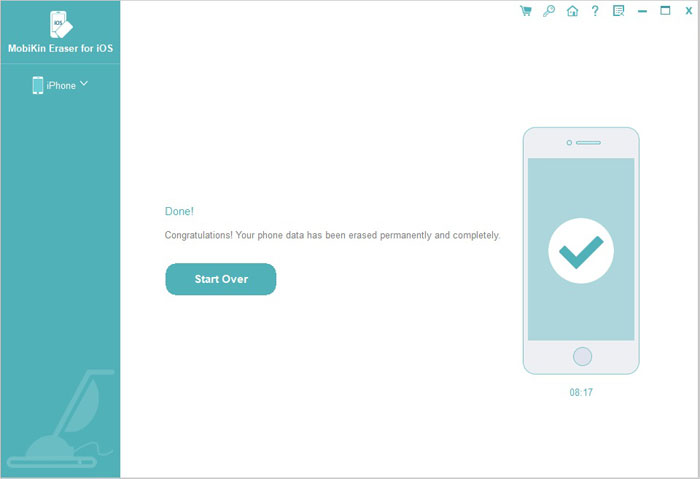
Choose the right erasing mode according to your need and type "Delete" into the box to confirm. Finally, click on "Erase" button to erase all deleted data on your iPhone.

Congratulations that you finally found a reliable tool to help you permanently erase deleted files on your iPhone, especially those you want to clean up permanently. MobiKin Eraser for iOS is a very powerful data deletion tool that worth trying. Using this software to delete data, the deleted data is unrecoverable, so you need to back up before deleting.
Related Articles:
[Fixed!] How to Permanently Delete Text Messages on iPhone?
Can I Delete Songs from iPhone But Keep Them on iTunes? Of Course You Can!
4 Marvelous Ways to Delete Messages from iCloud Storage [Quick Guide]


