[2024] How to Reduce System Data on iPhone to Get More Storage?
Numerous individuals encounter challenges with the sizable consumption of storage space by "System Data" on their iPhones, even after diligently deleting items to create free space. Have you ever pondered the nature of System Data (formerly known as Other data) on iPhones and iPads and sought ways to reduce system data on iPhone for the retrieval of valuable storage? If so, you're not alone in navigating this perplexing aspect of your iOS device. In the following sections, I will guide you through the process of effortlessly clearing System Data on your iPhone or iPad to free up storage space.
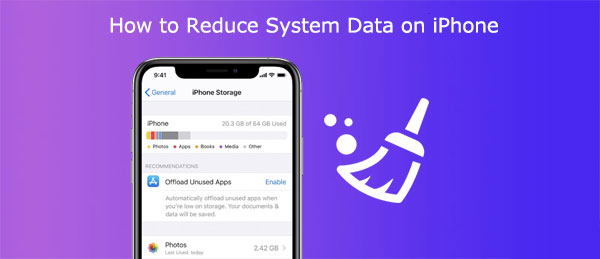
Part 1: What is System Data on iPhone and iPad? How to View It?
What is System Data?
System data refers to a specific storage category found on your iPhone, encompassing various files such as logs, caches, Siri voices, and miscellaneous data. In earlier iOS versions, this category was referred to as "Other Storage." Despite usually occupying minimal space, system data tends to accumulate over time. The good news is that you can identify and remove some of the contents within the System Data category to free up space on your device.
Where to Check System Data?
To check the System Data on your iPhone, follow these steps:
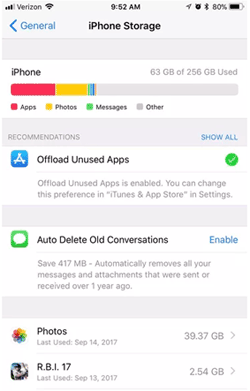
- Navigate to Settings > General > iPhone Storage.
- You'll encounter a visual representation of your iPhone storage through a bar chart, with distinct colors indicating different types of content like photos, apps, etc. Your apps will also be displayed based on the storage they consume.
- Inspect the bar chart closely, paying attention to whether 'System Data' or 'Other' occupies a significant portion of the bar. System data is typically represented by a gray color on the chart and is positioned towards the right end.
- If you identify the System Data category, scroll down past the apps until you find the 'System Data' or 'Other' option, along with the corresponding storage space it occupies. Tap on it to access and manage the content within.
More Useful Articles:
Part 2. How to Reduce System Data on iPhone [5 Solutions]
Solution 1: Clear Browsing History and Website Data
An effective method to lower system data on iPhone and optimize storage on your device is to routinely clear your browsing history and website data. Regularly clearing your browsing history serves multiple purposes—it keeps your browser uncluttered, ensures privacy protection, and contributes to the smooth functioning of the browser. The process of clearing history is straightforward across popular web browsers like Safari, Chrome, and Firefox. Here's how you can do it:
Clearing Safari Browsing History:
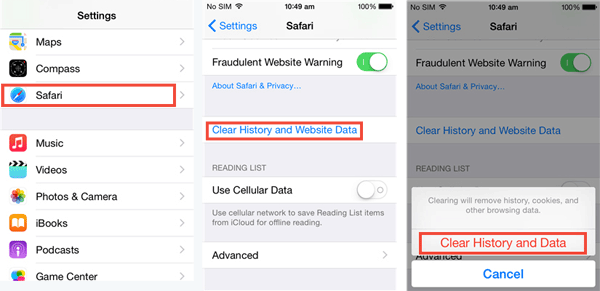
To tidy up Safari caches, go to "Settings" > "Safari" > "Clear History and Website Data". Confirm your decision by tapping on "Clear History and Data".
Clearing Chrome Browsing History:
In the Chrome app, tap on the three-dot icon at the bottom, then select "History". Choose "Clear Browsing Data", pick the desired time range, and confirm by tapping "Clear Browsing Data".
Clearing Firefox Browsing History:
Launch the Firefox app, tap on the menu button (three horizontal lines), and select "History". Next, tap the "Delete" icon at the bottom-left, then choose "Everything" from the menu to erase the entire browsing history.
Solution 2: Clear App Cache
Accumulating cached data from various apps on your iPhone can significantly contribute to the growth of System Data, potentially leading to issues like crashes and freezes. Despite this, Apple does not provide a straightforward method for deleting cached data. In some cases, uninstalling and then reinstalling an app becomes necessary. Fortunately, many apps offer an option to clear their cache directly from within the app's settings.
Here are two approaches to manage cached data so as to minimize system data on iPhone:
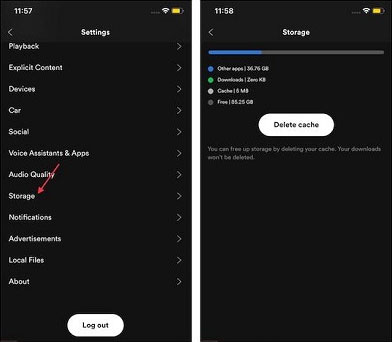
Deleting Cache Data via App Settings:
- Launch the target app.
- Navigate to the app's Settings.
- Look for an option to clear the cache and select it.
Deleting and Reinstalling an App:
- Go to Settings > General > iPhone Storage.
- Scroll through the list of apps, arranged in descending order based on storage consumption.
- Choose an app to delete and tap on Delete App. (How to delete apps permanently from iPhone?)
- Head to the App Store to reinstall the app.
Solution 3: Delete Message Attachments and Reduce Message History
Clearing unnecessary message attachments and managing message history can help free up valuable storage space on your iPhone or iPad. Apple's Message app simplifies this process, making it easy to identify and remove attachments. Here's a guide on how to free system data on iPhone by deleting message attachments:
Deleting Message Attachments:
- Navigate to Settings -> General -> iPhone/iPad Storage.
- Tap on Messages. Within the Documents section, you'll find various categories such as Top Conversations, Photos, and Videos. Enter the relevant category and proceed to delete unnecessary attachments.
In addition to clearing message attachments, you can also choose to reduce the history of text messages to optimize your device's storage. Here's how:
Reducing Message History:
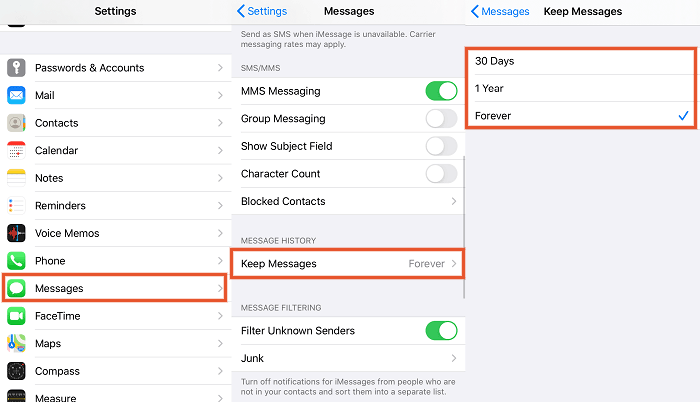
- Go to "Settings" > "Messages" and select the Keep Messages option.
- Choose a duration, opting for either 30 days or 1 year instead of Forever. You will then receive a prompt to delete older messages. If you are comfortable with this, proceed to make the changes. This approach allows you to delete messages regularly, managing your message history effectively.
Solution 4: Update to the Latest Software
In older iOS versions, there was an occasional issue where the system struggled to release storage on iPhones, leading to persistent storage constraints. If you find your iPhone storage nearing capacity, resolving this issue could be as simple as updating your device to the latest software version.
Follow these steps to update your iOS software to remove system data iPhone:
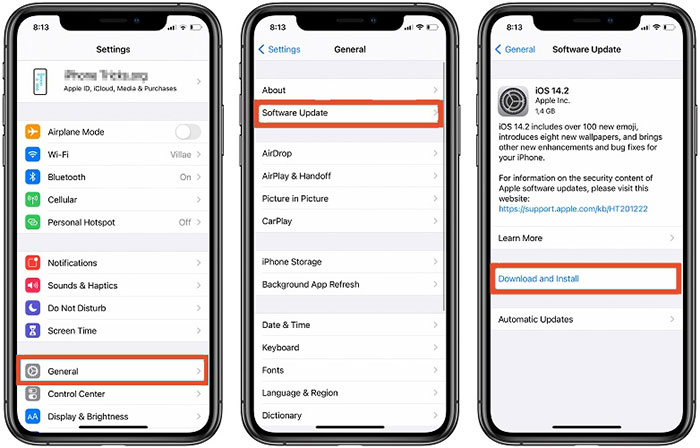
- Launch the "Settings" app on your iPhone.
- Navigate to "General."
- Tap on "Software Update."
- Download and install the most recent iOS version available.
After completing the update, check the status of System Data storage in your iPhone storage settings to ensure that the issue has been addressed.
More Useful Articles:
- How to Remove Documents and Data from iPhone to Free Up Space?
- How to Clear Junk Files on iPhone 15/14/13/12/11/X/8/7 Quickly
Solution 5: Reset iPhone as a Last Resort
If the solutions mentioned above prove ineffective or if the recovered space is still insufficient, resorting to a complete reset of your iPhone becomes the ultimate solution to address the System Data problem. Although factory resetting may seem drastic, it is a highly effective method. There are three options available to perform a full reset, either through iCloud or iTunes on a computer.
Option 1: Backup and Restore via iCloud
Performing an iCloud reset is a straightforward method to wipe and restore your iPhone, provided you have adequate space in your iCloud account. Before initiating the erase, ensure that you back up all your iPhone contents to iCloud.
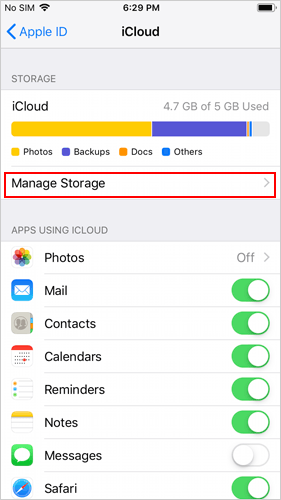
- Open Settings, then tap on your name.
- Navigate to iCloud.
- Enable the toggle for each app (toggles should be green when enabled).
- Press iCloud Backup > Backup now. The duration of this process depends on the size of your backup.
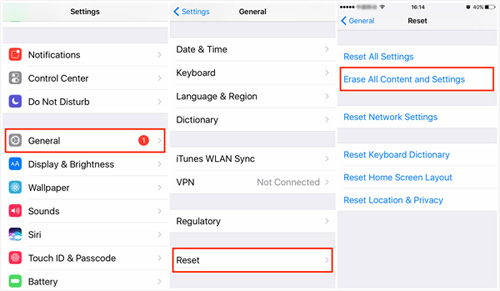
- Once the backup is complete, go to General in Settings.
- Scroll down and tap Transfer or Reset iPhone > Erase All Content and Settings > Continue.
- Input your passcode when prompted, then tap Erase iPhone.
- After the iPhone erases and restarts, follow the on-screen instructions until you reach the Apps & Data screen.
- Log in to your Apple ID and select the most appropriate backup based on size and date. The restoration process will then commence.
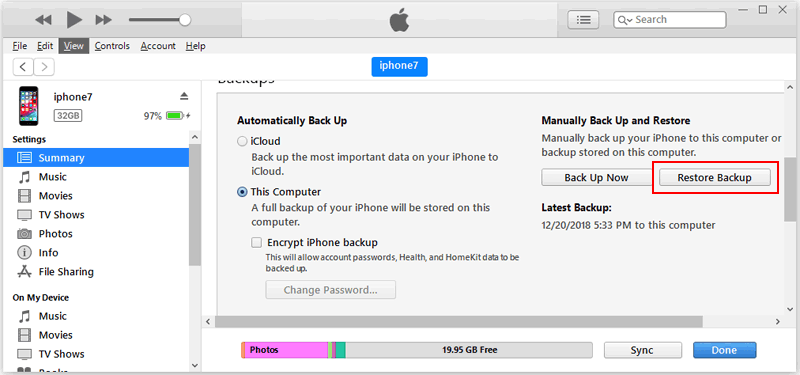
Option 2: Backup and Restore via iTunes
Alternatively, you can reset your iPhone through a computer using iTunes. Ensure that you have the latest version of iTunes on your Mac or PC. If your Mac has macOS Catalina or later, use Finder instead of iTunes. While resetting and restoring via iTunes is a more time-consuming process, it effectively minimizes System Data.
- Connect the iPhone to your computer and launch iTunes.
- If prompted to 'Trust this Computer' on your iPhone, select Trust.
- A small phone icon will appear on the upper-left side of your iTunes window. Click the icon.
- Under 'Automatically Back Up,' select This Computer.
- Opt for the Encrypt local backup option and set a password to include passwords and health data in the backup.
- Click Back up now.
- After the backup is complete, click Restore iPhone and follow on-screen instructions.
- Once the iPhone is restored, click "Restore Backup" in the iTunes app.
- Choose an appropriate backup based on date and size, then click Restore.
- Keep the iPhone connected to your computer during the restoration process.
- After completion, check iPhone Storage in the Settings app to evaluate the effectiveness of the process.
Option 3: Backup and Restore via Assistant for iOS
If the above steps seem overwhelming, you can consider using MobiKin Assistant for iOS, a user-friendly tool for one-click iOS backup and restore. The following steps provide a clear guide:
Step 1: Launch Assistant for iOS and go to "Super Toolkit." Connect your iPhone to your PC, and you will see an interface like the one below:
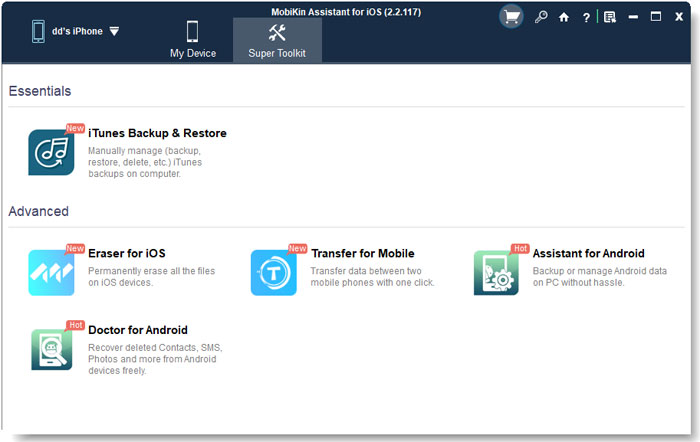
Step 2. Choose "iTunes Backup & Restore" > "Backup," decide where you wish to store the backup files, and click "Backup" to initiate the process. All data on your iPhone will be backed up to your computer.
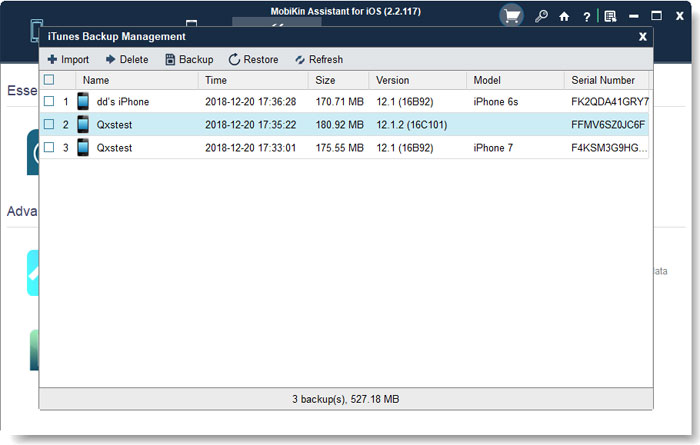
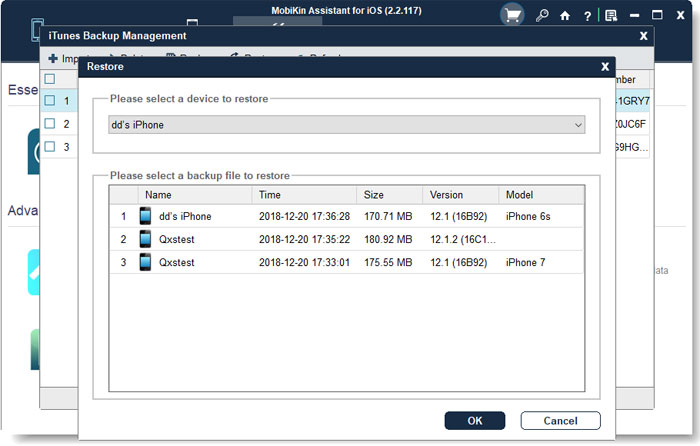
Step 3: Perform the factory reset on your iPhone. After resetting, open the software, click "Super Toolkit">"iTunes Backup & Restore" > "Restore" button, and choose a backup record to restore to your device.
Part 3. FAQs of Clearing iPhone System Data
Q1. Why does "System" take up so much storage on the iPhone?
The "System" category accumulates miscellaneous data that doesn't neatly fit into other specific categories like Photos or Apps. This diverse data, originating from various sources, can increase rapidly, outpacing the growth of other storage segments. Quick remedies such as restarting the device or installing updates can help alleviate this storage burden.
Q2. Is it safe to clear cached data on an iPhone?
Clearing cached data is a safe practice. It allows the removal of unnecessary system files that tend to clutter the device, occupying valuable space and potentially slowing down its performance.
Q3. What does the "Other" category encompass in iPhone data usage?
The "Other" category includes non-removable mobile assets like Siri voices, fonts, dictionaries, as well as non-removable logs and caches. Additionally, it encompasses essential system data such as Keychain, CloudKit Database, and cached files that cannot be deleted through standard system processes.
Conclusion
You have now been acquainted with five methods for clearing System Data on your iPhone. This article serves as your compass, eliminating the need for arduous searches or the hassle of erasing these files. However, it is advisable not to wait until your iPhone is on the brink of running out of space before addressing System Data. Instead, adopt a proactive approach by routinely reviewing and eliminating this content to forestall the accumulation that could potentially lead to storage complications.
Related Articles:
Does Factory Reset Delete Everything on iPhone? What Will Happen?
How to Back Up iPhone without Passcode? Way 1 is Recommended!
[Guide] How to Reset iPhone 15/14/13/12/11/X/8 without iTunes
How to Wipe Reminders on iPhone Permanently?


