Reset All Settings vs. Erase All Content and Settings [Comprehensive Comparison]
"When giving a used iPad to someone else, what is the difference between reset all settings and erase all settings? Which is the best way to go when purchasing a used iPad?" -- from Apple Support Community
Go into the Settings app on your iPhone or iPad, and you'll find two built-in reset options: Reset All Settings and Erase All Content and Settings. Let's say you're clearing the data on your iPhone/iPad to sell or trade it in, you'll definitely want your privacy on your phone to be well protected. So, which option will do the job well?
Okay, Reset All Settings vs Erase All Content and Settings is the topic we're going to discuss today. They work differently when it comes to resetting your device. Now we'll analyze them in more depth.
- Part 1: Difference between Reset All Settings and Erase All Content and Settings
- Part 2: Reset All Settings vs. Erase All Content and Settings: Which One You Should Choose
- Part 3: Cons of Reset All Settings and Erase All Content
- Part 4: Completely Wipe iPhone/iPad/iPod touch with Eraser for iOS (Unrecoverable)
- Bonus: Back up Your iPhone Data Before Resetting or Erasing
Part 1: Difference between Reset All Settings and Erase All Content and Settings
The difference between reset and erase all content and settings is explained below:
Reset All Settings:
- Restore iDevice Settings to factory settings, including Wi-Fi password, ringtones, notifications, brightness, font, wallpaper, etc.
- It won't erase any content on your iOS device.
- It doesn't affect the state of a jailbroken phone.
- It can do all that "Reset Network Settings" does.
Erase All Content and Settings:
- Wipe out everything on the iDevice.
- Restore your iOS device to factory settings.
- A jailbreak might get broken at most and erased at best.
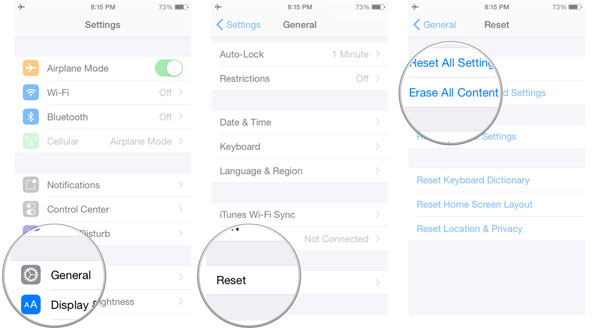
Part 2: Reset All Settings vs. Erase All Content and Settings: Which One You Should Choose
The main difference between the two reset options discussed earlier is that one only resets settings, while the other resets settings and deletes user data and media. This subtle but important distinction means that the appropriate reset option will depend on your specific needs. See below for more details.
When to Choose Reset All Settings:
- Your iPhone is sluggish.
- Your device gets stuck on the backup screen.
- There are some iOS issues caused by system glitches.
- You want to make some changes on your device when encountering phone-to-phone transfer stuck.
When to Choose Erase All Content and Settings:
- When you intend to resell, give away, or even trade in your iDevice.
- Restore iPhone from the previous backup.
- Free up space on iPhone/iPad, as it is running out of storage.
- Just want to get rid of all personal data.
Do not select "Erase All Content and Settings" unless you're to wipe out data on your iPhone. And please back up your iPhone/iPad before getting any further.
Part 3: Cons of Reset All Settings and Erase All Content
After going through iPhone's "Reset All Settings vs. Erase All Content and Settings", we'll get a basic understanding of the features. It's important to weigh the potential benefits brought by both and against the possible risks. OK, although the two options can get your phone to its best state, they also possess some defects.
Disadvantages of Reset All Settings & Reset All Settings and Erase All Content:
- All the deleted settings and content are recoverable.
- You may get more prompts when installing some apps.
- You might lose some content forever, for even recovery software can't find things that have been deleted.
- Some of the phone's previously saved info, like passwords, need to be re-entered.
Part 4: Completely Wipe iPhone/iPad/iPod touch with Eraser for iOS (Unrecoverable)
Neither Reset All Settings nor Erase All Content guarantees that erased content or settings in the device are totally secure. In other words, some common recovery programs can easily access and recover the items so that your personal data can be made public. That's terrible. Fortunately, you get to know MobiKin Eraser for iOS, a professional iPhone data erasing tool that allows you to choose different erasure levels so that you can easily delete everything on your iDevice without leaving any traces.
MobiKin Eraser for iOS - erasing all iOS data completely:
- With just one click, you can erase an iPhone permanently, leaving no opportunity to restore it.
- Three different erasing levels: Low Level, Medium Level, and High Level.
- Clear private data and settings to better protect your privacy.
- Work well with a whole range of iOS devices, including iPhone 15/14/13/12/11/X/8/7/6, iPod touch, iPad, etc.
- It won't let out your privacy.
How to wipe out an iPhone via MobiKin Eraser for iOS?
Step 1. Launch Eraser for iOS on a computer
Get the program on a computer before installing and launching it. Then connect your iPhone to the computer via a Lightning USB cable. And the software will soon detect your device.
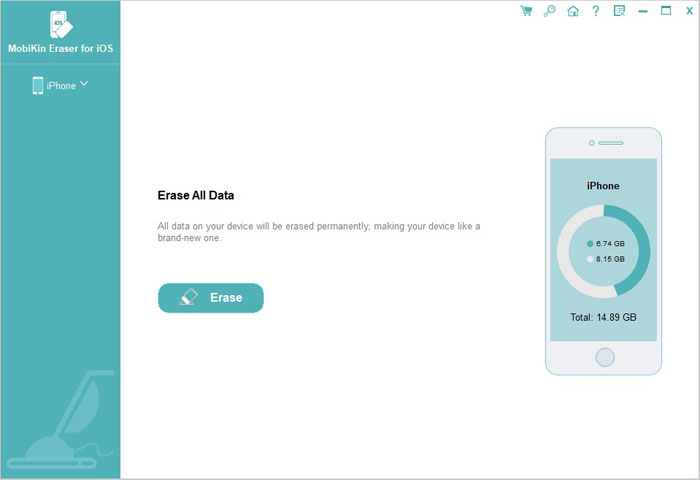
Step 2. Choose "Select Security Level"
After the recognition, choose the "Erase" button on the screen. Next, check the on-screen prompt and enter the "Select Security Level" window.
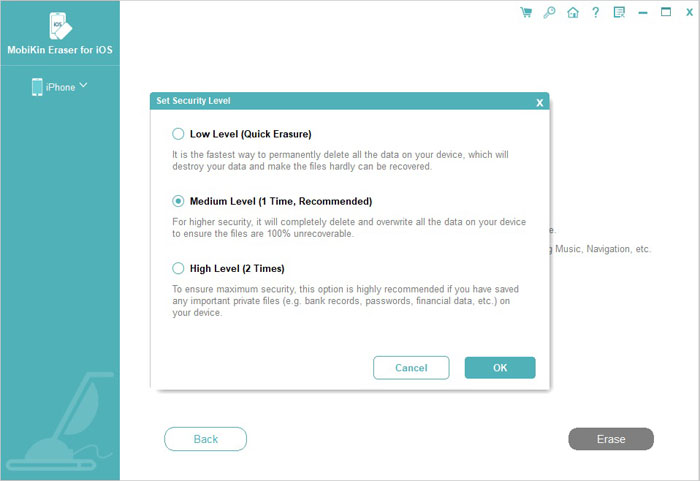
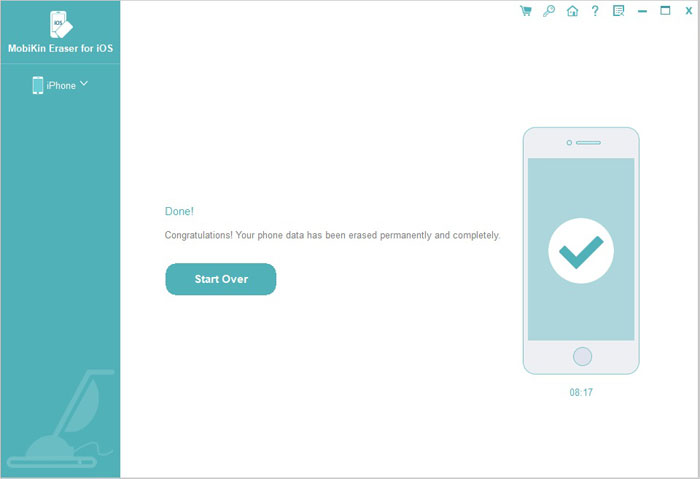
Step 3. Erase all iOS content and settings permanently
Select the security level as "Medium Level". You'll then be required to input "Delete" in the box and tap "Erase" again to wipe your iPhone off with one click.
Bonus: Backup Your iPhone Data Before Resetting or Erasing
If you decide to erase all content and settings from your iPhone, be sure to back it up beforehand. You can simplify the backup process by using MobiKin Assistant for iOS, which is able to back up your whole iPhone, or selective iPhone data to computer with one click. This tool can completely back up various iOS file types from your old iPhone, including contacts, SMS, photos, videos, music, notes, apps, and more. It also allows you to restore the backup file to your new iPhone without data loss. Just follow the provided instructions to complete the process.
How to back up iPhone data before resetting or erasing via Assistant for iOS?
Step 1. Connect your iPhone to your computer using a USB cable and launch the installed program on your computer. Follow the instructions on the tool's initial interface to identify the connected iPhone.

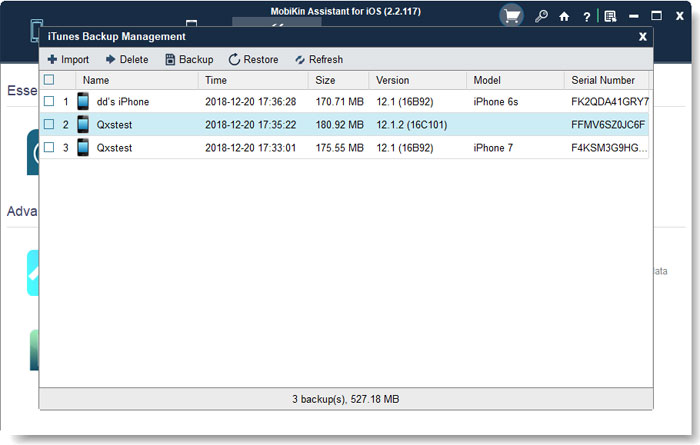
Step 2. From the top menu, click "Super Toolkit" and select "iTunes Backup & Restore". In the "iTunes Backup Management" window, your device name will be listed. Select your device and click "Backup" at the top.
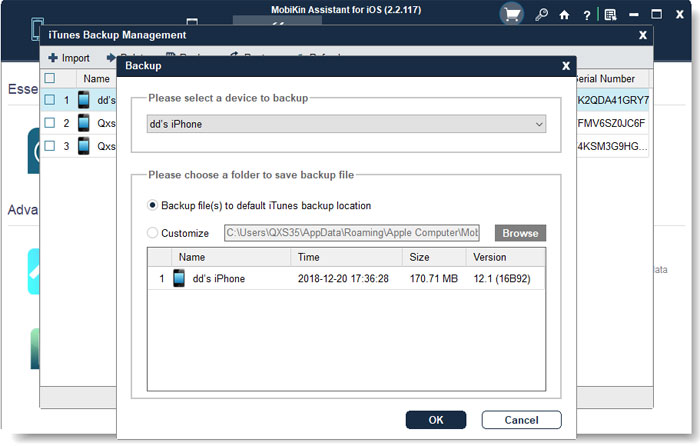
Step 3. Select "Back up files to default iTunes backup location" and select the iPhone you want to back up. Finally, click "OK" to save your data to the iTunes backup destination.
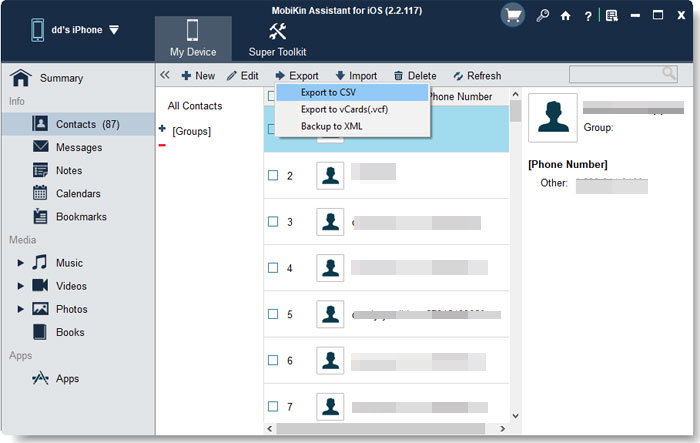
Back up iPhone data selectively: MobiKin Assistant for iOS also lets you preview and selectively back up specific data. To do this, navigate to the left sidebar and choose the data types you need. Preview the scanned data on the right, select the items you want to back up, and then save them to your computer by clicking the "Export" button in the top menu.
Ending Words
The background knowledge about the two terms we just talked about aims to help you make a reasonable choice when making some changes to the settings or content on your iPhone/iPad. But if you intend to pass it to its next owner, erasing your iOS device with MobiKin Eraser for iOS, apparently, is the best way to go. Any questions on use? Please contact us by leaving a message in the comments.
Related Articles:
4 Solutions to Erase All Content and Settings from iPhone
[Up to Date] How to Wipe Android Phone Completely before Selling?
[Full Guide] How to Erase iPhone without Password Permanently?


