Three Secure Ways to Format iPhone Completely
Formatting iPhone is to reset your device into the original factory settings. This operation will erase all the contents and settings that you have saved on iPhone. So it is an essential operation before selling your phone. Besides, iPhone formatting is also an effective method to solve some iPhone issues that are difficult to handle. But the problem is: How to format iPhone completely and securely?
Just look here! 3 secure ways to fully format iPhone will be introduced here. You must be able to get the one you want here.
Part 1. Preparation for Formatting iPhone
As we have mentioned above, the formatting process will wipe all the contents and settings on your iPhone. So, it is indispensable for you do some preparations before beginning the process. Actually, the only thing you need to prepare is to make a backup. If you do not sync and save the wanted files from iPhone to other device, it will be very untoward to get them back after formatting the device.
To transfer and store the data from iPhone effortlessly, we would like to advise you to use a professional software- MobiKin Assistant for iOS (Win & Mac). This tool can help you to complete the transferring within several simple clicks.
Step 1. Establish a connection between iPhone and PC
Connect your iPhone to PC with a USB cable and run the installed program.
Step 2. Make your device be recognized
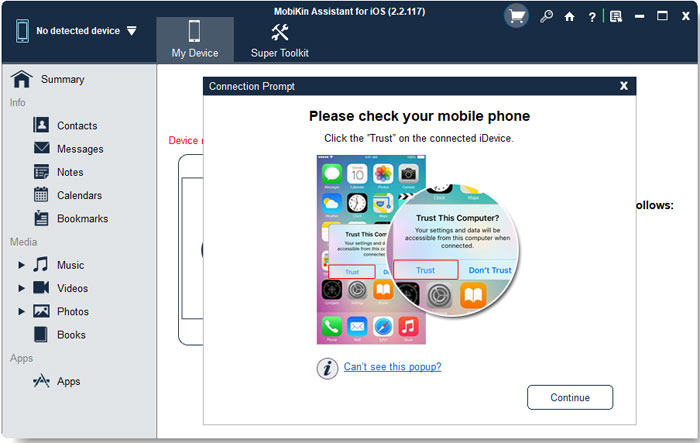
The tool will explore the connected iPhone automatically after the connection. Then you will be asked to trust the computer on your iPhone. Just click on "Trust" and tap on "Continue" on computer to go on.

Step 3. Move the wanted files to computer
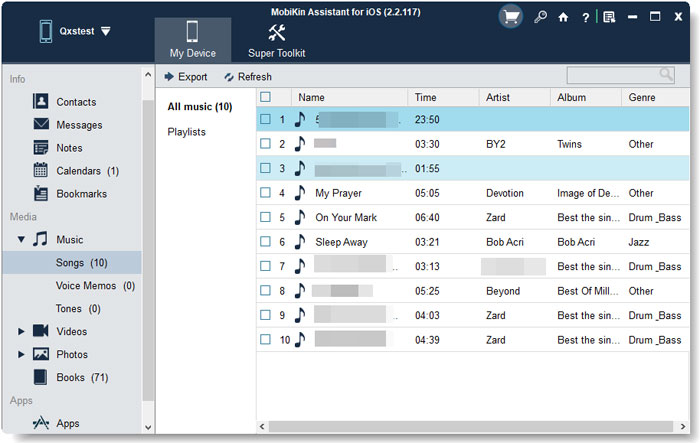
After detecting your iPhone, the software will display the file folders of your iPhone on the interface. Just select the categories you wanted in the left panel and tick the data you wish to sync. Finally hit "Export" to accomplish the process.

Now you can begin to format the device with the rear secure!
Part 2. The Recommended Way to Format iPhone Completely
The most recommended means to erase the data on your iPhone is to turn to iOS Data Eraser. With this software, you can format your iPhone with one simple click. In addition, you also can use it to delete specific files. What's more, it is compatible almost all generations of iDevices, including iPhone X/8 Plus/8/7/6, iPad mini, iPad Air, iPod Touch, iPod Mini and so on.
The followings are the detailed operation of formatting iPhone completely. You can go with the steps to erase your phone.
Step 1. Download and install the tool
At first, download and install the suggested program on your computer. Then use a USB cable to link your iPhone to PC.
Step 2. Select to erase all data on iPhone
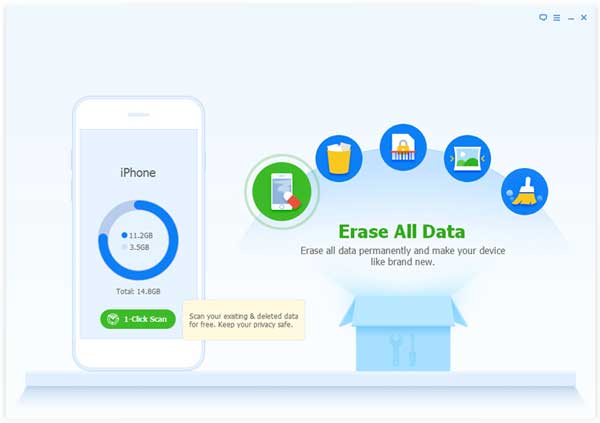
Launch the tool and wait for your iPhone to be detected. Next, elect your device and choose the deletion option you need- Erase All Data.

Step 3. Wipe all the files on your device
Finally click the "Erase Now" button and wait for a while till the process is finished.
Part 3. Erase All Contents and Settings on iPhone Directly
If you do not like to install and use any third-party software, you can select to complete the formatting process on your device directly. This solution is very straightforward:
Tap on the icon of "Settings" on the iPhone screen to enter the setting section. Click on General and select "Reset" under this folder. Then you will see several options on the interface. Just choose "Erase All Content and Settings" to wipe all the data on your iPhone.

Part 4. Reset iPhone via iTunes
The last method that introduced here is to make use of iTunes. It would not be as simple as the previous two means, but it also works.
Step 1. Disable Find My iPhone feature
Go to Settings> iCloud to turn the feature "Find My iPhone" off.
Step 2. Build a connection between iPhone and iTunes
Use USB cable to link your iPhone to the computer and then launch iTunes to connect iPhone to iTunes.
Step 3. Backup the data
Click the icon of iPhone in iTunes and tap on "Summary" tab. Next click on "Backup Now" to save your iPhone data.
Step 4. Remove content and settings on your iPhone
After finishing the backup, click "Restore iPhone..." and hit "Restore" in the pop up window to wipe all the content and settings on your iPhone.

Related Articles:
iPhone 12/12 Pro (Max)/12 mini Screen Is Black But Phone Is On? Reasons & Fixes Here
Fix "Android Touch Screen Not Working - Can't Unlock" Issues in 12 Methods
7 Useful Ways to Fix iPhone Stuck on Restore Screen
Apps Didn't Transfer to New iPhone 14/13/12/11/X/8/7? Try the 7 Solutions Here


