How to Remove Contacts from Nexus 10/9/7/6P/6/5X?
There are many different reasons for deleting contact information from a Nexus phone. After all, it's not uncommon for people to change their mobile phones from time to time. From buying a new Google Nexus phone to take advantage of new hardware updates and software to trading phones with a friend or a family member, there are many different reasons to transfer a Nexus phone to another user. When this is the situation, there are a few things that will need to be done prior to handing the phone over. One of the most important is deleting personal information like all of the user's contact information before changing hands. When a user has a need to delete contact information, they may find that there are several ways to delete this information. But which way is the easiest?
You do not need to delete contacts from your Google Nexus phone, such as Nexus 7, Nexus 6, Nexus 6P, Nexus 5, Nexus 5X, manually one by one, as long as you have the MobiKin Assistant for Android, which is one stop solution to delete Nexus phone's contacts in 2 simple steps. It can fully help you delete your Nexus and other Android contacts, as well as SMS, music, photos, videos, apps, etc. on computer with one click; install, uninstall, import or backup Apps in batch; backup your music, photos, videos, contacts, SMS, apps etc. to computer and restore them easily, reply SMS with computer, and it fully compatible with 3000+ Android devices from Google Nexus, Samsung, LG, HTC, Motorola, Sony, Huawei, etc.
You may also want to know:
Print out Text Messages from Samsung Galaxy
Transfer Text Messages from HTC to Computer
The program also comes with Mac version - Assistant for Android (Mac), which has the same feature with the Windows version. Just read the following article to learn how to use the software to remove contacts from Google Nexus 7/6/6P/5/5X.
Guide to Delete Nexus Contacts with Assistant for Android
Step 1. Plug Nexus phone into the computer
The user should install and launch Assistant for Android software on your computer. Once this application has been installed on a desktop or laptop computer, the Nexus phone can be connected via a USB cable or WiFi to the computer.

Tips: if you haven't enabled the USB debugging on your phone, the Android data managing tool will be failed to detect your phone. Therefore, you have to follow the instructions below to open USB debugging on your phone.
For Android 2.3 or older, Go: "Settings" < Click "Applications" < Click "Development" < Check "USB debugging".
For Android 3.0 to 4.1: Enter "Settings" < Click "Developer options" < Check "USB debugging".
For Android 4.2 or newer: Enter "Settings" < Click "About Phone" < Tap "Build number" for several times until getting a note "You are under developer mode" < Back to "Settings" < Click "Developer options" < Check "USB debugging"
Step 2. Remove contacts from Google Nexus
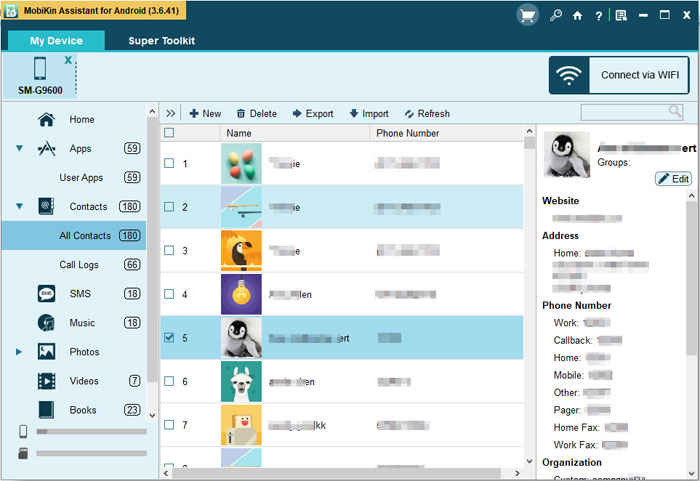
After the Control panel on the Nexus phone appears, choose the "Contact" tab on the left panel. The user will have a "delete' option that allows them to delete all contacts at one time.

From the top menu bar, you can realize that the Assistant for Android is also able to add contacts to Android, delete Android duplicate contacts and edit Android contacts on computer directly.
Related Articles:
How to Backup Android to Mac? (4 Free Ways)
How to Easily Delete Backup on Android
How to Permanently Erase SIM Card from Android Phone
3 Easy Ways to Recover Deleted Files from Android in 2023
Ultimate Guide on How to Transfer Contacts from Android to Android


