What to Do with Old iPhone after Transfer [7 Tips to Follow]
Every year, Apple releases new iPhones with new features and upgrades. Many people are excited to switch to the latest iPhone, and transferring all the data from the old iPhone to the new one is usually the first thing to do before getting a new iPhone. While most users handle the data transfer just fine, many are unsure of what to do with the old iPhone after the transfer.
Some people plan to sell their old iPhone, while others might give it to a friend or family member. But before you hand it over to your new iPhone, there's one very important thing to take care of – your personal data. That's why this guide will walk you through several useful tips on what to do with your old iPhone after you switch to a new one.
- Part 1: What to Do with Old iPhone after Transfer?
1: Back up Your Old iPhone
2: Log out of Your iCloud Account
3: Clean Old iPhone before Selling or Giving Away
4: Disconnect Old iPhone from Your Apple ID - Part 2: What Else to Do with Old iPhone after Transfer?
1: Use Your Old iPhone as a Security Camera
2: Use Your Old iPhone as a Backup Phone
3: Use Your Old iPhone as a Music Player
Part 1: What to Do with Old iPhone after Transfer?
1: Back up Your Old iPhone
Even if you've already moved everything from your old iPhone to your new one using Quick Start, it's still a good idea to make a backup. You never know when something unexpected might happen, like a system crash, virus, or an accidental reset, that could wipe out all your data in seconds.
To stay safe, backing up your old iPhone to iCloud is a smart move. But if your iCloud storage is full or you want more control, you can use a tool like MobiKin Assistant for iOS to back up your data directly to a computer.
MobiKin Assistant for iOS – Fast, Easy, and Safe iPhone Backup & Restore Tool
- Back up and restore your iPhone to your computer with just one click.
- Avoid data loss with a smooth, secure backup process.
- Supports 14 types of data: messages, contacts, photos, videos, music, notes, Safari bookmarks, voice memos, and more.
- Easily manage your iPhone, iPad, or iPod data right from your computer—add, delete, edit, and organize as you like.
- It is compatible with iPhone 16/15/14/13/12/11/X/8/7/6 and more.


The steps below show how to use Assistant for iOS to back up iPhone data.
Step 1. Download, install, and launch the MobiKin Assistant for iOS on your PC. Then, using a USB cable, connect your iPhone for the main interface to be shown.
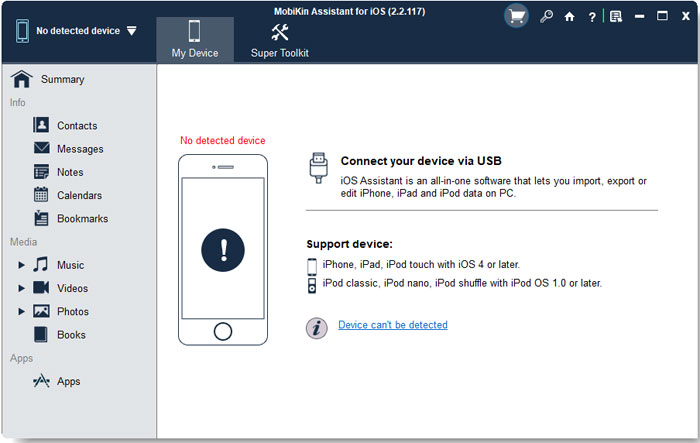
Step 2. On the left side, you will note a list of files. Click on the desired categories and check the boxes next to the files that you want to back up to your PC.

Step 3. On the top menu, find and click on "Export" to back up your files.

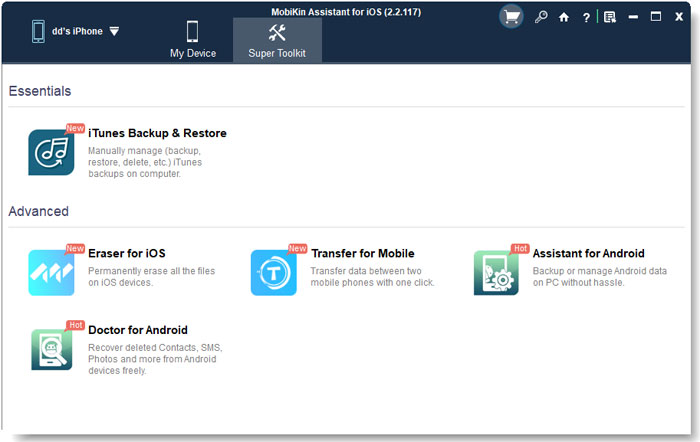
You can also go to "Super Toolkit" > "iTunes Backup & Restore" > "Backup" to back up iPhone data to computer with one click.
Video Guide:
Check If You Need:
2: Log out of Your iCloud Account
Apple's iCloud service is super handy for keeping your data in sync across all your devices. But there's a catch—any changes you make, like deleting something, will show up on all devices connected to the same iCloud account.
So, if you're planning to erase your old iPhone, here's something important to know: using "Erase All Content and Settings" will wipe the phone clean, but it won't delete anything from your other devices. Still, to be safe, it's a good idea to sign out of iCloud on that phone before resetting it. Here's how to do that:
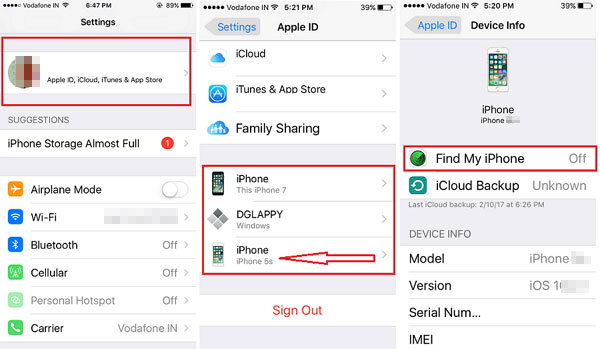
- Open "Settings".
- Tap your "Apple ID" at the top.
- Scroll down and tap "Sign Out".
- Enter your Apple ID password to turn off "Find My iPhone" (if it's on).
- Tap "Sign Out" again to confirm.
Note: Signing out of iCloud will remove iCloud-stored data (like contacts, notes, and photos) from "that device", but don't worry, it's still safely stored in iCloud and can be accessed again from other devices or when you sign back in. Just make sure you've backed everything up first.
3: Clean Old iPhone before Selling or Giving Away
Once you've moved everything to your new iPhone and signed out of iCloud on your old one, it's time to wipe it clean. Don't worry. Erasing your old iPhone won't affect your new device at all.
To make sure your personal data is completely gone and can't be recovered, a full and secure erase is important. This is where MobiKin Eraser for iOS comes in. It's a top choice for safely wiping an iPhone before selling, donating, or recycling it.
Why Choose MobiKin Eraser for iOS?
- Quick and Easy – Just one click to erase all your data and settings.
- Deep and Thorough – It goes beyond a basic reset by scanning deeply and erasing multiple times.
- Safe and Reliable – Works with the newest iPhones, including iPhone 16 and iOS 18.
- Trusted Name – Built by MobiKin, a well-known expert in iPhone data security.
If you're ready to pass on your old iPhone, don't forget this final step. Download MobiKin Eraser for iOS and clear your device the smart and secure way.
Important: Make sure you've backed up everything or transferred all your data to the new iPhone before erasing the old one.
Step 1. First of all, launch the installed Eraser for iOS program on your computer and connect your iPhone to the computer via a USB cable. Next, tap on "Erase" button that appears in the program interface.
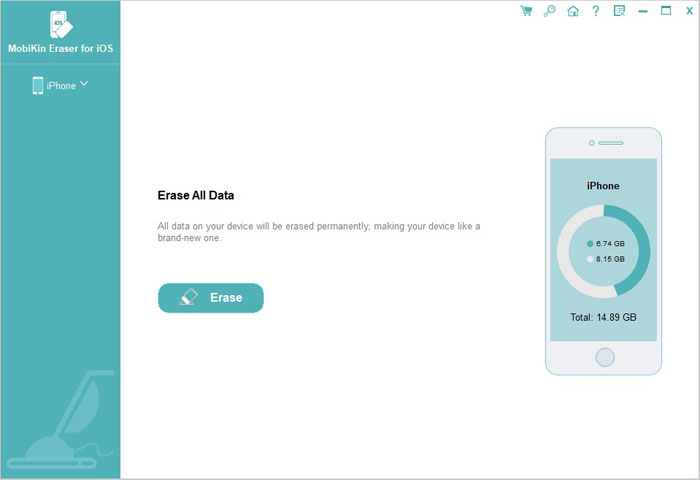
Step 2. The program provides you with three different security levels: Low & Medium & High. Just select an erasing level according to your own situation and then tap on "OK" to confirm your choice.

Step 3. Type in "delete" in the blank box to confirm your commands and then hit on "Erase" button to start erasing your iPhone data. Keep your iPhone connected well until the erasing process is fully complete.
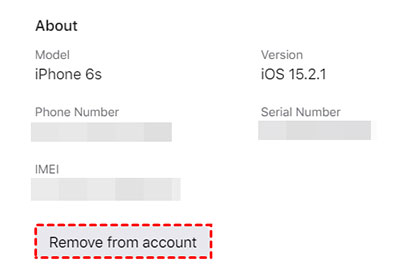
4: Disconnect Old iPhone from Your Apple ID
When you're done using your old iPhone and want to give it away or sell it, it's important to unlink it from your Apple ID. This helps keep your account secure and ensures the new owner won't be tied to your personal data.
Here's how to do it:
- Go to appleid.apple.com and sign in. Then, head to "Account Security".
- Look for your list of "trusted devices".
- Find your old iPhone in the list, click "Remove from account", and confirm.
Once that's done, your old device is no longer connected to your Apple ID. You're now free to sell or give it away without worrying about your data or account being affected. It also takes care of the question, "How do I erase my old iPhone after transferring everything?"
Click to See:
Part 2: What Else to Do with Old iPhone after Transfer?
If you're planning to sell or give away your old iPhone, the steps mentioned earlier are definitely worth following. But what if you're not ready to part with it yet? Instead of letting it sit in a drawer collecting dust, why not give your old iPhone a new purpose?
Here are a few smart and fun ways to reuse your old iPhone:
1: Use Your Old iPhone as a Security Camera
You can easily repurpose your old iPhone into a home security camera. With the help of a simple third-party app, you can keep an eye on your home while you're away. Whether you want to check on your baby, keep track of your pets, or just monitor the front door, your iPhone can be a handy little surveillance tool.
2: Use Your Old iPhone as a Backup Phone
Phones can get lost, stolen, or damaged unexpectedly. Having a spare phone ready can save you from the stress of being suddenly disconnected. Your old iPhone can serve as a backup that's ready to go when you need it—just charge it up and you're good to go.
3: Use Your Old iPhone as a Music Player
Why not turn your old iPhone into a music player for your home? Load it up with your favorite playlists for offline listening, or connect it to Wi-Fi or a hotspot to stream music. You can leave it in the kitchen, bedroom, or anywhere else to enjoy music without interrupting your main phone.
Final Thoughts
What should you do with your old iPhone after transferring your data? We've already gone over some of the smartest options, and we hope you found them useful. Whether you're planning to give your old iPhone to someone else or hang on to it for yourself, the steps we shared are definitely worth following.
Related Articles:
4 Ways to Transfer iPhone to iPhone without Quick Start
How to Create a New Apple ID and Transfer Everything
