Android Backup: How to Backup Android Photos to Cloud?
Photos loss is not a rare issue in our lives. Therefore, to avoid this kind of problems, users of Android phones are suggested to backup the important files on their mobile phones to a Cloud storage. However, some users may not be familiar with cloud and do not know how to deal with the backup process. Thus, this tutorial is written to help you complete the backup process more easily.
1. Backup Android Photos with Google Drive
Google Drive is compatible with many Android models. By using this way, you can upload the photos on your Android phone to the Google Drive. And here, you are suggested to download the photos from the Cloud to your computer after completing the uploading process to ensure the safety of the data. Now just download and install the Google Drive on your phone at first and then go with the steps below to backup your wanted photos.
Step 1. Move Photos from Android to Google Drive
Launch the program and then sign into the Google Drive on your device. Next, tap on the "+" icon and select "Upload" option from the menu. Then a popup with different categories will appear. Just select the "Images" or "Gallery" folder to open your files. After that, you need to tick the photos you want and hit on "Done" button to sync or save the photos to Google Drive.

Step 2. Download and Save the Synced Photos to Computer
Run the Google Drive on your computer and type in the username and passcode to enter it. Then click on the icon with three dots to open the menu. Next, select "Download" option to download the pictures to your PC.
Also read:
Backup Calendars from Android to PC
2. Upload Photos on Android to OneDrive
OneDrive is a file-hosting service which allows users to store files as well as personal data to Cloud. Therefore, you can elect it to be your Cloud storage as well. But you should notice that the free storage space of OneDrive is only 5GB. Thus, you need to buy further available space to save your files if you possess too many files.
Notice: You are also advised to download and save the photos from OneDrive to computer in case of data loss.
Step 1. Sign in OneDrive Account
Download and install the software- OneDrive on your computer. Then open up the cloud and sign into it with a Microsoft account.
Step 2. Move Photos from Android to OneDrive
Tap on the "+" icon at the corner and select "Upload" from the menu. Then, you need to select and tick the wanted files from Images/Gallery folder. Finally, click on "Open" at the upper right corner to begin the photos uploading.
Step 3. Download the Synced Photos to PC
Sign in your OneDrive account and then tap on plus icon and choose "Upload" option. Next, elect "Photos" and then go to "Download" to right click the items you want. Finally hit on "Download" to save the images to your computer.

3. Use Samsung Cloud to Backup Android Photos
If you are s Samsung users, you have one more option- Samsung Cloud. Compared with OneDrive, its free storage space is bigger- 15GB available. And if you want to store more files, you need to purchase the space as well. The followings are the details about how to backup Android photos to Samsung Cloud and you can take a look.
Step 1. Sign in Samsung Cloud
Tap the icon of "Settings" on Home screen and find out "Cloud and accounts". Just select the "Samsung Cloud" from the menu and sign in your Samsung account.
Step 2. Backup Android Photos
In Samsung Cloud screen, you can tap the toggle of the Gallery to sync certain data selectively. Except that, you also are able to go to "Backup my data" screen and turn on "Auto back up" option. Once you enable this feature, your device will do a backup regularly.

4. Alternative Way to Move and Save Photos from Android
Some users might be tired of using Cloud to do an Android backup and wish to find and get a new way to save their photos. In this case, MobiKin Assistant for Android could be a good helper. This software has two versions- Windows and Mac version. With it, you can transfer and save your data from Android to computer within several simple clicks. If you don't believe it, you can download the trial version of this software and go with the following steps to have a try.
Step 1. Make Your Android be Detected
Connect your Android to computer via USB cable and launch the installed the tool. Here, remember to enable the USB debugging on the device and install the driver or the program would not be possible to explore your phone. After the connection, the tool will detect your phone automatically.

Step 2. Select Super Toolkit
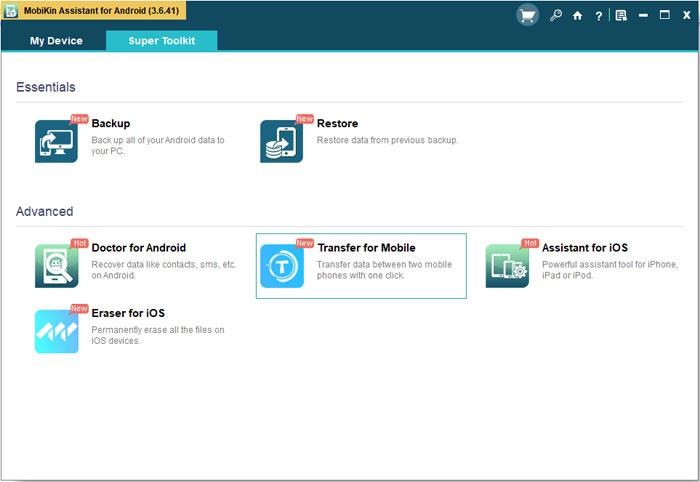
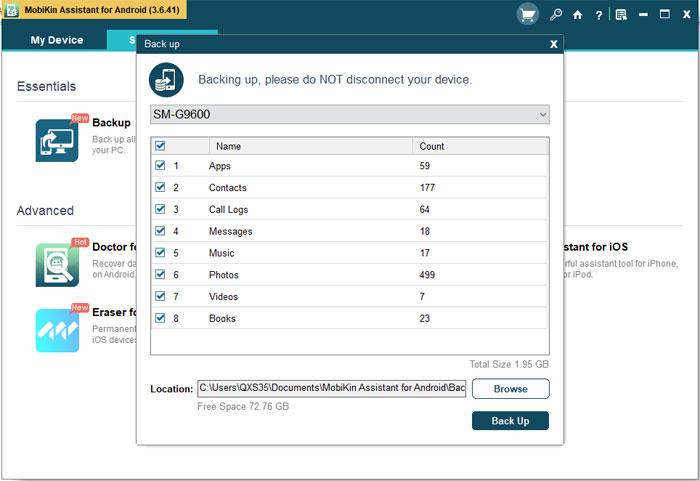
On the main interface, just click the "Super Toolkit" option at the top menu. After that, you will see a "Backup" option on the screen. Just tap on it and all the contents on your mobile phone that can be backed up will be listed here.

Step 3. One Click to Backup Your Android Photos
Several categories will be displayed on the screen here. Just elect "Photos" folder and choose the path where you want to save your photos. Finally, hit "Back Up" button from the bottom right to start the transferring process.

Conclusion
As can be seen from the above, backing up photos on your Android phone to a computer is much more reliable than backing up to the cloud. Install MobiKin Assistant for Android to your computer now, and then back up more Android data.
Related Articles:
How to Backup Data from A Broken Android?
Backup & Transfer Photos to A SD Card
Best 10 Android Desktop Managers to Manage Your Android Devices on PC/Mac in 2023
Top 6 File Manager for Android to Keep Your Device Organized (2023)
Top 5 Android PC Suites - Help You Manage Your Android Phone with Ease
The Best Android SMS Manager Helps You Manage Android Messages Easily


