How to Backup & Restore iPad from iCloud Backups?
Since the storage space on iDevice is limited and the high risk of data losing in the daily life, Apple released iCloud service to help iOS users to backup and manage their iOS data easily. And in recent years, Apple has added more and more layers onto the iCloud service, and you can use it without USB cable while you're under a nice WiFi network, so an increasing number of iDevice users are tending to store their iDevice data with iCloud for backup. Therefore, when you need to set up a new iPad, iPhone or iPod, or just lost something important on the old iPad, you can choose to restore iPad from iCloud backups easily.

However, not all of you know well about how to restore data from iCloud backups, especially when you only need to retrieve specific files. Therefore, we write this article to show you how to backup and restore iPad data from any kinds of iCloud backups.
1. What can or can't be backed up with iCloud?
2. How to restore iPad from iCloud backup without data losing?
What Can or Can't Be Backed up with iCloud?
Now, let's have a brief look on what does iCloud back up here:
1) Purchased history for music, movies, TV shows, apps, books;
2) Photos and videos in your Camera Roll;
3) iOS settings and App data;
4) Home screen icon layout and folders;
5) App organization;
6) Messages, including SMS, MMS, iMessage;
7) Ringtones;
8) Visual Voicemail.
What Can't be Backed up by iCloud at present?
Just like the says going "Every coin has two sides", so since we have listed 8 different types of files in the above contents which can be backed up with iCloud, you may have found that another files can't be backed up by icloud, right? These data includes contacts, bookmarks, notes, reminders, calendars, music, or media files that are not purchased from iTunes, photos synced from computer, podcast and audiobooks.
Note: Obviously, these data also contains lots of privacy info and very important for your daily using, so if you don't want to lose them by accident, we strongly recommend you to use iCloud alternatives to back up all your iPad data to your local disk with 1 simple click.
Can't Miss:
How to Backup Contacts from iPhone/iPad to Computer
How to Transfer Notes from iPad/iPhone to PC
Referring to backup & restore iPad with iCloud, lots people think it is difficult or complicated to do it, but actually, you can do it as easy as 1-2-3. In this article, we don't want to spend too much words to explain how to backup iPad with iCloud, if you wish to know the detailed steps of how to back up iPad with iCloud, you can click the link to learn more details. Let's learn how to restore iPad from iCloud backups easily.
How to Restore iPad from iCloud on Windows/Mac?
Even though you can directly restore the whole iCloud backps on iPad by setting on your device, but you must be noted that this will replaced all data that exisiting on your device. So if you don't want to erase any data on your iPad, or you only wish to restore specific iPad data from iCloud backups, then you need to ask help for a professional iCloud data recovery software. With it, you'll be able to scan files from iCloud backups directly, and then restore selected data from it as you like. What's more, this kinds of iCloud data recovery program always allows users to recover data from the iDevice or iTunes backups also, so the possibility of regaining your lost data have been greatly improved. Now, just download this tool on your PC or Mac, then follow the below instructions to begin the whole process.
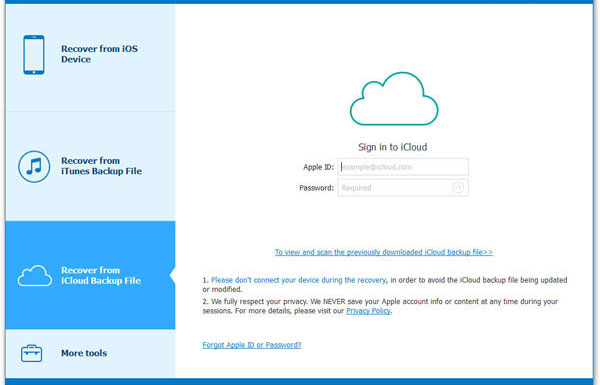
Step 1. Directly launch the program on your computer after the installation, then choose "Restore from iCloud Backups" in the program's primary window. Here, you'll be required to log in your iCloud account and password.

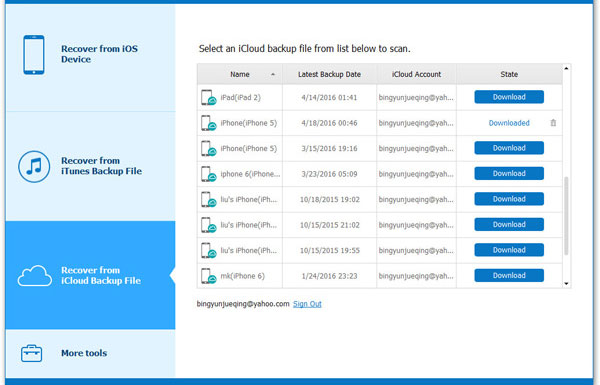
Step 2. Now, you'll be required to locate the target backup file and tick it for downloading. After that, you can choose the types of files that you wish to restore and click "Next" to begin the scanning.

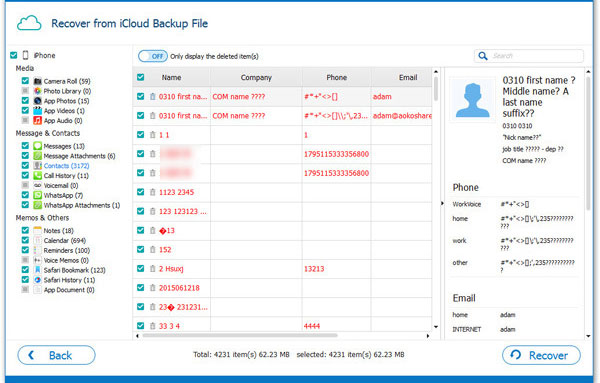
Step 3. When the scanning is finished, you can tick the data like messages, photos, etc. in the left panel for detailed viewing. Mark all files you want to recover and hit "Recover" button to save them on your computer.

Related Articles:


