Full Guide on How to Backup iPhone to Cloud Easily
Plan to backup the data on your iPhone? Then you can take cloud backup into account. Compared with other methods, backing up iPhone to cloud is totally a free way. And what's more important, this means is easy to follow and you can access the saved iPhone files anytime and anywhere you like. Just read on to get the detailed steps and you will find that iPhone data backup is just a piece of cake.
How to Sync iPhone Data to iCloud?
iCloud is the official cloud server provided by Apple, so to backup your iPhone to cloud, it could be your first choice. Then how to sync the files on your iPhone to iCloud? You have two ways:
1. Manually Move iPhone Data to iCloud
Step 1. Connect your iPhone to a stable Wi-Fi network.
Step 2. Then you can turn on the iCloud Backup feature in Settings, to complete that, you can:
- On the iPhone running on iOS 11 or above, you can go to Settings > your name > iCloud > iCloud Backup.
- On the iPhone running on iOS 10.2 or earlier, you can click on Settings > iCloud > Backup > turn on iCloud Backup.
Step 3. Tap on Back Up Now and wait till the backup process ends.

Step 4. When the backup is completed, you should:
- For the iPhone running on iOS 11 or above, you should tap on Settings > your name > iCloud > iCloud Storage > Manage Storage > your device and then you can view the details of the backup.
- For the iPhone running on iOS 10.2 or earlier, you need to select Settings > iCloud > Storage > Manage Storage.
2. Automatically Sync iPhone Data to iCloud
Step 1. Unlock your iPhone and link it to a strong Wi-Fi network.
Step 2. Turn on the iCloud Backup by going to:
- Settings > your name > iCloud > iCloud Backup on the iPhone running on iOS 11 or newer version.
- Settings > iCloud > Backup on the iPhone running on iOS 10.2 or older version.
You may also want to know:
How to Backup Photos to iCloud Effortlessly?
How Can I Upload iPhone Files to Dropbox?
Dropbox is a popular cloud storage service which enables users to backup different kinds of files on iPhone. Its supported file types include Apps, photos, videos, music and documents. The followings are the detailed steps of uploading iPhone files to Dropbox:
Step 1. Download and install the Dropbox App on your iPhone and then launch it.
Step 2. If you do not have a Dropbox account, you need to create a new one at first. If you already have an account, just sign in.
Step 3. After entering the application, you will see a + icon at the middle bottom of the screen. Just tap on it and you will receive a window with several options. Just choose Upload files and select the files you want to backup.
Step 4. At last, you can simply tap on the Upload button to begin the moving process.

Easy Way to Backup iPhone to OneDrive
Another well-known cloud storage service is OneDrive which provides its users a fast and hassle-free way to store their data. With it, you are free to save your documents, photos, videos, etc. and the saved data will be well protected. You can go to App Store to download and install one on your device and then have a try.
Step 1. Open the application and login to your OneDrive account.
Step 2. After that, you will get the main interface of OneDrive. Just tap on the three dots icon at the top right corner and then different options you can select will be displayed.
Step 3. Tap on Add Items from the listed options and continue to choose the wanted files and upload them to your OneDrive for backup.

As for Android users, you can go to the page "A Complete Guide on How to Backup Files to OneDrive" to learn the uploading methods.
Steps to Backup iPhone Data with Google Drive
Your next option is Google Drive - an online cloud storage service with 15GB free storage space. It allows users to store various kinds of iPhone data like images, videos, audios, etc.
Step 1. Run the Google Drive on your mobile phone and click on the menu icon on the primary interface.
Step 2. Choose Settings followed by Backup.
Step 3. Finally, you can click on START BACKUP to start the backup process.

Want to know more methods to backup iPhone to Google Drive? Just go to the page: How to Backup iPhone to Google Drive.
Tutorial to Transfer iPhone Photos to Flickr
Compared with the cloud servers above, Flickr would be less famous but it is practical as well. Unlike other cloud servers, Flickr only supports to backup photos. However, its storage space is much larger - you are allowed to upload hundreds of thousands of photos with 1000GB of free storage. And also, it is easy to operate:
1. Manually Upload Photos from iPhone to Flickr
Step 1. Open the Photos App on your smart phone and choose Camera Roll or other Album where your wanted images are located.
Step 2. Click on the option Select located at the top right corner and choose the pictures that you want to upload.
Step 3. Hit the Share icon at the bottom left corner and elect the Flickr option from the pop-up Share Menu.

Step 4. Tap on the Open Lock option and a Menu screen will appear after that.
Step 5. In the Menu window, you will see several share options - Public, Friends, Family, Friends & Family, Private. Just choose the one you like.
Step 6. At last, you need to create a title for your images and choose Upload to transfer them to your Flickr account.
2. Auto Backup Your iPhone Photos to Flickr
Step 1. Enter the Flickr application on your device.
Step 2. Tap the Menu option (Gear shaped icon) on the App and choose Auto-Uploader from the listed option.
Step 3. Slide the button next to Auto-Upload photos to turn on the feature.

How to Save Your iPhone Data without Cloud?
Certainly the cloud storage service is not the only way to make the iPhone backup. And apart from cloud storage servers, another popular way to back up iPhone data is to transfer the files to computer. Here, if you are interested in the iPhone to computer transfer, then you are strongly recommended to use the freeware - MobiKin Assistant for iOS. This tool can help you to transfer more than 10 types of iPhone data to PC/Mac with ease, such as contacts, text messages, photos, movies, music, Safari bookmarks and so on. You can download its free trial version to make an attempt.
After downloading the software, you should go with the wizard to properly install it on your computer. Then you can follow the steps below to easily move the files.
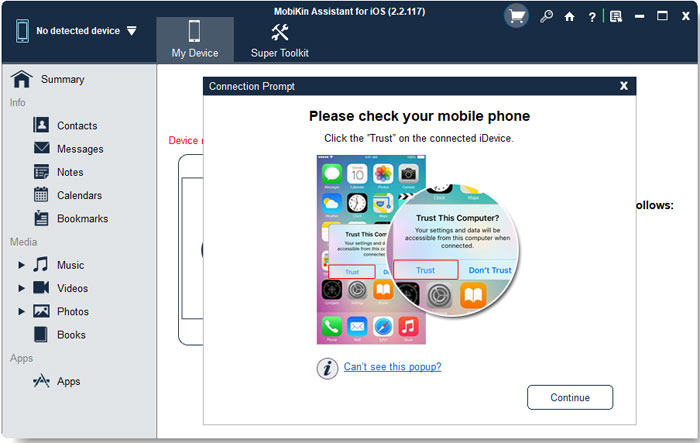
Step 1. Open the program on your computer and use a USB cable to build a connection between your device and computer. Here, you need to install the latest iTunes on your desktop computer and trust the computer on your device if required.

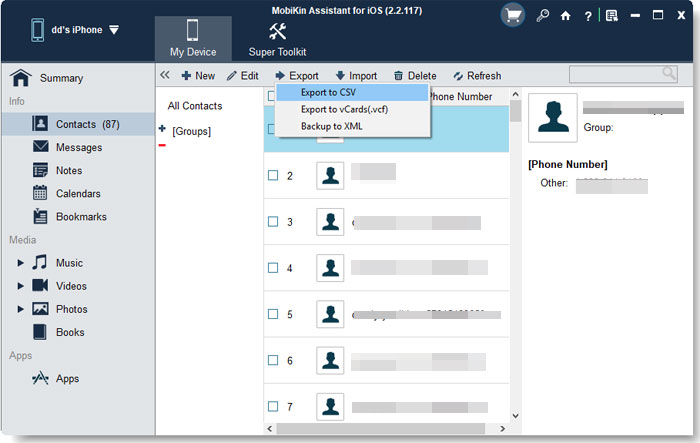
Step 2. Then the program will detect your iPhone automatically. Once the detection succeeds, you will get the following interface:

Step 3. Tap on the folder containing the files you want to transfer in the left panel and tick off the desired data in the right column. After that, you can hit the Export button to save the selected data.

Here is a video tutorial about transferring contacts from iPhone to computer for your reference:
Words in the End
Do you know how to backup iPhone to cloud or computer now? If you do, just take action to perform and complete the backup so that you won't need to worry about the data loss anymore. And if you have any problem about the methods provided in the article, please feel free to contact us.
Related Articles:
How to Transfer Contacts from iPhone to PC?
How to Transfer Text Messages from iPhone to Computer?
iPhone Music Transfer: How to Transfer Music from iPhone to Computer freely?


