How to Transfer Videos from iPhone to iPad in 5 Simple Ways?
Transferring videos from your iPhone to iPad isn't difficult. You can use options like Email, AirDrop, iTunes, iCloud, and more. But what's the best and most efficient way to move those videos? If you're looking to save time and get the job done quickly, you've come to the right place.
In this article, we'll go over the 5 most popular methods to transfer videos from iPhone to iPad. Keep reading to find the best video transfer solution for you!
- Part 1: How to Transfer Videos from iPhone to iPad with iOS Transfer (5 Minutes Way)
- Part 2: How to Send Video from iPhone to iPad with iTunes
- Part 3: How to Transfer Movies from iPhone to iPad with iCloud
- Part 4: How to Share Videos from iPhone to iPad via AirDrop
- Part 5: How to Transfer Videos from iPhone to iPad Using Email
- Part 6: FAQs of Transferring Videos from iPhone to iPad
Part 1: How to Transfer Videos from iPhone to iPad with iOS Transfer
If you want a direct way to transfer purchased or non-purchased videos from iPhone to iPad, you can try a professional iPhone to iPad transfer solution, which is iOS Transfer. You may know that this program is a reliable tool to transfer videos from iPhone to PC or Mac within a few clicks. But you may not know that it is also an ideal solution to transfer videos from one device to another directly.
Core features of iOS Transfer:
- Transfer all kinds of data from one device to another, no matter they are iOS or Android devices.
- Move videos, music, photos, playlists, etc., between iPhone/iPad, PC/Mac, or iTunes library.
- Retain original video quality after you get the video files on target devices.
- Import content from your computer or iTunes library to your iDevices.
- Work well on various iOS devices, including iPhone 16/15/14/13/12/11/X/8/7/6, iPad 10/9/8/Pro/Air/mini/4/3/2, and more.
- It does not interfere with any behavior of its users.
Here is how to transfer video from iPhone to iPad with the help of iOS Transfer.
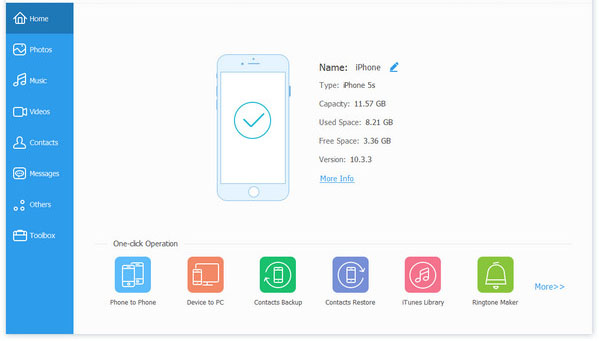
Step 1. Connect your iPhone to the computer
Download, install and launch the iOS Transfer on your computer. Use a USB cable to link your iPhone to the computer and the program will detect your device automatically. All the iPhone information, as well as the file categories will be displayed on the interface.
Step 2 Select the videos you need
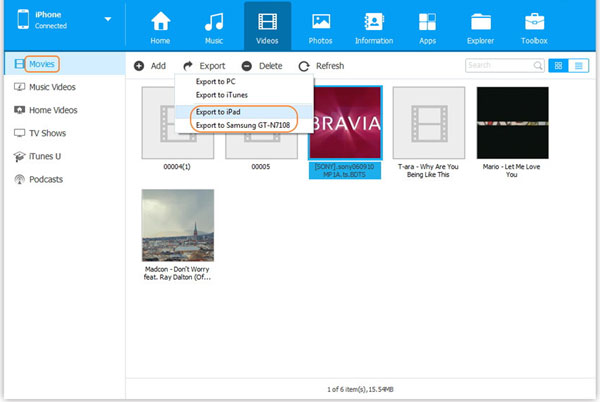
On the left sidebar, choose "Videos" and you will see all videos on your iPhone are scanned out and listed. Just preview and select the video files you want to transfer.
Step 3. Transfer videos from iPhone to iPad
Now, connect your iPad to your computer and do not disconnect your iPhone. The program will also detect the connected iPad. As you have already selected your wanted videos, you can click the option with a phone icon from the top menu and then choose the name of your iPad. The program will begin to move the selected videos from iPhone to iPad automatically.
Guess you like:
Part 2: How to Send Video from iPhone to iPad with iTunes
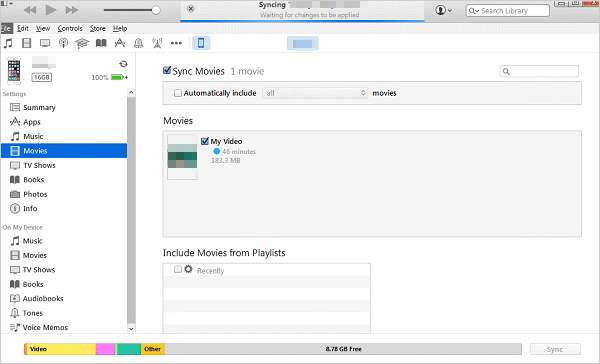
If you just wish to watch the iPhone videos on your own iPad devices, you can directly sync them with iTunes. But this is only available for the video which is purchased or downloaded from the iTunes store, and the iPhone/iPad is sharing with the same Apple ID. That means, if the iPad and iPhone have different Apple ID, or the video are not downloaded from iTunes store, then you can't share them between iPhone and iPad freely.
- Ensure you have installed the latest version of iTunes on your computer. Launch iTunes and connect your iPhone to the computer with a USB cable.
- From the main interface of iTunes, select the connected iPhone, go to "Summary" > "Back Up Now" to back up all files from iPhone to iTunes. After the backup process is finished, disconnect iPhone from the computer.
- Connect your iPad to the same computer. Select the iPad device from iTunes screen, and go to "Summary" > "Restore Backup" > Choose the desired backup > "Restore", to restore videos from backup to iPad.
Part 3: How to Transfer Movies from iPhone to iPad with iCloud
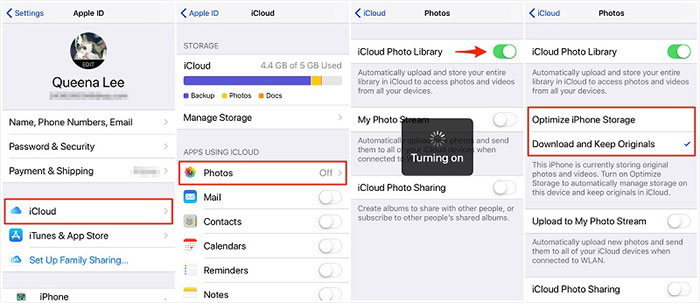
iCloud gives each Apple ID 5GB of free storage space. Therefore, if you only have a small amount of videos to transfer, you can use iCloud to transfer videos from iPhone to iPad. You only need to synchronize the two devices to the same iCloud account, and then enable the iCloud Photo Library function. Specifically, the following steps can be taken.
- Unlock your iPhone, go to "Settings" > "iCloud" > to check how much space left on iCloud.
- Tap on the "Photos" and turn on "iCloud Photo Library". Then, all photos and videos from your iPhone will be synced to iCloud account.
- Unlock your iPad and link it to the same iCloud as your iPhone.
- Go to "Settings" > "iCloud" and turn on the iCloud Drive.
- Visit the Photos section and then turn on the iCloud Photo Library.
Please make sure that there is a stable Internet connection during the video synchronization process to the iPad. And you can also get an answer if you can't export iPhone photos/videos with iCloud Photo Library enabled.
Can't Miss:
Part 4: How to Share Videos from iPhone to iPad via AirDrop
If you only have a few small video clips to transfer from iPhone to iPad, then you can use AirDrop to help you achieve it. You only need to turn on WiFi, Bluetooth and AirDrop at the same time, and you can transfer small movies and small videos from iPhone to iPad in the form of wireless transmission.
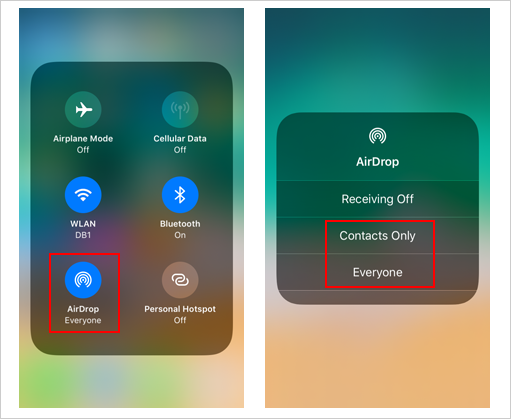
- Unlock your iPhone and iPad, and turn on the WiFi option for both of them. Make sure the two devices are linked to the same WiFi. Enter the "Control Center" by swiping up from the bottom of the screen.
- Click on "AirDrop" and select the option "Contacts Only" or "Everyone".
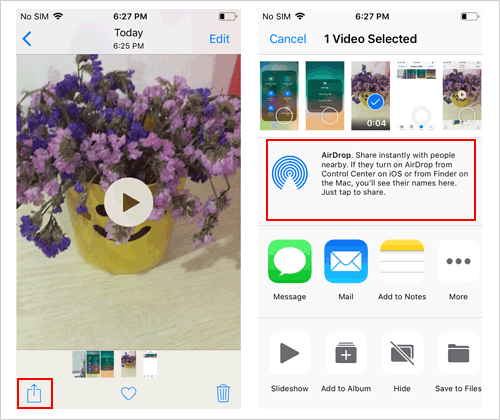
- Choose the video files that you want to transfer from your iPhone.
- Tap on "Share" and choose the name of your iPad shown on the AirDrop card. Tap on the "Accept" option on your iPad and the selected videos will be transferred from iPhone to iPad.
When AirDrop not working, you can try transferring videos from iPhone to iPad via Email.
Part 5: How to Transfer Videos from iPhone to iPad Using Email
If you have no WiFi connection and do not want to install extra software or app, then, Email should be a nice choice for you to copy videos from iPhone to iPad.
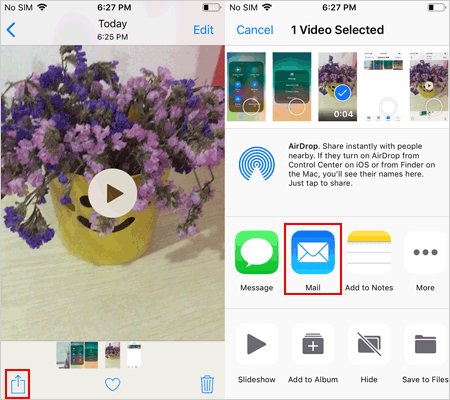
- Unlock your iPhone, navigate to the "Photos" app and choose the videos you want to transfer. Click on the "Share" icon and choose the option of "Mail".
- The mailing app will be opened, in which you can enter the email account and send the videos to the email.
- Once you send the videos, you can go to "Mail" app on your iPad, check the email you have sent from your iPhone, and download the attached videos to your iPad.
Part 6: FAQs of Transferring Videos from iPhone to iPad
Q1: How to transfer contacts from iPhone to iPad?
You can easily transfer contacts from iPhone to iPad using iCloud or AirDrop. If you want a faster way, you can also use the contact transfer tool iOS Transfer to quickly manage and move contacts.
Q2: Can AirDrop send photos from iPhone to iPad?
Yes, AirDrop allows you to send photos directly from iPhone to iPad. For detailed steps, check out this guide: Transfer photos from iPhone to iPad.
Q3: How to transfer videos from old iPhone to new iPhone?
To transfer videos from one iPhone to another, you can use tools such as iTunes, AirDrop, or iOS Transfer. For detailed steps, check out this guide: Transfer videos from iPhone to iPhone.
Conclusion
I'm sure, after reading this guide on how to transfer videos from iPhone to iPad, your goal must be achieved. After constant attempts, do you have the same feelings as me that the simplest solution for videos transfer is using iOS Transfer. It can freely transfer videos, photos, contacts, information, documents and other various data between devices, and between devices and computers.
Feel free to try it out and share this guide with your friends to enjoy a simple and convenient way of data transfer.
Related Articles:
4 Best Methods for Screen Mirroring iPhone to iPad
How to Unsync iPhone from iPad or Vice Versa [5 Methods]


