How to Transfer Photos from iPhone to iPhone [Stepwise Guide 2025]
Upgrading to a new iPhone can be exciting, but before you start enjoying the new features your new device brings, it's important to transfer photos and other data from your old iPhone to your new one. After all, Apple releases new iPhone models every year, and even if you keep updating iOS (iPhone Update Stuck?), your old device may start to look outdated. Before you say goodbye to your old iPhone, make sure you know how to move your precious photos and other files to your shiny new phone.
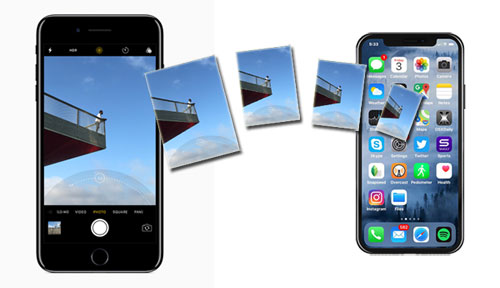
In this guide, we share five common ways to transfer photos from one iPhone to another. Read on to choose the one you prefer, whether you prefer wired or wireless transfer.
- Method 1: Transfer Photos from iPhone to iPhone via Phone Transfer [1-Click Way]
- Method 2: Transfer Photos from iPhone to iPhone Using iCloud
- Method 3: Transfer Pictures from iPhone to iPhone via AirDrop
- Method 4: Transfer Photos from Old iPhone to New iPhone via iTunes
- Method 5: Transfer Photos from iPhone to iPhone via Email
Method 1: How to Transfer Photos from iPhone to iPhone via Phone Transfer
We have many ways to transfer photos from one iPhone to another, but first, we are still willing to share the easiest and most effective method for you. We have tested many methods and many tools, the most successful of which is the Phone Transfer. It can provide you the fastest and most convenient way to complete photos transfer between two iPhones, even if you have a large number of photos need to be transferred.
Phone Transfer - Transfer Photos from iPhone to iPhone with 1 Click
- A cross-platform application that empowers users to transfer data from one device to another with one simple click.
- Easily transfer pictures, contacts, music, videos, and etc. from one iPhone to another without losing or deleting any data on the device.
- It can help you well manage, export, import, edit, delete any data on your iPhone through computer without iTunes.
- It is able to transfer data between iOS and iOS, Android and Android, and even Android and iOS devices.
- Supports almost all iOS devices, including iPhone 16/15/14/13/12/11/X/8/7/6 and more.
- It is an ideal phone to phone transfer tool with simple operation, powerful function and full security.
Now, just click the below icon to take a free trial of the Phone Transfer by yourself!
How can I transfer photos from iPhone to iPhone by using Phone Transfer?
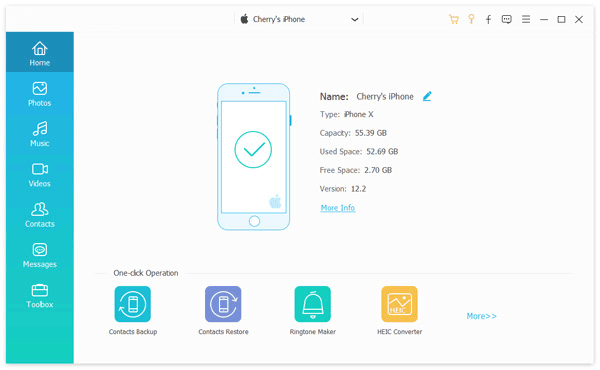
Step 1: As the best photo transfer for iPhone, you only need to launch it on your computer, link your two iPhones to the computer via USB and they will be detected by the program. Then you can see an interface like below:
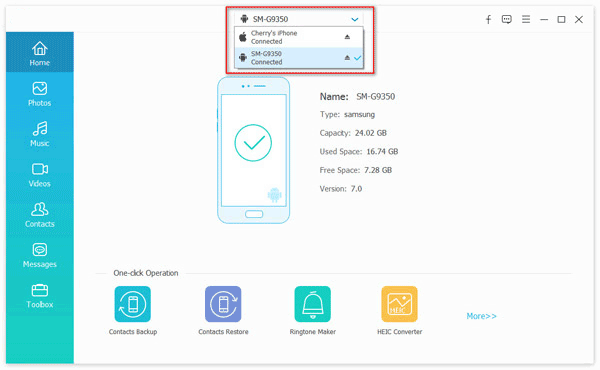
Step 2: Make sure the old iPhone is the source phone and the new iPhone is destination phone. If not, you can click the dropdown to select the correct source device.
Step 3: Choose "Photos" option and click "Export to Device" button to start the transferring process.
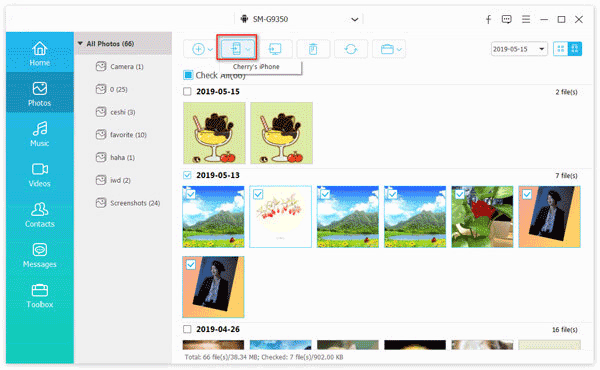
Done! This is the way of transferring iPhone photos to iPhone on Windows computer by using Phone Transfer. Actually, if you are using a Mac, you can also follow the similar steps to transfer pictures from one iPhone to another via the Mac version of Phone Transfer.
Check If You Need:
Method 2: How to Transfer Photos from iPhone to iPhone Using iCloud
iCloud is a great cloud service because it allows you to access the data stored in iCloud on any device, as long as you use the same Apple ID. However, this method requires that you have an Internet connection to upload files to iCloud, and access files on iCloud; In addition, the free space provided by iCloud to users is very limited, only 5GB. If you think you don't have enough storage space, you can pay monthly to get more space.
Some tips you should know before starting the photos transfer via iCloud:
- The two iPhones need to be iOS 8.3 or later.
- iCloud Photo Library has been enabled on both your iPhone and iPad.
- There is sufficient iCloud storage space.
- Log into the same Apple ID on both iPhones.
- You need to connect to a wireless network to upload photos.
Let's see how to transfer all photos from iPhone to iPhone via iCloud.
- Go to "Settings" on your iPhone > [your name] > Tap on "iCloud".
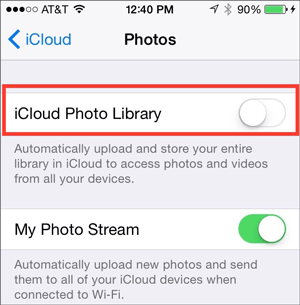
- Choose "Photos" > Toggle on "iCloud Photos" to enable the iCloud Photos features.
- Select "Optimize iPhone Storage" or "Download and Keep Originals". Then, wait for the photos being uploaded to the iCloud Photo Library.
- After the operations above, you can access photos from an album named All Photos in the new iPhone's Photos app.
Method 3: How to Transfer Pictures from iPhone to iPhone via AirDrop
How to transfer photos from iPhone to iPhone without iCloud? If your iPhone is iOS 7 and later, and you only need to transfer a small amount of photos to your new iPhone, using AirDrop is a good choice. However, if you have hundreds or thousands of photos to transfer, I wouldn't recommend you to use this method, because transferring files via AirDrop is very slow.
Now, let's check if using AirDrop is a good way to transfer photos from one phone to another iPhone.
Step 1: Enable AirDrop on two iPhones
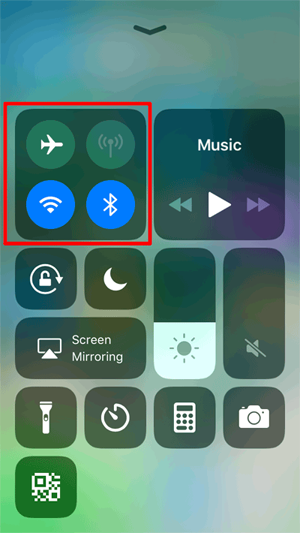
- Swipe up from the bottom of your iPhone screen to launch Control Center.
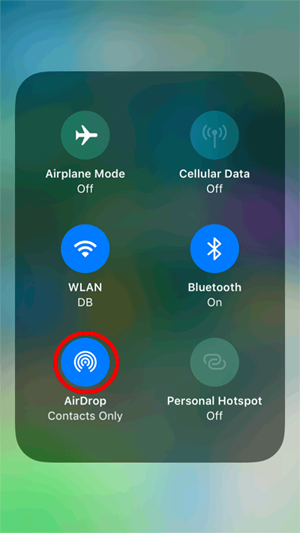
- Press and hold the airplane button which is on the upper-left corner of the screen.
- Tap on "AirDrop" and choose "Contacts Only" or "Everyone" to run on the AirDrop option.
Step 2: Select the photos you want to transfer from your old iPhone
- Open the Photos app on your old iPhone.
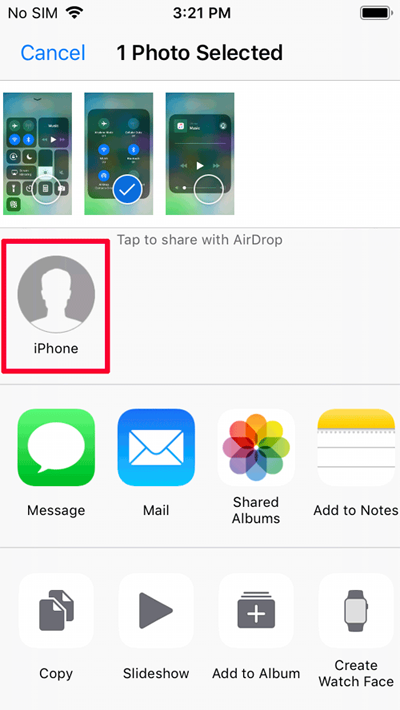
- Select the photos you want to transfer and tap the Share icon in the lower-left corner.
- Tap on AirDrop icon in the pop up window.
Step 3: Check the transferred photos on your new iPhone
- You will receive a pop up dialog on your new iPhone, asking you if you want to receive the photos sent from the old iPhone.
- Accept the transfer and then all the photos will be saved to the Photos app on your new iPhone.
Method 4: How to Transfer Photos from Old iPhone to New iPhone via iTunes
iTunes is probably one of the most commonly used tools for iOS users to transfer files. However, the biggest problem with iTunes to transfer pics from iPhone to iPhone is that it deletes existing photos in the photo library. If you don't mind this or you have already backed up all your photos, you can continue to use download the latest iTunes to get photos from one iPhone to another.
Step 1: Transfer photos from iPhone to computer
- On Windows PC: Connect your old iPhone to your computer with a USB cable. The AutoPlay will pop up, in which you should click "Import Pictures and Videos". Choose a location to save the iPhone photos and then click "Import" button to transfer photos from your old iPhone to PC.
- On Mac: Connect your old iPhone to your Mac with a USB cable, launch iPhoto and select the photos you want to transfer. Then, click "Import" or "Import Selected" to transfer photos from your old iPhone to Mac.
Step 2: Transfer photos from computer to new iPhone
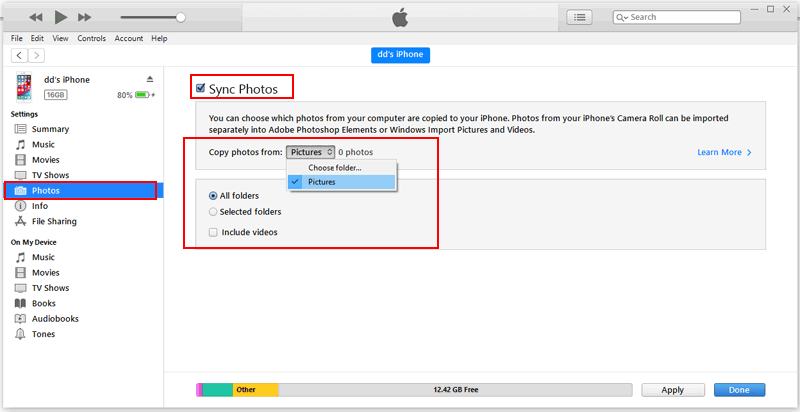
- Connect your new iPhone to the computer with a USB cable and launch iTunes.
- Choose the iPhone's icon in iTunes and click the "Photos" option.
- Select "Sync Photos"option and choose an application or folder.
- Click "Apply" to sync photos from iTunes library to your new iPhone.
Method 5: How Do I Transfer Photos from iPhone to iPhone via Email
If the above still does not have the transfer method you want, then you can also use the email function to send photos to your new iPhone. This method is very simple, but due to the size limitation of email attachments, you can only send photos smaller than 25MB (Some mailboxes can only send less than 20MB files).
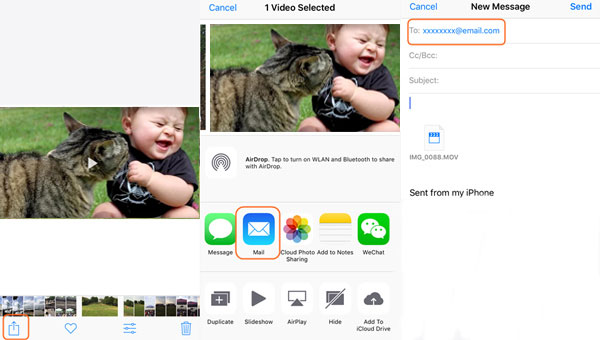
- Open the Photos app on your old iPhone, tick off the photos you want to transfer and then turn to the bottom left to click the Share option.
- Choose the mail button from the new window, fill in the recipient's email ID and then click "Send" to send the email with all the photos have been attached.
- On your new iPhone, open the "Mail" app and log in with the recipient's email ID or address, check the email you just sent and download the attachments. Now, your photos are available for viewing on your new iPhone.
The Bottom Line
If you want to transfer photos from one iPhone to another, this article will help you as fully as possible. Although we showed you five different methods, compared to Phone Transfer, the other four methods have many disadvantages. To avoid various restrictions, you can directly use the professional third-party transfer tool - Phone Transfer. In addition to photos, it also supports transferring videos, music, contacts, text messages, voice memos, etc. from one phone to another. You can have a try!
Related Articles
Easy Way to Transfer Photos from iPhone to iPad
How to Transfer Contacts from iPhone to iPhone


