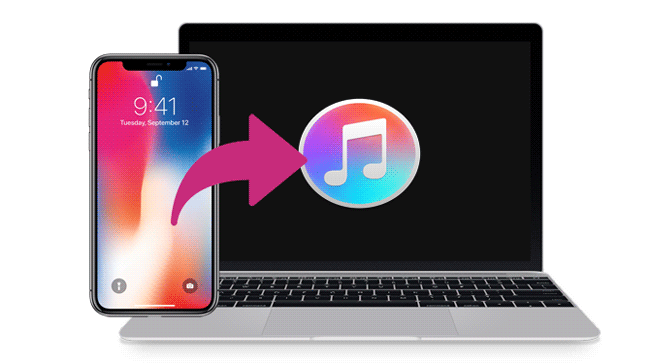
How to Transfer Music from iPhone to Computer for Free: 6 Ways
Once you get the hang of it, you'll realize how easy it is to transfer music from your iPhone to your computer. Whether you want to back up your music, free up space on your iPhone, or listen to music on your computer, this guide will show you how. Just follow a few simple steps and you'll be able to effortlessly transfer your music collection from your iPhone to your PC or Mac.
Whether you prefer to use iTunes, third-party apps, or a cloud-based method, there's an option for everyone. Keep reading to learn the best ways to move your music and keep your favorite songs safe and playable on any device.
- Part 1: Transfer Music from iPhone to Computer with Assistant for iOS (Video Tutorial Included)
- Part 2: Extract Music from iPhone to Computer Free with iTunes
- Part 3: Copy Music from iPhone to Computer via iTunes Backup
- Part 4: Back up iPhone Music to Computer via Cloud Service
- Part 5: Download Music to PC from iTunes Store
- Part 6: Sync Music from iPhone to Mac via Finder
Part 1: Transfer Music from iPhone to Computer with Assistant for iOS
MobiKin Assistant for iOS Free (Windows/Mac) is a professional yet reliable freeware on the market, which empowers users to copy up to 14 types of files from iPad, iPhone and iPod devices to desktop computer within few clicks. And MobiKin guarantees here no quality loss during the process. These highlights make it the first choice to freely transfer music from iPhone to computer.
Let's have a brief look at its main features:
- Transfer music from iPhone to PC selectively or in a batch. No limit on the number of your selected songs.
- Transfer other data like contacts, SMS, notes, photos, movies, etc. to a desktop computer as you like.
- Import data from computer to iPhone easily, including contacts, calendars, and bookmarks.
- Uninstall apps on iPhone without limitations.
- Compatible with all generations of iDevices, including the latest iPhone 16/15/14, etc.


Note: For using this program for free, you need to get a free license code for registration from here.
Quick steps to transfer music from iPhone to computer for free:
- Run the program and connect your iPhone to Mac/PC.
- Preview and select iPhone music.
- Click "Export" to transfer music from iPhone to a computer.
You can read on the following step-by-step guide or go to the video tutorial for more info.
Below are the detailed steps to move music from iPhone to computer for free:
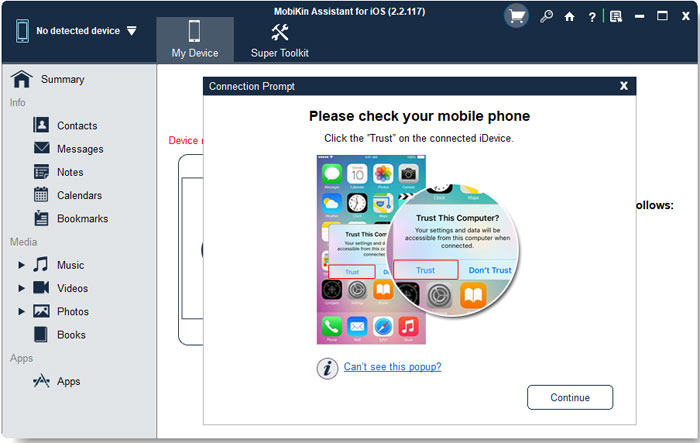
Step 1. Launch MobiKin Assistant for iOS freeware and connect iPhone to the computer with a USB cable. When your device is detected, turn to your device and click "Trust" button on the pop-up window. Then click "Continue" in the program to finish the connection.
Step 2. Once your iPhone data is scanned by the program, you can click the button like "Music" to open up the folder and select the right category to view the whole song list on iPhone. Find and mark one or many target songs or the whole music folder on the program as you like.
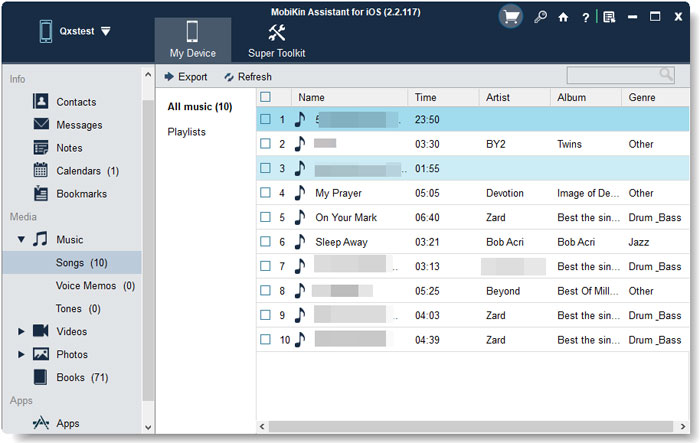
Step 3. Now please click the "Export" button to save the wanted music on your Windows or Mac computer.
Here is a video tutorial for your reference:
What's more, its Mac version allows you to copy music from iPhone to Mac freely. Since it supports many kinds of files, you can also use it to transfer/backup files from iPhone to PC/Mac:
How to Send Large Size Videos & Photos from iPhone Effectively?
Part 2: Extract Music from iPhone to Computer Free with iTunes
To sync music from iPhone to computer, you can turn to Apple's official tool - iTunes, as well. This program is provided to help users sync or backup their iPhone, iPad or iPod data on PC easily. However, It only allows you to download the music purchased from the iTunes Store. If you need to transfer the content from other sources, you can use MobiKin Assistant for iOS, which is mentioned in Part 1.
The following is the tutorial about how to transfer music from iPhone to computer via iTunes. It contains two main processes. Firstly, you need to transfer purchased music from iPhone to iTunes library, then download the purchased music from iTunes to your computer.
Step 1: Transfer purchased music from iPhone to iTunes
- Launch the latest iTunes on your computer.
- Connect your iPhone devices to Mac/PC via its USB cable.
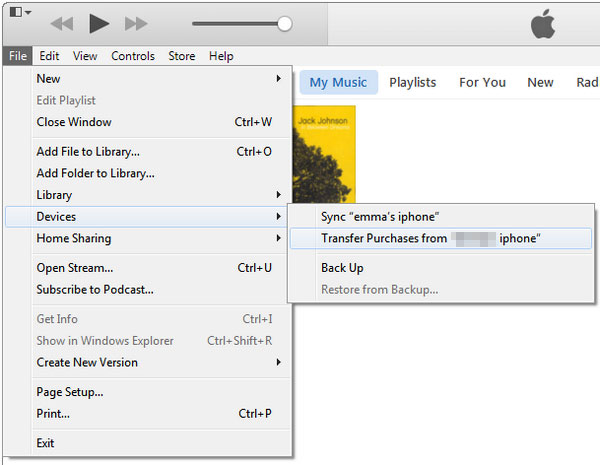
- Tap on the "File" option at the upper left corner of iTunes.
- Choose "Devices".
- Select the option "Transfer Purchases" from your iPhone name.
- Wait till the transferring process ends.
Step 2: Download purchased music from iTunes to a computer
- Click "Recently Added" at the left side of iTunes.
- Select the purchased music that you want to save.
- Click the "Download" button to transfer music.
Part 3: Copy Music from iPhone to Computer via iTunes Backup
If you want to back up your music and avoid data loss, you can use iTunes to transfer all your music and other data from your iPhone to your computer. However, it is important to note that iTunes backups are not directly accessible. You can only listen to your music after restoring the backup to another iPhone, and this process will erase the current data on your iPhone.
Here's how to transfer music from iPhone to computer for free using iTunes:
- Install and launch the latest version of iTunes on your computer, then connect your iPhone.
- Click iPhone icon > "Summary" > "This Computer" > "Back Up Now" and wait for the backup to complete.
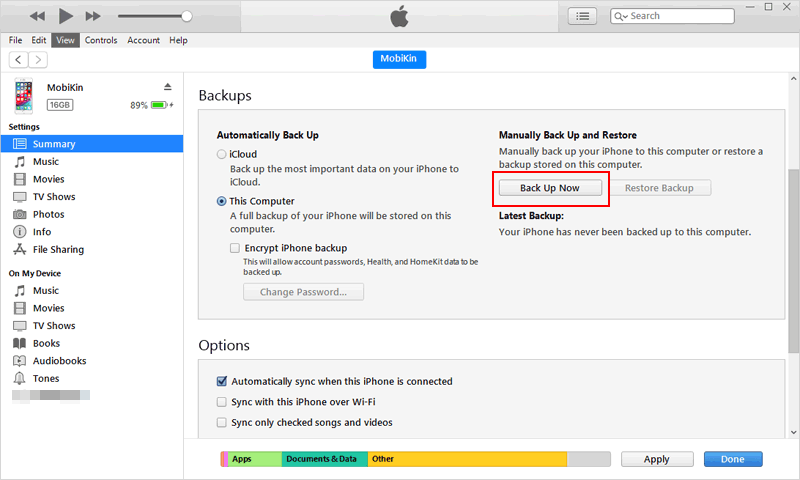
Once the backup is complete, you can use the "Restore Backup" feature to restore all your music and other data.
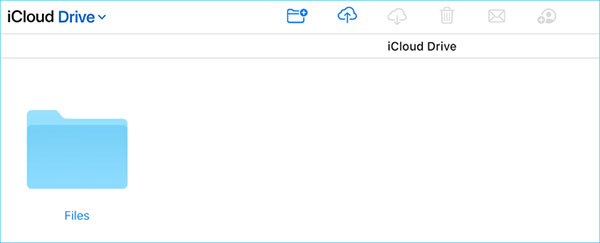
Part 4: Back up iPhone Music to Computer via Cloud Service
Cloud services like iCloud, Google Drive, and Dropbox are also great ways to transfer music from iPhone to PC. These services let you share files between devices using the same account, and as long as you have an internet connection, it's an easy solution for transferring music in both directions - from iPhone to PC or from PC to iPhone.
Let's take iCloud Drive as an example to show you how to transfer music from iPhone to PC:
- On your iPhone, go to "Settings" > tap "[your name]" > "iCloud" > Turn on iCloud Drive.
- Open the Files app, select the songs you want to transfer, and tap the "Copy" button.
- Go to iCloud Drive and long-press to paste the music files. They will be synced between devices connected to the same account.
- Visit the iCloud website on your computer, log in with the same Apple ID, go to iCloud Drive, and download the music files from iCloud.
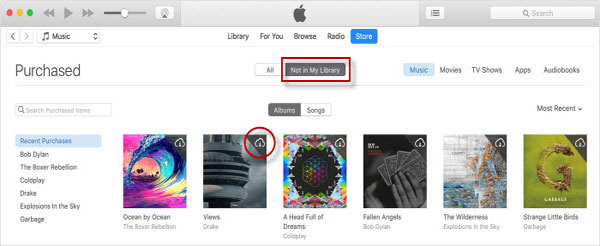
Part 5: Download Music to PC from iTunes Store
If you purchased songs from the iTunes Store on your iPhone or iPad, you can easily download them to your computer using iTunes since the purchase history is saved in your account.
Here's how to download songs you purchased:
- Open iTunes on your computer and click "Account" at the top of the window.
- You may need to sign in with your Apple ID if you're not already signed in.
- In the iTunes Store section, click "Purchased" on the right. You'll see a list of songs you've purchased.
- Select the songs you want to download, or click "Download All" to transfer all purchases to your computer.
Part 6: Sync Music from iPhone to Mac via Finder
Finder is another easy way to transfer files from iPhone to Mac. The process is very similar to using iTunes. Here's how to sync music:
- Connect your iPhone to your Mac and open Finder.
- Click on your iPhone's name under "Locations" and select "Music" from the top menu.
- Check the box next to "Sync music to [your device name]".
- Check the boxes next to the items you want to sync.
- Click "Apply" to start syncing your music to your Mac.
Final Thoughts
That's all for how to transfer music from iPhone to computer for free. Just choose one method to transfer the wanted songs for backup so that you can get them back while accidentally losing them. Although there are other tools available for you to retrieve the iPhone music without backup, you are unable to recover all kinds of data with these tools. So to better protect your phone data, you'd better make a backup beforehand.
Related Articles
How to Transfer Contacts from iPhone to PC?
How to Transfer Photos from iPhone to Computer?
