How to Transfer Music from iTunes to Flash Drive [Full Guide]
iTunes is the go-to program for managing media like music, playlists, movies, and ringtones on your iPhone, iPad, or iPod. However, since each device can only sync with one iTunes library, a computer crash could result in you needing to rebuild your entire music collection. You may also want to transfer music from iTunes to flash drive for listening in the car. The good news is that transferring your iTunes library to a flash drive or USB is definitely possible.
Wondering how to do it? Don't worry! This guide will show you the simple steps to move music from iTunes to a flash drive or USB stick. Follow these simple instructions and you'll be able to take your favorite songs with you or protect your library from unexpected computer problems.
Part 1: Why Transfer Music from iTunes to a USB Flash Drive?
Here are a few reasons why transferring music from iTunes to a USB flash drive is a good idea:
- Portability: USB flash drives are small and lightweight, making it easy to carry your music with you, whether in your pocket or bag.
- Free up space: If your phone or computer is running low on storage, a USB flash drive provides extra space to keep your music without filling up your device.
- Works without Wi-Fi: Some older devices or non-smartphones can't sync with iTunes or use Wi-Fi. A USB flash drive lets you play your music on nearly any device, without the need for internet.
- Keep your music safe: By storing your music on a USB, it's no longer tied to your online accounts or apps, giving you extra security and peace of mind.
Part 2: Transfer Music from iTunes to Flash Drive Directly
Transferring your music from iTunes to a USB flash drive is simple and doesn't require much technical knowledge. Here's an easy guide to walk you through the process.
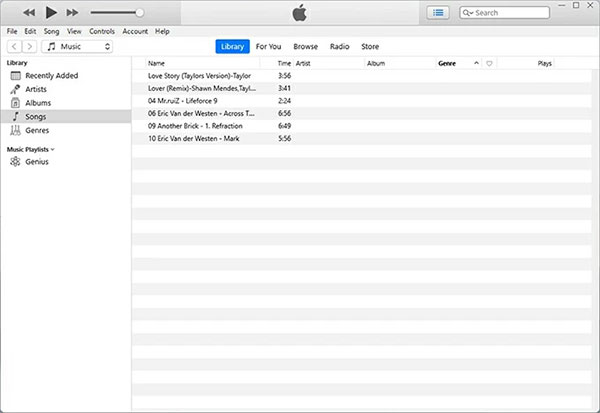
- Open the iTunes application on your computer.
- Go to your music library or playlist. On Windows, make sure you are in the Music section by selecting Library > Songs from the top left. On a Mac, click the Music icon and select Playlists to see your music. (Where to Find the Location of iTunes Library on Mac/PC)
- Insert your flash drive into your computer and open it. Make sure both your iTunes window and the flash drive window are visible on the screen.
- Select the songs you want to move in iTunes. On Windows, you can use "Ctrl" or "Shift" to select multiple tracks. Then, just drag and drop them into the folder on your flash drive. On a Mac, hold down the "Command" key to select multiple songs and drag them over.
You May Want to Know:
Part 3: Copy Playlist from iTunes to USB Drive via File Explorer
The above is to copy music directly from iTunes to a flash drive. Another way to do this is to find the folder on your computer where iTunes stores songs, and then move the files from there to a flash drive. This way, you can easily save your music without using iTunes directly.
- Insert the flash drive into the USB port of your computer (Windows or Mac).
- Open iTunes and click "Edit" in the upper left corner. Go to "Preferences" and click "Advanced". This will show you the location of your iTunes music files.
- Go to the folder shown in the "Preferences" window on your computer. Your iTunes music is usually stored in a folder called iTunes Media. If you want to find a specific song, you can right-click it in iTunes and select "Show in Finder" (Mac) or "Show in Windows Explorer" (Windows) to open the folder where it is saved.
- Right-click the music folder or individual music files you want to transfer and click "Copy".
- Go to the flash drive and right-click to "Paste" the file.
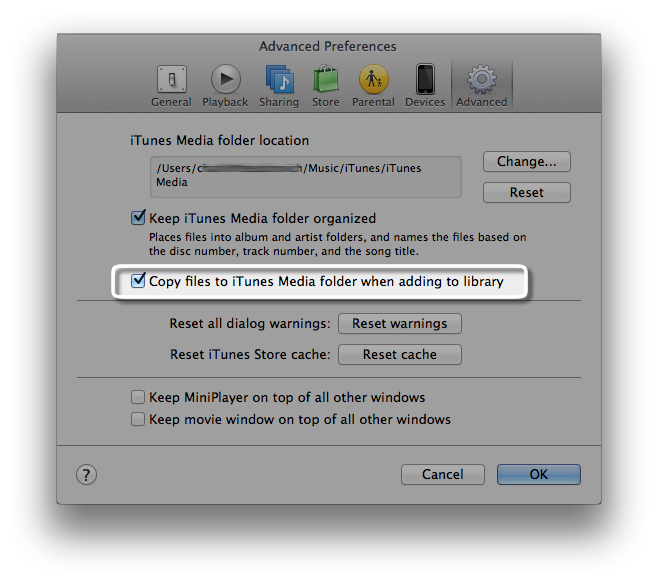
Tip: You can check the "Keep iTunes Media folder organized" and "Copy to iTunes Media folder when adding files to library" options to make it easier to organize your music into neat folders.
You May Want to Know:
Bonus: Transfer Music from iPhone to USB with Assistant for iOS
Transferring data using iTunes can be tricky, especially when you encounter issues with iTunes on Windows when moving songs to an external hard drive. An easier way is to use MobiKin Assistant for iOS (Windows/Mac), which allows you to export iTunes playlists from iPhone to a USB drive. With just a few clicks, you can easily transfer up to 14 different types of files from your iPhone, iPad, or iPod to your computer or other external hard drive.
Moreover, MobiKin ensures that there is no loss of quality during the transfer process, making it a great choice for transferring music from iPhone to computer.
Let's have a brief look at its main features:
- Transfer music from iPhone to flash drive selectively or in a batch. No limit on the number of your selected songs.
- Transfer other data like contacts, SMS, notes, photos, movies, etc. from iPhone to computer, and vice versa.
- With an easy-to-use interface, you can quickly transfer 100 songs in just a few minutes.
- Unlike the complicated steps in iTunes, Assistant for iOS lets you complete the transfer in just a few simple clicks.
- Compatible with all generations of iDevices, including the latest iPhone 16/15/14, etc.


Here's how to transfer your iPhone music to a USB flash drive using Assistant for iOS:
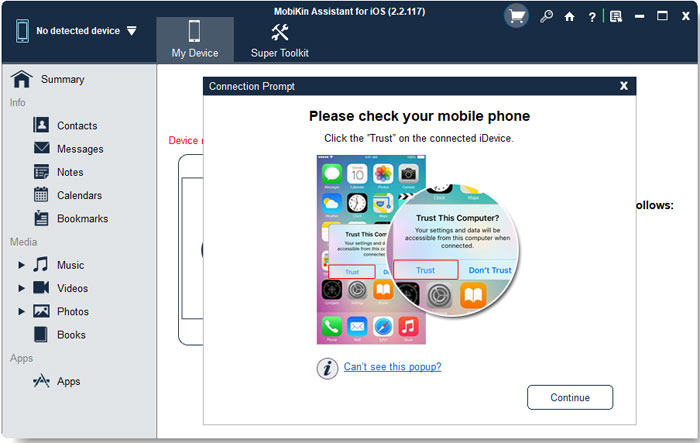
Step 1.Download and install Assistant for iOS. Connect your iPhone to your computer with a USB cable, and plug in your USB flash drive. When your iPhone is detected, tap "Trust" on your phone, then click "Continue" on the program to establish the connection.
Step 2. After your iPhone data is scanned, click on the "Music" section to see your song list. You can choose individual songs or select the whole music folder, depending on what you want to transfer.
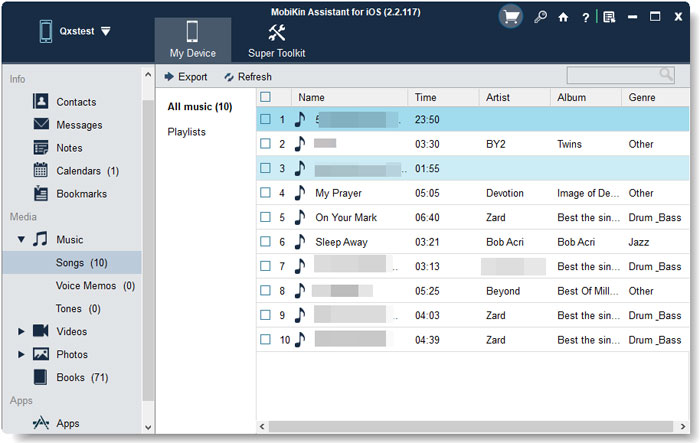
Step 3. Click the "Export" button and choose your USB flash drive as the destination. Then, save the selected music files to the flash drive.
Here is a video tutorial for your reference:
Final Thoughts
Once you're familiar with the methods shared above, transferring music from iTunes to a flash drive becomes a breeze. When it comes to moving music to your iPhone, whether you choose the official method or use MobiKin Assistant for iOS, it's a simple process.
However, MobiKin Assistant for iOS stands out as a more powerful tool. It lets you preview and select your music before transferring, giving you more control. Plus, it helps you manage and edit your iOS data on your computer. You won't know how useful it is until you try it—so go ahead and download it to see for yourself!
FAQS on iTunes Music Transfer to a USB Stick
Q1. Why can't I move music from iTunes to a USB drive?
If you're unable to transfer music from iTunes to a USB drive, it's important to check that you have full access permissions to the USB drive. Also, keep in mind that when using iTunes, you can only transfer music that is organized in folders.
Q2. How do I move music from iTunes to a USB drive on a Mac?
You can use Assistant for iOS (Mac Version) or iTunes on your Mac for this task. Simply install one of these programs, follow the steps to transfer your music, and you'll be able to move your iTunes music to the USB drive easily.
Q3. Can I play music from my USB drive on devices other than my computer?
Yes, you can! With an OTG (On-The-Go) cable, you can play your music on your phone or tablet. You can even listen to it in your car, as long as your car's system supports USB connections.
Related Articles:
How to Transfer Music from iTunes to iPhone Like a Pro
How to Transfer Photos from iPhone to Computer?
