[8 Solutions] How to Get Rid of iPhone Backup Failed Notification?
Dealing with the vexing "iPhone Backup Failed" notification can be a perplexing experience for many users. This alert often surfaces due to varied reasons such as insufficient storage, network instability, or outdated software. As users strive to secure their valuable data, understanding the nuances behind this notification becomes paramount.
This post aims to unravel the common triggers of iPhone backup failures and sets the stage for effective solutions. Whether it's optimizing iCloud settings, rebooting the device, or exploring alternative backup methods, this exploration navigates through the avenues to resolve the persistent challenge of iPhone backup failures.
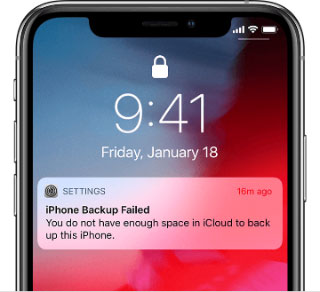
Part 1. Why iPhone Backup Failed Notification Won't Go Away?
Encountering iPhone backup failure notifications can be frustrating, but troubleshooting steps can help resolve the issue. Firstly, let's identify the potential causes behind these notifications.
- Insufficient Storage: The primary reason for iPhone backup failures is often insufficient storage space. iPhones require adequate free space for proper backups. If space is low, consider deleting files or apps to free up storage.
- Unstable Network Connection: Another possible cause is an unstable or weak internet connection. If connected to a slow or unreliable Wi-Fi network, switching to a more robust connection may resolve the backup issue.
- Outdated iOS Version: Outdated iOS versions can contribute to backup problems. Ensure the device is running the latest iOS version. If the device is jailbroken, restoring it to factory settings might be necessary for a successful backup.
- Locked or Disabled iCloud Account: Issues with the iCloud account, such as being locked or disabled, could be the culprit. Contacting Apple Support may be necessary to address and resolve such account-related problems.
These steps can be followed to address and resolve the iPhone backup failed notification.
Can't Miss:
- [3 Methods] How to Backup Text Messages on iPhone Effectively?
- [Full Guide] How to Transfer Videos from PC/Mac to iPhone
Part 2. How to Get Rid of iPhone Backup Failed Notification
Method 1. Turn off iPhone Backup Failed Notification
When your iPhone encounters issues backing up to iCloud, it triggers the "iPhone Backup Failed" notification. To avoid this message, a quick workaround involves disabling the iCloud backup function entirely. However, if automatic iCloud backups are essential, you can explore alternative methods.
For a direct solution to prevent the iPhone Backup Failed message, simply turn off the "iCloud Backup" function. By doing so, iCloud won't attempt to create backups when your iPhone is locked, charging, and connected to Wi-Fi.
To disable iCloud backup, navigate to Settings > [your name] > iCloud > iCloud Backup, and toggle off the iCloud Backup option.
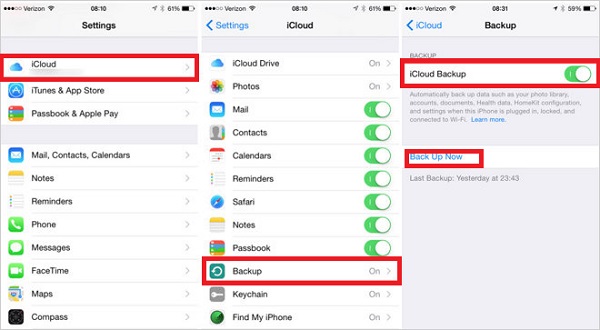
Note: For enhanced data security, consider backing up your iPhone to a computer. Refer to the following part 3 to learn how to back up all iPhone content or select specific files.
Method 2. Free Up iCloud Storage
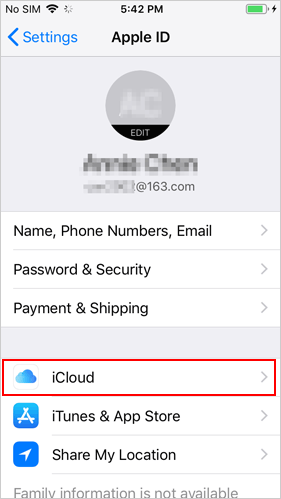
The primary cause for receiving this notification is insufficient space in your iCloud storage. Follow this step-by-step guide to clear iCloud storage and eliminate the notification:
- Open "Settings" and click on your profile.
- Navigate to "iCloud" and choose "Manage Storage."
- Disable backup for select applications. This action will halt the appearance of the notification.
Method 3: Log Out of iCloud and Log Back In
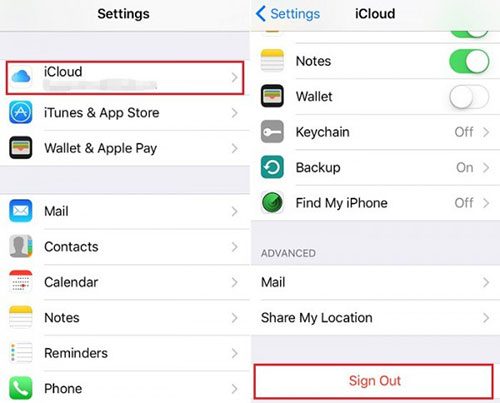
To address this issue, the initial step is to log out and then log back into your Apple ID. Follow these steps:
- Open the "Settings" app on your iPhone and tap on your name at the top.
- Scroll down and choose "Sign Out" at the bottom of the screen.
- Enter your Apple ID password and opt for "Turn Off."
- Confirm the sign-out by tapping "Sign Out."
- Sign in again and check if the notification ceases.
Method 4: Reboot Your iPhone
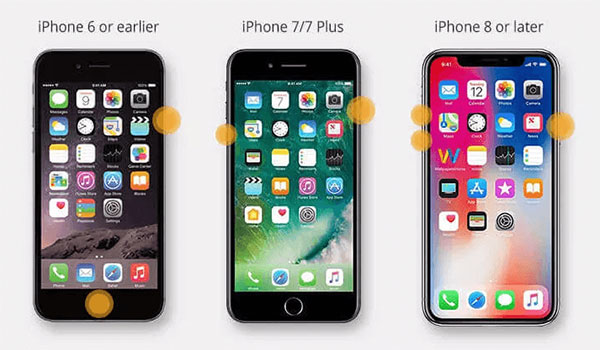
When faced with any issue, a simple yet effective method is to restart your iPhone. Start by attempting a regular restart. If that doesn't resolve the problem, opt for a hard restart:
- For iPhone 8 /X/XS/XR/11/12/13/14: Press and release the Volume Up button, then the Volume Down button, and finally, press and hold the Side button until the Apple logo appears.
- For iPhone 7/7 Plus: Hold down the Power and Volume Down buttons until the Apple logo emerges.
- For iPhone 6/6s and earlier models: Press and hold the Home and Power buttons until the Apple logo appears.
Method 5: Reset Network Settings
Another approach to tackle this issue involves resetting your network settings. However, it's important to note that this action will erase stored Wi-Fi passwords, VPN configurations, and other network settings. Follow the steps below to reset network settings on your iPhone. (iPhone won't connect to WiFi?)
- Launch the "Settings" app on your iPhone.
- Tap "General" and scroll to the bottom to locate "Reset."
- Select "Reset Network Settings" and input your device passcode, if prompted.
- Confirm the reset by choosing "Reset Network Settings" once again.

Method 6: Upgrade iOS to the Latest Version
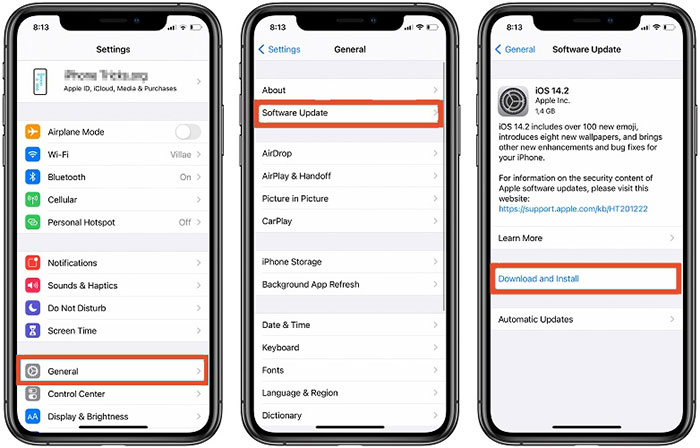
If the previous solutions prove ineffective, consider updating iOS to the latest version to address the iPhone/iPad backup failure issue. To verify and install the latest updates:
- Open Settings on your iPhone.
- Navigate to General > Software Update.
- If an update is available, proceed to install it.
Method 7: Seek Assistance from Apple Support
When none of the aforementioned methods yield results, your final recourse is to reach out to Apple Support. If your iPhone is within the warranty period, they will investigate and address the issue promptly, adhering to their policies.
Guess you like:
- How to Transfer Photos from Mac to iPhone? [6 Easy Ways Included]
- [Easy Guide] How to Download Video from Google Drive to iPhone Easily?
Part 3. An Alternative Way to Back up Your iPhone Successfully
While iCloud remains a popular choice for Apple users to back up their data, its free plan is limited to 5GB. Beyond this threshold, additional storage incurs a cost, prompting some users to explore third-party backup solutions.
If you find yourself seeking an alternative for backing up your data, consider MobiKin Assistant for iOS —an iPhone transfer software. This high-end application boasts a user-friendly interface coupled with extensive versatility. Here are some noteworthy features you can enjoy with this software.
Assistant for iOS - Flexible Way to Back Up iPhone
- Effortlessly back up your iPhone data to your computer with a single click, whether you wish to save all or specific items.
- Support for backing up nearly all types of iDevice data, including videos, photos, music, contacts, messages, and more.
- Preview and restore any item from the backup to any iOS device as needed.
- Directly edit, delete, and manage iOS data on your computer.
- Compatible with a wide range of devices, spanning from iPhone 4 to iPhone 15, as well as all iPad and iPod touch generations.
How to remove iPhone backup failed notification by using Assistant for iOS to back up your iPhone?
Selective iPhone Data Backup:
Step 1. Launch Assistant for iOS and link your iPhone to the computer via a USB cable. The software will identify your device and showcase it on the main interface.

Step 2. Pick the file categories for backup from the left sidebar. The software will then scan your device, retrieving all content within those chosen categories.
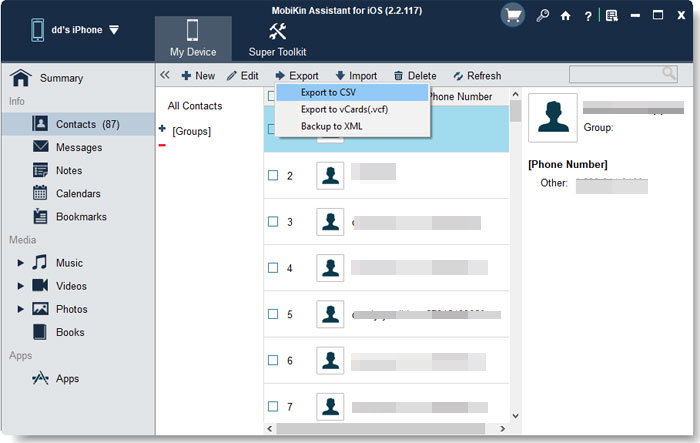
Step 3. Select the files you wish to back up, then click "Export" in the top menu bar to commence the backup process.
One-Click iPhone Data Backup:
Step 1. Open Assistant for iOS and connect your iPhone to the computer. Navigate to "Super Toolkit" in the top menu, where an interface will appear.
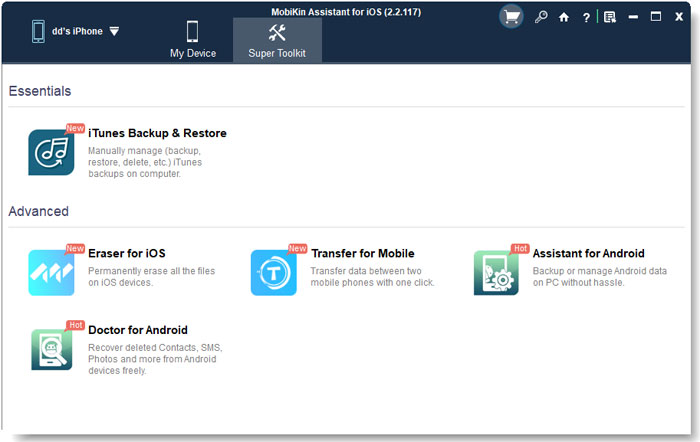
Step 2. Choose "iTunes Backup & Restore" > "Backup" and specify the device for backup. Indicate the location to store the backup files.
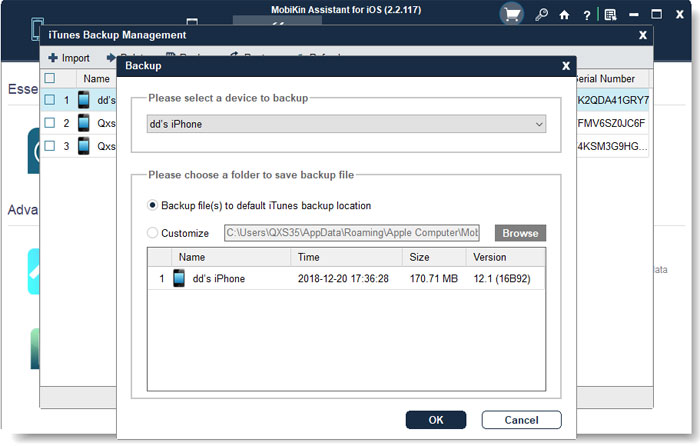
Step 3. Click "Backup" to initiate the process, ensuring your iPhone, iPad, or iPod remains connected throughout the backup.
Video guide:
Part 4. FAQs of How to Get Rid of iPhone Backup Notification
Explore some essential FAQs before you leave:
Q1. How much storage is necessary for iPhone backup?
The storage needed for your iPhone backup aligns with the amount of data you intend to secure. Typically, a 128GB iPhone requires 50-100GB of storage space.
Q2. How long should an iPhone backup take?
The time needed for an iPhone backup varies based on factors like internet speed, data size, and device battery. Generally, iCloud and iTunes backup durations are uncertain, but iCareFone backups typically complete within 30 minutes, ensuring a swift process.
Q3. How to delete a failed iPhone backup on Mac?
To delete a failed backup on your Mac, initiate Finder and select your device. Next, click on Manage Backups to access a list of your backups within the General tab. Right-click on the specific backup you wish to remove and choose the Delete option for its deletion.
Q4. How to delete a failed backup in iTunes?
To eliminate a failed iTunes backup, launch the iTunes application on your computer. Navigate to Edit, then Preferences. Within Preferences, access the Devices tab and choose the backup file for deletion. Once selected, click on Delete to remove the backup file.
Final Words
That covers the steps to stop iPhone backup failed notification. Has this information addressed your issue? If it has, consider sharing it to assist others. Alternatively, feel free to leave a comment with any additional thoughts or ideas you may have. Your input is valuable!
Related Articles:
12 Best iPhone Contacts Managers You'll Wish You Knew Sooner
iPhone Music Transfer: How to Transfer Music from iPhone to Computer Freely?
How to Transfer Contacts from iPhone to Computer?
How to Transfer SMS (Text Messages) from iPhone to Computer?
[Stepwise Guide] How to Back up Photos from iPhone to PC/Mac/Cloud?


