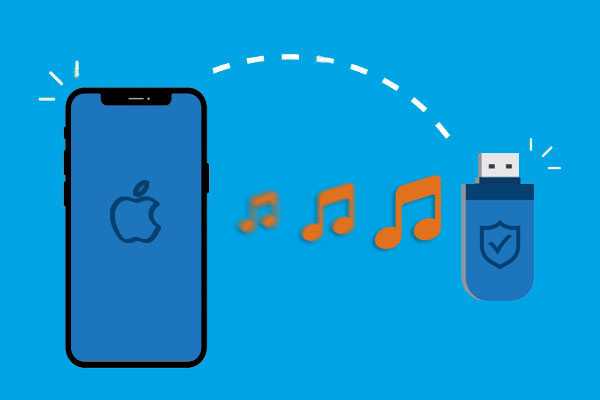
[4 Proven Tips] How to Transfer Music from iPhone/iPad to Flash Drive?
The songs saved on the iPhone are always your favorites. But storing too many music files on the iOS device will take up the limited storage space on the device. And saving the files directly on the iPhone will face the danger of losing them at any time. Therefore, transferring music from iPhone to computer or a flash drive is a good way to reduce the storage pressure on your iPhone and ensure the safety of your music files.
Regardless of the reason, as long as you want to transfer music from iPhone/iPad/iPod to flash drive, you can use the five quick solutions provided in this guide to let you complete the task easily. Please read on for more details.
- Part 1: Can I Transfer Music from iPhone/iPad to Flash Drive?
- Part 2: Transfer Music from iPhone/iPad to Flash Drive with Assistant for iOS
- Part 3: Move Music from iPhone/iPad to USB Flash Drive via Windows Explorer
- Part 4: Transfer Songs from iPhone/iPad to Flash Drive with iTunes
- Part 5: Transfer Music from iPhone/iPad to USB Flash Drive via iCloud
Part 1: Can I Transfer Music from iPhone/iPad to Flash Drive?
How to transfer songs from iPhone to flash drive is what more and more iPhone and iPad users want to know. Why is this demand increasing?
- The storage space of iPhone or iPad is limited, and storing a large number of songs on the device will take up more space. You may need to transfer some songs to the flash drive to free up storage space on your device.
- Transfer music from ipod, iPad, iPhone to USB flash drive is a good way to back up music files. Because mobile devices will inevitably encounter various accidents which will lead to data loss. Once the backup is done, you will not lose any songs even if there is any problem with the iPhone.
- Once you transfer music from phone to flash drive, you can easily and conveniently share your songs with your family and friends, and you can even play music directly on any device equipped with a USB port.
So here comes our concern: is it possible to transfer music from iPhone to flash drive? The answer is YES! Now we introduce three different methods and tools to help you transfer music from iPad/iPod/iPhone to flash drive effortlessly.
Guess You Like:
Part 2: Transfer Music from iPhone/iPad to Flash Drive with Assistant for iOS
Apple has set restrictions on music transmission, so we need third-party software to achieve this. This is when MobiKin Assistant for iOS comes into play. This is a program that can transfer and manage iPhone music, as well as other more types of content on iOS devices without using iTunes. This is an easy way to transfer music from iPhone to flash drive and computer without iTunes.
Unique Features of MobiKin Assistant for iOS
- With the user-intuitive design, you can finish the music transfer in only a few clicks.
- It allows you transfer selective songs or export all songs with one click.
- It lets you preview the scanned out files and select the ones you want to transfer.
- It can transfer songs downloaded or purchased from different sources.
- Support to transfer Photos, Videos, Notes, Contacts, SMS, Books, Safari Bookmarks, Music, Voice Memos, etc.
- All iOS devices supported, including iPhone 16/15/14/13/12/11/X/8/7/6, as well as all generations of iPod touch, iPads, etc.


How to transfer songs from iPhone to flash drive/USB drive with Assistant for iOS:
Step 1. Connect iPhone to your computer
Install and launch Assistant for iOS on your computer. Connect your iPhone or iPad to the computer via a USB cable. Also, don't forget to plug in your flash drive to the computer.

Step 2. Enter the music managing page
Choose the "Music" tab from the left sidebar to enter the music managing page. Here, all music files on your iPhone will be scanned out and displayed. You can preview them and mark whatever you want.
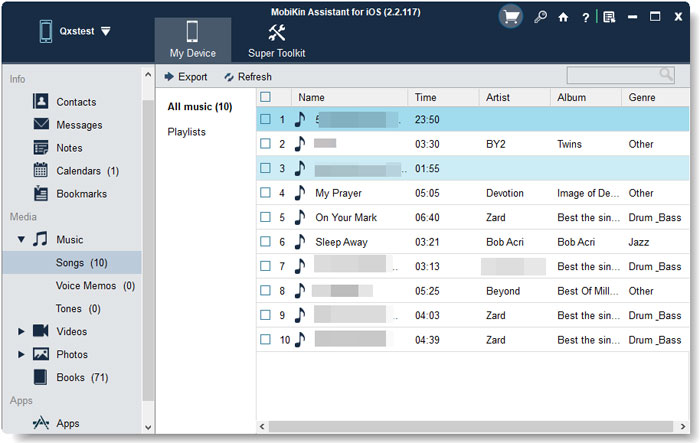
Step 3. Transfer music from iPhone to flash drive
After selecting all the songs you want, tap "Export" from the top menu, choose the connected flash drive as the output location, and then all the selected songs will be saved into the flash drive immediately.
Video Guide:
Part 3: Transfer Music from iPhone/iPad to USB Flash Drive with Windows Explorer
The next method is to manually transfer music from iPhone, iPad or iPod to a USB flash drive by using Windows Explorer. The required items have an Apple USB cable, an iOS device and a computer.
- Connect your iPhone or iPod to the computer with an Apple USB cable. The connected device will be displayed in the "My Computer" window.
- Connect the flash drive to this computer. Please make sure that this flash drive has enough space to store the music on your iPhone.
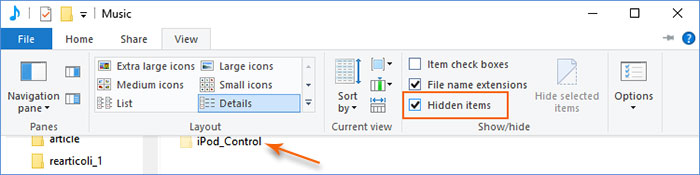
- In the Window Explorer under Tools, select "Tools" > "Folder Options" > "view". Then select "Display hidden files and folders" in the drop-down options.
- Go to the "My Computer" window and double-click to open the iPhone or iPod. Taking iPod as an example, you will find a folder named "iPod _ Control".
- Double-click the folder, you will see all the music files on the device. Copy all the music you want to transfer.
- Open the connected flash drive, create a new folder or select an existing folder, and then paste the selected music into this folder.
You May Also Like:
Part 4: Transfer Songs from iPhone/iPad to Flash Drive with iTunes
iTunes makes it easy to transfer purchased music from your iPhone or iPad to an external hard drive.
- Make sure you have the latest version of iTunes installed on your computer. Then, sync the songs on your iPad to iTunes.
- Plug your iPad into your computer and open iTunes. When prompted, tap "Trust" on your device to allow the connection.
- In iTunes, give your computer access to your iTunes account by going to "Account" > "Authorizations" > "Authorize this Computer".
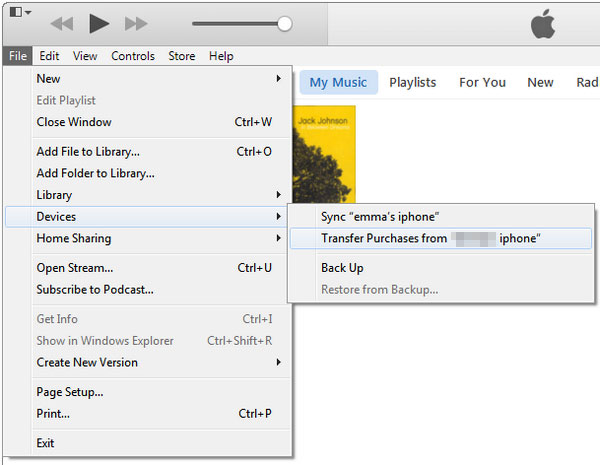
- Transfer your purchased songs to iTunes by clicking "File" > "Devices" > "Transfer Purchases from [your device name]".
- Go to the "Recently Added" section to view your songs. To download them to your computer, select the song and click the "Download" button.
- If you don't see the Download button, right-click the song and select "Show in Windows Explorer" (or Finder on a Mac) to find the music file on your computer.
- Finally, copy and paste the songs from your computer to your external hard drive.
Part 5: Transfer Music from iPhone/iPad to USB Flash Drive via iCloud
If you subscribe to Apple Music, you can use iCloud to transfer music from your iPod touch to a USB flash drive. Just make sure your device is running the latest iOS version. (How to Restore Apple Music Library on iPhone/Mac?)
- On your iPhone or iPod, go to "Settings" > "Music" and turn on "Sync Library".
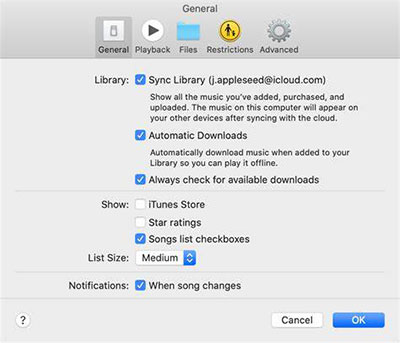
- Open iTunes, go to "Edit" > "Preferences" > "General" and check the box next to "iCloud Music Library" to enable it. Click "OK" to confirm.
Once iCloud Music Library is turned on, all your music will be synced between devices signed in with the same Apple ID. The syncing process may take a little time, so make sure you have a stable internet connection. After the songs are synced, you can download them and transfer them to your USB flash drive.
Remember, if you make any changes to your music on one device (such as deleting a song), it will be reflected on all devices connected to iCloud Music Library, including iTunes and your iPhone.
Conclusion
Although all the above options are suitable for transferring music from iPhone to flash drive, you must carefully compare and determine which tool is best for you. As you can see, with the help of MobiKin Assistant for iOS, backing up and managing iPhone/iPad music is as easy as ABC. If you have any questions, please feel free to leave a comment and we will get back to you as soon as possible.
Related Articles:
How Can I Transfer iPhone Files to Flash Drive?
How to Transfer iTunes Library to External Hard Drive?
Five Easy Ways to Transfer Photos from Phone to Laptop without USB
[Solved!] How to Transfer Photos from iPhone to iPhone without iCloud?
