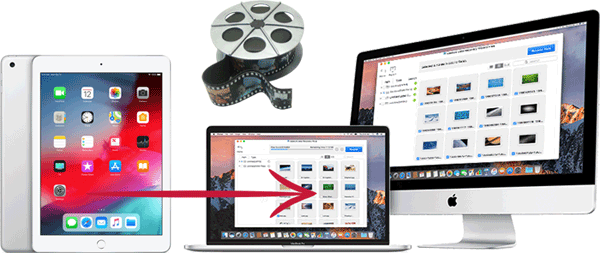
Top 6 Methods to Transfer Videos from iPad to Mac/MacBook
Have you ever recorded videos on your iPad and wanted to transfer them to your Mac to edit them in iMovie, Final Cut Pro, or other software? Or maybe your iPad is running out of space and you need to move your videos to free up storage. What's the problem? While you can easily transfer videos shot with your iPad's camera, moving downloaded or purchased videos isn't as simple. iTunes only allows videos to be synced to your iPad, not transferred back to your Mac.
So, how to transfer videos from iPad to Mac? This guide will walk you through the best ways to back up and transfer your videos, whether they're personal recordings, online downloads, or iTunes purchases.
- Part 1: Transfer Videos from iPad to Mac with Assistant for iOS [Recommended!]
- Part 2: Transfer Movies from iPad to Macbook with E-mail
- Part 3: Get Videos from iPad to Mac via Preview
- Part 4: Transfer Movies from iPad to Mac with Image Capture
- Part 5: Transfer Video from iPad to Mac with iPhoto
- Part 6: Transfer Videos from iPad to Mac with iTunes
Part 1: How to Transfer Videos from iPad to Mac with Assistant for iOS
Mobikin Assistant for iOS (Mac Version) is developed for Mac users to transfer videos, music, contacts, SMS, photos, books and other types of files from iOS devices to Mac computers. It is worth mentioning that it can not only export videos from the camera roll, but also other folders such as movies, TV shows, etc. You can easily preview all the videos on your iPad and then quickly transfer them to Mac.
Mobikin Assistant for iOS has many other advantages:
- Transfer videos from iPad, including large-size videos, to Mac in a fast and simple way.
- Import data from computer to iPad, iPhone.
- Easily and comprehensively manage iOS music, videos and photos on Mac.
- Ability to manage iTunes backup directly on Mac.
- Uninstall any application on iPhone, iPad or iPod with just one click.
- It supports all models of iPad, including iPad 10/9/8/Pro/Air/mini/2/1, as well as iPhone and iPod touch.


Steps to transfer videos from iPad to Mac with Mobikin Assistant for iOS:
Step 1: Launch the Program and Connect Your Device
After the download is complete, launch the program directly and there would be an interface shown on your Mac requires link to your device. Please use USB cable to connect them together. After your iPad is detected successfully, you would see the interface as below.

Step 2: Preview Videos and Select Your target Files
Click "Videos" in the left panel so that you could preview the videos in the right panel. Select the videos that you want to transfer to the Mac computer to move on the next step.
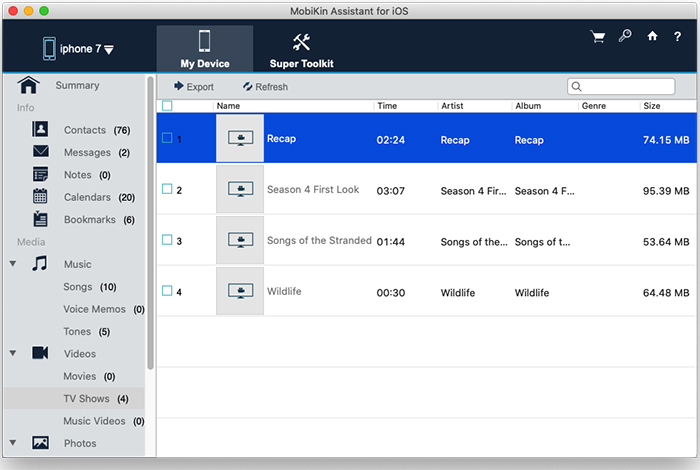
Step 3: Start and Finish the Transfer from iPad to Macbook
When the selection is done, please click on the "Export" button on the top to start the transferring from ipad to mac. The target videos would be backup on your Mac without losing quality soon.
Video Guide:
Part 2: Transfer Movies from iPad to Mac with E-mail
Import and download files such as Movies with E-mail would be helpful and needs no software or USB cable. However, this method does needs good Internet connection, especially when your target camera videos or movies files are too long or too many which will be very troublesome in the process of transferring from ipad to Macbook Pro. (How to Transfer Large Videos from iPhone to PC?)
Below are some steps should be took to transfer movies from iPad to Macbook with E-mail:
- Login one of your E-mail account. You could use the Mail app on your devices as a example. All E-mail accounts work.
- Select the movies files you want to transfer to on your iPad and send the email to yourself with the movies as attachments.
- Login the same E-mail account you sent the movies to on your Mac. Check the email and download the movies from it.
Part 3: How to Get Videos from iPad to Mac via Preview
Preview is a pre-download software in all Mac, developed by Apple. It performs lots of functions, including view and annotate PDFs, fill out and sign forms, edit images, share your file, export a password-protected PDF, or export images in variety of file types and etc. You could transfer videos and other files from your iPad to Mac via Preview.
Steps to Get Videos from iPad to Mac via Preview:
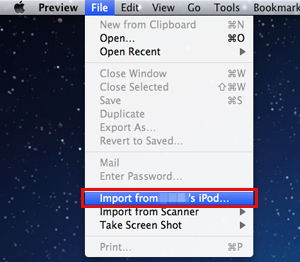
- Using a USB cable to connect your iPad with Mac OS X and run the Preview program.
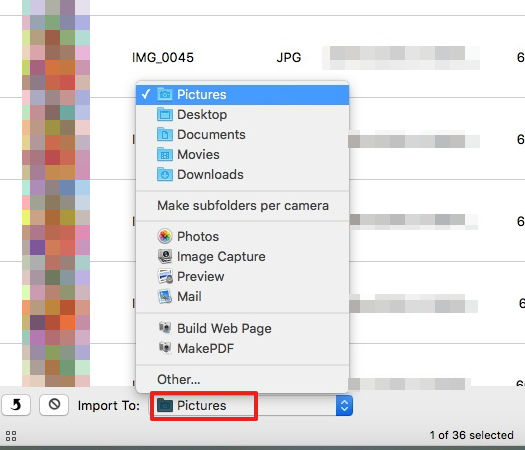
- Click on the "File" button in the top bar and select "Import from your iPad".
- Select the target videos and click "Import" button on your screen.
- Select the destination folder where you save these files. It would take some time before the transfer is finished, which depends upon the number of videos.
You can also click to learn:
Part 4: How to Transfer Movies from iPad to Macbook Pro with Image Capture
Image Capture is also a built-in software on Mac OS X which allows you to transfer and upload the videos from the iPad to Mac which is either connected directly to the computer or the network.
Below shown are the necessary steps to transfer videos from iPad to Mac by using Image Capture:
- You need to use USB cable to connect iPad to Mac. After Connection, launch the Image Capture on your Mac, which has already pre-installed on all Mac computers.
- Select iPad as your device. Then, select the videos that you wish to transfer to on the right side of the panel where the all images and videos present on your iPad should be shown.
- Press "Import" to start the transfer. Remember to choose the output folder where you wish to save the selected video on your Mac. A tick mark would display in once the video is transferred successfully.
Part 5: Transfer Video from iPad to Macbook Pro with iPhoto
iPhoto is another software that has been already installed on your Mac. It can also realize the transfer between the iOS and OS X devises.
Here are the steps to transfer videos from iPad to Macbook with iPhoto:
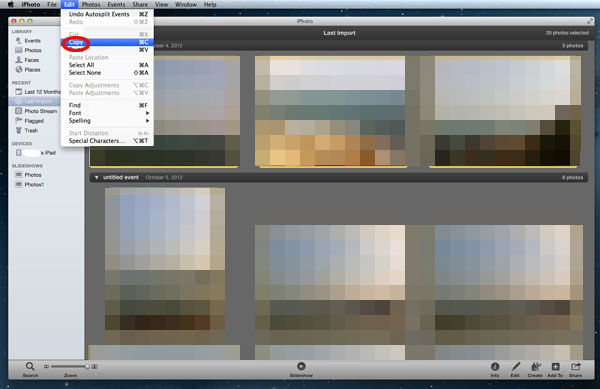
- Connect your ipad with Mac via USB cable and run iPhoto on your Mac.
- Find your iPad device in the left panel under "DEVICES" and click on it. Your photos and videos would be display on the right side into iPhoto library.
- Choose to import selected or all videos you want to transfer to. Press "Edit" and the "Copy" on the following submenu to start the transfer.
Part 6: How to Transfer Videos from iPad to Mac with iTunes
While iTunes also can be used to transfer videos from iPad/iPhone to iTunes library on Mac, it can only work at the range of the purchased videos because of the copyright issue. Therefore, iTunes is not recommended to transfer videos if they are from other resources. (How to Transfer Videos from PC to iPhone with iTunes?)
Steps to transfer videos from iPad to Mac with iTunes:
- Launch the iTunes on your Mac and make sure your iTunes already has been updated to the latest version.
- Connect your iPad to Mac with an USB cable.Then, select "File" and "Devices" below on the top manu of iTunes.
- Choose "Transfer Purchases from your iPad" and start the transfer.

Conclusion
Obviously, MobiKin Assistant for iOS (Mac version) has obvious advantages in all of the above methods. Other methods either require good network connection or have other disadvantages, such as file size requirements, slow transmission speed, and so on. And Assistant for iOS gives you the most direct and fastest transfer experience. Choose it and you no longer have to worry about how to transfer videos from iPad to Mac. I hope you find the above article useful. Any comments or suggestions are welcome.
Download and try the powerful Assistant for iOS right now!
More Readings:
How to Transfer Photos/Videos from iPad to External Hard Drive
How to Transfer Videos/Movies from iPad to Computer? [5 Easiest Ways]
How to Send Large Size Videos & Photos from iPhone Effectively?
How to Transfer Video from iPhone to iPad on Windows or Mac OS X?
