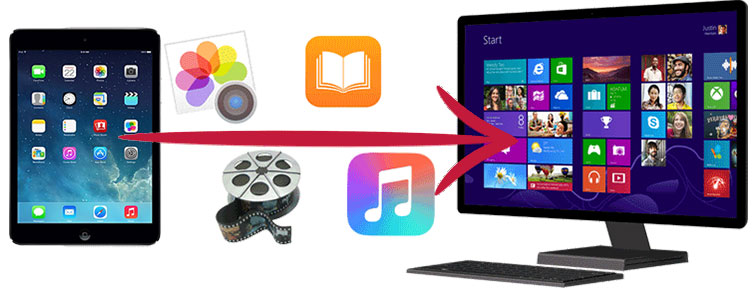
How to Sync iPad to New Computer without Losing Existing Data?
"How to sync iPad with new computer without erasing? My old computer which was used to sync the iPad is dead and I bought a new one. I want to sync iPad Pro with the new computer. How can I accomplish this?"
- Posted on discussions.apple.com
When you upgrade your computer to a new version, you may need to sync your iPad with the new system, especially if your iPad has been synced with the old computer before. This can be a bit tricky and stressful, especially if you have a lot of data on your device and you are worried about losing it. To make the process easier, we will share the best ways to sync iPad to a new computer without risking data loss.
We will introduce you to multiple ways to sync iPad to a new computer, both with iTunes and without iTunes. Read on to choose the best option for you.
Part 1: Sync iPad to New Computer Using Assistant for iOS
To sync iPad to computer without erasing, we can draw support from MobiKin Assistant for iOS, a highly recommended iOS device manager program to complete the data syncing process easily and safely without any data loss. As the best alternative to iTunes, Assistant for iOS enables you to transfer iPad to new computer, and vice versa. What's more, it helps you to manage your iPad/iPhone/iPod data on computer like deleting iPad photos, editing iPhone contacts, etc.
Why choose MobiKin Assistant for iOS:
- Sync iPad to a new computer, including contacts, photos, music, messages, videos, iBooks, bookmarks, notes, apps, calendars, and more.
- Preview data before transferring.
- Transfer files from iPad to computer, export/import, and manage your iOS data on PC and Mac.
- Backup and restore data between your iDevices directly.
- Import iTunes backups to your device selectively, or delete any unwanted iTunes backups as you need.
- Fully compatible with iPad 10/9/8/Pro/Air/4/mini/the new iPad/iPad 2, and all models of iPhone and iPod touch.


How to sync iPad with new computer without iTunes using Assistant for iOS? Below are the detailed steps.
Step 1: Connect iPad to a new computer
First of all, download and install Assistant for iOS on your new computer. Launch it and connect your iPad to the new computer via a USB cable. Once the connected iPad is detected by the software, the iPad information will be displayed in the main interface.

Step 2: Scan the iPad for specific files
All iPad data will be categorized on the left side of the program screen. Choose one category from the left, the contained files will show up in the right part of the window. You can preview and select the files you want to sync to the new computer.

Step 3: Start to sync iPad to new computer
After selecting the files you want to transfer, you can click "Export" on the top menu to transfer the selected files from your iPad to the new computer. When the data syncing is done, you can check the transferred files in the destination folder.
Video guide:
Part 2: Transfer iPad to New Computer with iTunes
Once you connect your iPad or other iOS devices to a new PC or Mac, iTunes will prompt you to "Remove and sync" with this iTunes library. Once this is done, all data on your iPad will be erased. Therefore, if you accept the result of the iPad data being erased, then you can follow the steps below. And you'd better back up the content on the iPad before you start.
How to move iPad to new computer via iTunes:
- Install and launch iTunes on your new computer. Connect your iPad to the computer via a USB cable.
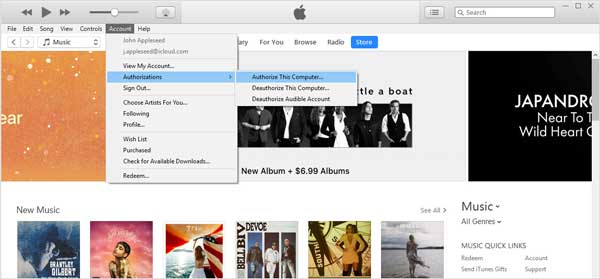
- Authorize the new computer using your Apple ID by going to "Account > Authorizations > Authorize This Computer." Enter your ID and password and click "Authorize" when it pop-up.
- Set up your iPad for syncing by going to "Account" > "Sign-In". Sign into with your Apple ID and password.
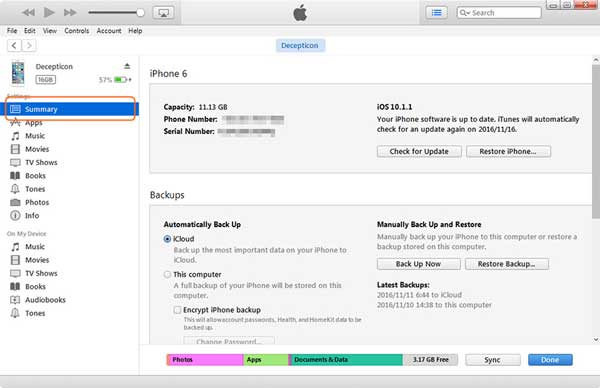
- Click on the device icon at the upper left corner of the iTunes window and choose the "Summary" option.
- You can now click on the "Back Up Now" button on the right Backups section to begin the iPad syncing process.
- When the backup has been completed, you can simply click "Done" button on the bottom right, and now you can manage files through iTunes on the new computer.
Guess you like:
Part 3: Move iPad to New Computer By Finder
Apple has retired iTunes on the latest macOS and replaced it with Finder, the Apple Music app, and a few other features. However, you can still use Finder to back up and sync your iPad with your computer.
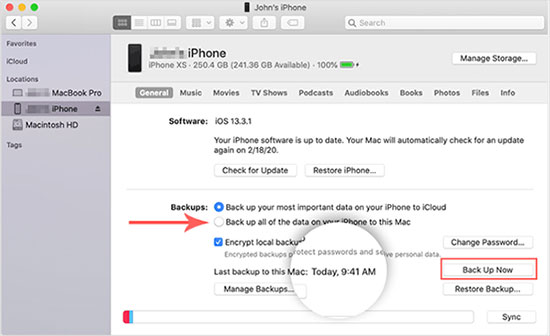
- Open Finder on your Mac and tap "Trust" on your iPad when prompted to allow the connection.
- Click the device icon in Finder and select your iPad from the list on the left.
- On the right, select the type of data you want to sync. Check the box next to "Sync [data] to iPad".
- Click "Sync" to start the process.
If you prefer, you can also sync your iPad wirelessly by going to "Finder > General" and checking "Show this iPad on Wi-Fi".
For wireless syncing, iCloud is a good option, especially if you use the same Apple ID across devices. In the next section, we'll explain how to use iCloud on Windows and Mac.
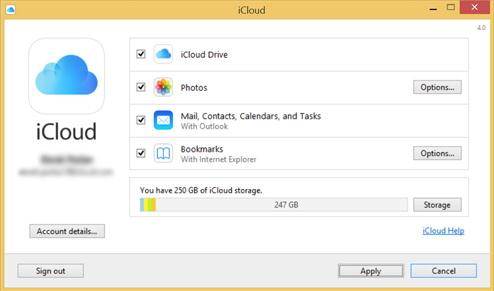
Part 4: Sync iPad to New Computer via iCloud for Windows
With iCloud for Windows, you can easily sync and download data across multiple devices. You can choose to sync all your data or just select the items you want to update. Here's how to sync iPad to a new computer using iCloud for Windows:
- Download and install iCloud for Windows on your computer, then open it. You'll need to log in to your Apple ID account.
- Set up iCloud and choose the type of data you want to sync, such as photos, documents, and more. ([Uploading to iCloud Paused?)
- On your iPad, go to "Settings" > [your name] > "iCloud" and make sure your data is set up to sync with your computer.
If you're using a Mac, you don't need to download anything extra. iCloud is built in, so you can easily sync your iPad data to your new Mac without taking extra steps. Refer to the steps below for details.
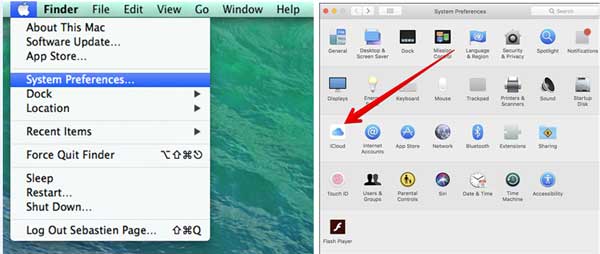
Part 5: Transfer iPad to New Computer via iCloud on Mac
With iCloud, you can sync data between iPad, Mac, and other Apple devices, as well as iCloud for Windows after granting permission. Here's how Mac users can sync iPad data to a new Mac using iCloud:
- On iPad, go to "Settings" > [your name] > "iCloud", and turn on the data you want to sync (such as photos, contacts, and documents).
- On Mac, click "Apple menu" > "System Preferences" > "Apple ID" > "iCloud", and sign in with your Apple ID.
- You'll see a list of available data that can be synced to your Mac. Simply select the data you want to sync, and the data will be automatically transferred.
Summary
That's all! Each of the solutions mentioned here are easy to follow and have been proven to be effective. You can try them as per your requirement. The best solution is to use the third-party software MobiKin Assistant for iOS. On the one hand, it can ensure that files are transferred between the computer and the computer without losing the existing data on the device; on the other hand, in addition to data synchronization, it also provides a more convenient and direct iPad file management function.
With Assistant for iOS, it is very easy to sync iPad to new computer. If you are not a big fan of iTunes, you can use this software to handle transfer tasks and manage your iOS device in a more effective way.
Relative Articles:
Top 3 Ways to Transfer Music from iPhone to Computer for Free
How to Transfer Large Videos from iPhone to PC
6 Ways to Transfer Photos from Computer to iPhone Effectively
