7 Popular Ways to Back Up and Restore Android Device [Updated]
I went through the whole setup with Smart Switch during initial startup etc. and assumed that this would also transfer data, but it doesn't! This is an exclusive feature of the Google Backup! -- from xdaforums.com
Android-based mobiles have always been a strong force in intelligent terminal devices. Having a device means that you probably won't lead the topic away from "how to back up and restore Android phones or tablets". That's because you would risk data loss when accidental deletion, phone misplacement, or hard reset occurs.
So, is there a terrific method to back up and restore data like contacts, photos, and docs? Well, that's easy! Focus on this passage to get the most anticipated methods now.
- Way 1: Back Up and Restore Android Phone to/from PC in One Click
- Way 2: Back Up and Restore Android Phone/Tablet via Assistant for Android
- Way 3: Back Up and Restore Android Apps and Data to/from PC via File Explorer
- Way 4: Back Up and Restore Android Using Google Drive
- Way 5: Back Up and Restore Data on Your Android Device with Dropbox
- Way 6: Back Up and Restore Data on Android with Samsung Account
- Way 7: Back Up and Restore Android with Easy Backup & Restore
Way 1: Back Up and Restore Android Phone to/from PC in One Click
Want to get a suitable backup and restore software? Take a look at MobiKin Backup Manager for Android (Win and Mac); another name for it is Android Backup & Restore. As a tool tailored for Android users, it is second to none in the industry, considering its simplicity, security, timeliness, and affordability. It can help you back up your entire phone to your computer and restore data to any Android device.
Core features of Backup Manager for Android:
- One-tap to back up and restore an Android quickly.
- Transfer your wanted data types from one Android phone to a PC/Mac and move them to any Android cell phone.
- Apple to such files as contacts, messages, call logs, photos, music, videos, documents, and apps.
- Two connection modes: Wi-Fi and USB.
- Work well with various Android devices with even the latest OSes.
- It won't disclose your privacy.
Section 1 - Back Up:
Step 1. Open the software after you download and install it on your computer. Then connect your Android phone to the computer through a USB cable.
Step 2. You may now need to enable USB debugging mode on Android to have your phone recognized. After that, it will display the screen with "Backup" and "Restore". Just select the former.

Step 3. Pick the data types you'd like to back up. Then specify a location on your computer to get them stored. Finally, tap on "Back Up" to copy Android data to this computer.

Section 2 - Restore:
Step 1. When the software recognizes your Android phone, choose "Restore" from the main screen and check the backup content you've made before.

Step 2. Select your desired file type(s) and tap on "Restore" again to put the items onto the linked device.
Video Tutorial:
My Personal Take:
- Easy backup and restore for various data types.
- Works offline.
- One or more specific data cannot be viewed before backup.
Way 2: Back Up and Restore Android Phone/Tablet via Assistant for Android
If you want to preview the Android content and choose whatever you want to back up, MobiKin Assistant for Android (Win and Mac Version) can also be included in your list of options. Similarly, it plays functions on files like contacts, messages, media files, documents, apps, etc.
In addition to providing a more convenient transmission, it can also perform one-click backup & restore and let you further manage your device on a computer directly.
How to back up and restore Android phone with MobiKin Assistant for Android?
Back Up:
- Download Assistant for Android when you install and open it on a computer.
- Make a physical connection between your Android phone and the computer via USB.
- Get your phone identified by following the specifications on the screen.
- After the recognition, press any data types from the left menu.
- Preview and select the specific files you want to backup.
- Lastly, tap "Export" to back up your chosen files to the computer.

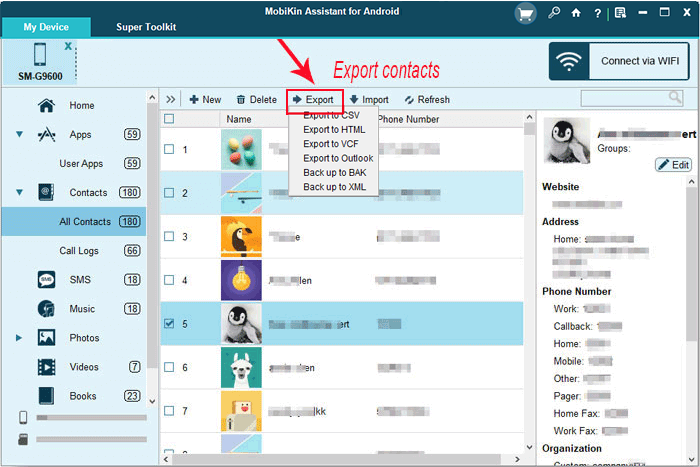
Restore:
- Select any file type from the left menu.
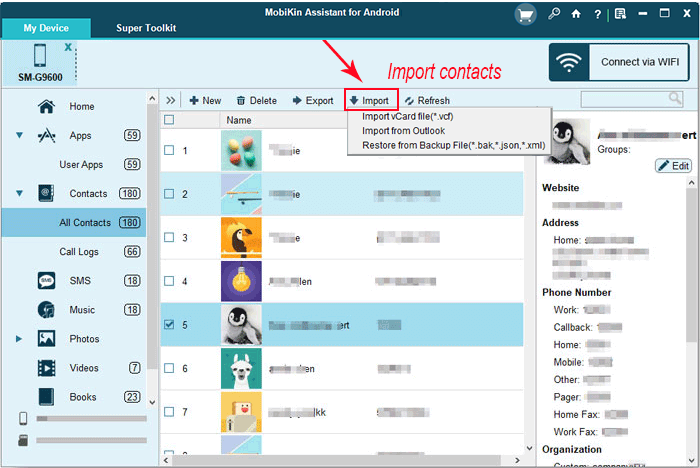
- Tap "Import" at the top screen to choose the backup content from your computer.
- Save the items to restore them to your Android phone.
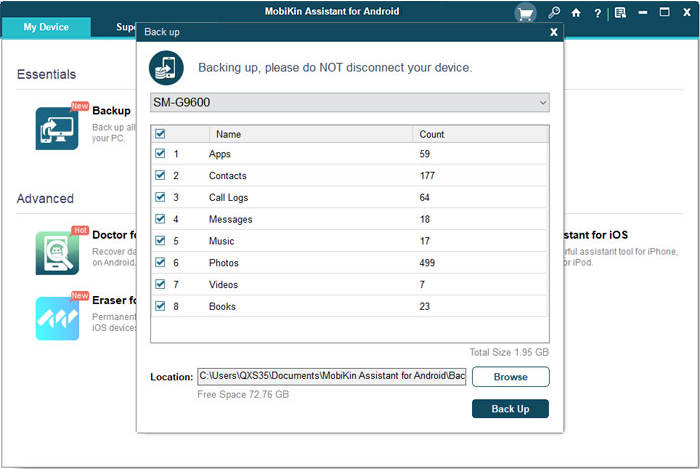
This smart tool also lets you back up and restore Android phones in bulk. Back Up: After the connection and recognition, go to the program's "Super Toolkit" > "Backup" > choose data categories > "Back Up". Restore: tap "Super Toolkit" > "Restore" > select backup files > "Restore".
My Personal Take:
- Can transfer, back up, restore, and even manage a variety of data types.
- Let you choose specific files to back up or restore.
- Full features require a paid license.
Way 3: Back Up and Restore Android Apps and Data to/from PC via File Explorer
File Explorer is a built-in Windows tool for managing files, including transferring files between Android and computers. While it doesn't back up and restore contacts, messages, and call logs on Android, it works for personal files like photos, videos, and documents. Learn how to back up and restore Android media via File Explorer:
- Connect your mobile device to a USB port on your desktop or laptop computer.
- Swipe down the notification panel on your device and locate a notification from the system indicating Charging this device via USB, with an option to "Tap for more options". Select this notification.
- Find the option labeled File transfer and choose it.
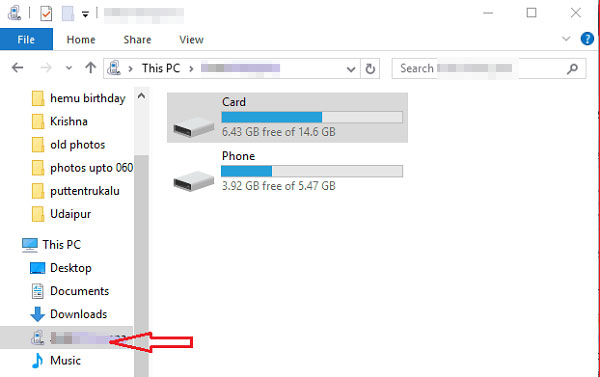
- Access Windows File Explorer and select your device from the left sidebar under "This PC" or "My Computer".
- Navigate through the folders and copy and paste any files you wish to back up.
- To restore files, simply repeat the previous steps and, in the end, copy and paste the desired content from your computer back to your mobile.
My Personal Take:
- No need for additional software or fees.
- Gives full control over which files are backed up.
- Only works for personal media files.
- Requires manual file selection, which can be tedious.
Way 4: Back Up and Restore Android Using Google Drive
To restore a backup from Google Drive, ensure you've backed up your data. By default, backups occur daily or weekly, but if the settings have changed, follow these steps to enable manual backup from your smartphone.
How to back up files on Android tablet/phone and restore them with Google Drive?
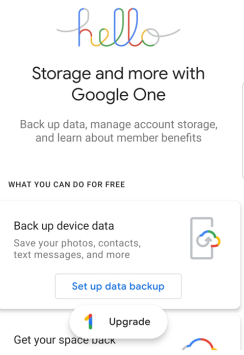
- Back Up: Open Settings on your phone. Go to "Backup and Restore". Select "Backup Data" and enable "Backup by Google One". Tap "Back up now" to back up current data.
- Restore: On the Welcome screen of your new Android device, tap "Let's Go". Select Copy your data (ensure you're connected to Wi-Fi). Choose Backup from the cloud. Sign in to your Google Account and agree to the terms. Select items to restore and tap "Restore".
Note: If you can't restore your phone from Google Drive backup, try these tips: 1. Check your phone's storage and free up space if needed. 2. Verify you're signed in to the correct Google account with the backup. 3. Confirm the backup was completed and synced properly. 4. Visit Google support for further help.
My Personal Take:
- Easy to access and restore data from any device.
- 15 GB of free space.
- May require purchasing additional storage for large backups.
- Doesn't back up certain app-specific data unless configured.
Way 5: Back Up and Restore Data on Your Android Device with Dropbox
Dropbox is a cloud storage service that allows you to store, access, and share files across devices. It offers a seamless way to back up and restore data on your Android device, primarily focusing on personal files like photos, videos, and documents. Let's check out how to back up and restore Android without a PC using Dropbox:
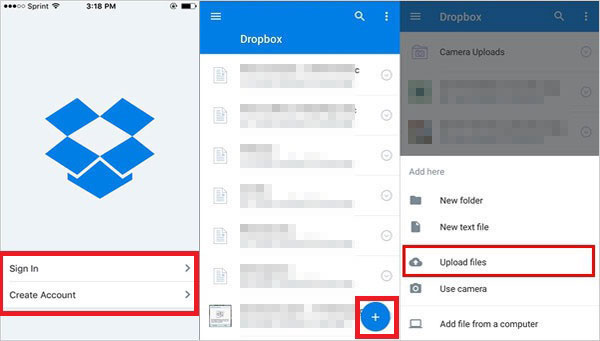
- Back Up: Install Dropbox from Google Play and sign in. Tap the "+" button to upload photos, videos, or documents. Enable "Camera Upload (optional)" in Settings for auto photo/video backup.
- Restore: Restore: Sign In to Dropbox. Browse "Files" and select the ones you want to restore. Download the files to your phone.
My Personal Take:
- Easy to upload and download files like photos, videos, and documents.
- Access files from any device with Dropbox installed.
- No automatic backup for full device data.
- Only 2 GB of free space.
Way 6: Back Up and Restore Data on Android with Samsung Account
A Samsung account gives you the ability to back up your private data and Settings on Samsung and restore them whenever you need. As its name suggests, it is exclusive to Samsung phones/tablets, and you need to register for an account first.
How to back up Android data before factory reset and restore it with a Samsung account?
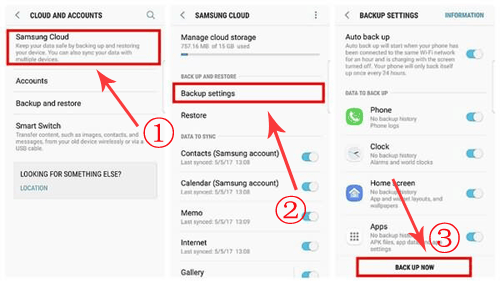
- Back Up: Go to your Samsung phone's "Settings" > "Cloud and Accounts" > "Samsung Cloud" > "Backup Settings" (Log into your Samsung account if needed). Then touch "BACK UP NOW".
- Restore: Head to Samsung's "Settings" > "Cloud and Accounts" > "Samsung Cloud" > check the backup and tap "Restore" > "RESTORE NOW".
My Personal Take:
- Backs up app data, system settings, contacts, messages, etc.
- Data can be restored on any Samsung device.
- Only works with Samsung phones.
- May require a premium plan.
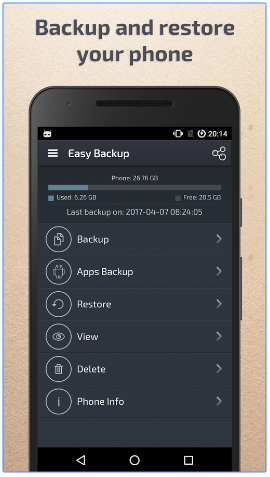
Way 7: Back Up and Restore Android with Easy Backup & Restore
Finally, you also have the option to back up and reset Android with some dedicated apps like Easy Backup & Restore. This ingenious app enables you to copy your Android files in a zip archive format for easy viewing as well as restore them as required. It mainly works for items like contacts, SMS, MMS, call logs, calendars, bookmarks, and dictionaries.
How to back up and restore Android with apps:
- Download and install Easy Backup & Restore on your Android phone.
- Open the app, and you'll be prompted to take a backup of your device; just tap "Yes".
- Back Up: Pick whatever you want from the data types to copy and set a location for the backup. Name the file and click "OK" to trigger the Android sync. Wait until the backup is complete.
- Restore: Run the app and touch the "Restore" when prompted. Then do as the instructions imply to get back your wanted files from the backup you ever created.
My Personal Take:
- User-friendly interface for quick backup and restore.
- Offers a free version with basic features.
- The free version may not provide full backup options.
- It doesn't support backing up all app-specific data.
Keypoint Extraction:
- Methods 1 and 2 are widely applicable, compared with ways 3 and 4, and method 2 can further let you manipulate your Android phone on a larger screen directly.
- Option 5 and 6 require you to have an account and fully rely on the network, which may lead to a sluggish backup and restore.
- The last resort can be implemented with a downloaded third-party app, which might be from some untrusted source with unknown security.
Related Articles:
3 Secure Ways to Erase Android Phone Permanently before Selling It
How to Recover Deleted Files on Android Device? 6 Most Effortless Ways


