Google Photos Not Backing Up? 9 Solutions & 2 Alternatives Here
"New Pixel 6a user here. When I open Google Photos, it says 'getting your photos'. If I click the top right, it says the backup is on with a spinning wheel and 'Getting ready to backup'. I've tried clearing the data, but it doesn't make a difference. Why is my Google Photos not backing up? Any help would be appreciated." -- from Reddit
Google Photos comes with your Gmail account, offering up to 15GB of free storage shared across various Google services like Drive, Gmail, and Photos. It's designed to automatically back up photos and videos, particularly on smartphones running Android or iOS. However, occasional errors can occur in this process. This provides us with the significance of the present article. Let us examine the reasons behind this occurrence and explore various approaches to address it.
Part 1: Why Is Google Photos Not Backing Up on Android/iPhone
Despite the popularity of Google Photos as an image management app, some users are experiencing problems with it not backing up their photos and videos on Android or Android devices. Identifying and addressing these issues can help speed up the backup tasks properly. Before that, let's see some of the main reasons.
* Why is my Google Photos not backing up all photos on iPhone or Android?
- Uploading videos with incorrect format or size.
- Excessive cache and data leading to background freezing.
- Insufficient storage for original quality backups, which necessitates deleting images in Google Photos.
- Temporary network or Google Photos errors.
- Hitting the Google Photos storage limit.
- Technical errors within Google Photos.
- Failure to update the Google Photos app to the latest version.
You Might Also Enjoy:
- How to Recover Permanently Deleted Photos from Google Photos [Simple & Efficient]
- Google Photos vs. iCloud: What Are the Differences Between Them? [2024]
Part 2: 9 Quick Solutions to Google Photos Not Backing Up
Solution 1: Maintain Enough Power
Google Photos photo is not fully backed up yet when your device is low on power. To resolve this:
For Android:
- Go to "Settings > Photos > Battery".
- Disable battery optimization.
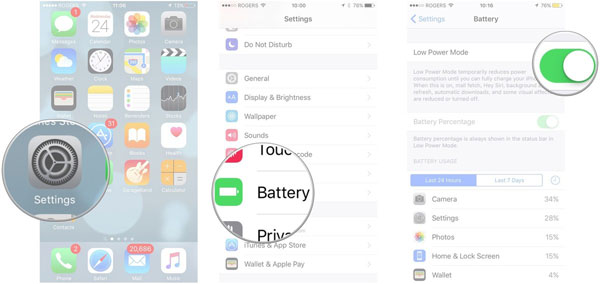
For iPhone/iPad:
- Navigate to "Settings > Battery".
- Turn off "Low Power Mode", then adjust backup settings.
Solution 2: Toggle on Backup & Sync
The auto-sync feature is typically enabled by default. However, it's possible to accidentally disable it, causing Google Photos to stop backing up automatically. To rectify this:
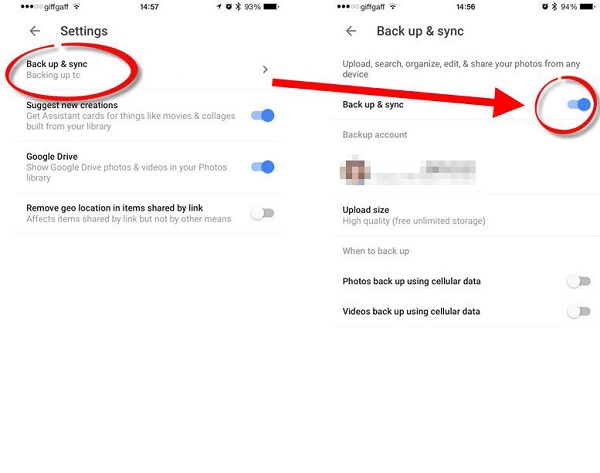
- Launch Google Photos on your Android or iPhone device.
- Click on the profile pic and go for "Settings".
- Access "Back up & sync" and ensure that the toggle is switched on.
Google Photos is designed to automatically scan your device for new photos and videos, uploading them seamlessly. Typically, syncing begins when connected to Wi-Fi. However, Google Photos may be stuck when backing up. A quick way to check your connection's strength is by installing a Wi-Fi analyzer app.
Solution 3: Upload Photos Manually
If the auto backup failed on Google Photos, you can manually upload images and videos to this service:
- Open the Google Photos application and touch the "+" icon.
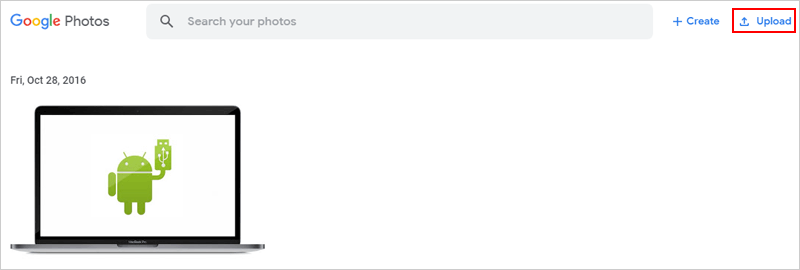
- Alternatively, visit the Google Photos website on your computer.
- Pick the photos or videos you wish to upload.
- Tap "Upload" and wait for the task to complete.
- After that, check your uploaded content in the "Photos" tab.
To save space, you can lower upload quality, sacrificing original quality. Opt for "Express" or "High quality" for unlimited storage, with "High quality" offering better resolution. To adjust upload quality, open Google Photos and go to "Settings", tap "Backup and Sync", select "Upload size", and choose your preferred quality for unlimited storage.
Solution 4: Verify Backup Status
To troubleshoot Google Photos when it fails to back up, check the backup status by following these steps:
- Open the Google Photos app on your mobile device.
- Tap your profile picture in the upper right corner.
- Select "Manage your Google Account" to check the backup status.
Now, there are possible messages you may encounter:
- "Waiting for Wi-Fi/Waiting for connection": Reconnect to the Internet.
- "Backup and sync is off": Enable this feature by tapping "Turn on backup".
- "Preparing backup or Getting ready to back up": Wait for the process to complete.
- "A photo or video was skipped": The file exceeds size limits; skip or reduce its size.
- "Backing up photos/Backup complete": Photos are currently backing up, or backup is finished.
See More:
Solution 5: Back Up Phone Folder
In doing so, you have the option to back up photos and videos downloaded or saved from other applications:
- Launch the Google Photos app on your mobile phone.
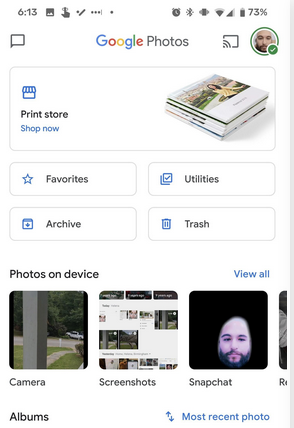
- Tap "Library" at the bottom, then select "Photos on device".
- Choose the folder you wish to back up.
- Enable "Backup" at the top of the screen.
Solution 6: Check File Size
Google Photos won't back up photos larger than 100 megapixels or 75 MB and videos over 10GB. Therefore, to avoid Google Photos backup stopped, ensure your media meets these limits to avoid backup issues. Supported video formats include .asf, .avi, .divx, .mov, .mpg, .mod, .mp4, .m4v, .m2t, .m2ts, .mts, .mmv, .tod, .3gp, .3g2, .wmv, and .mkv. So, you're advised to convert unsupported videos to these formats to enable backup.
Solution 7: Clear Cache
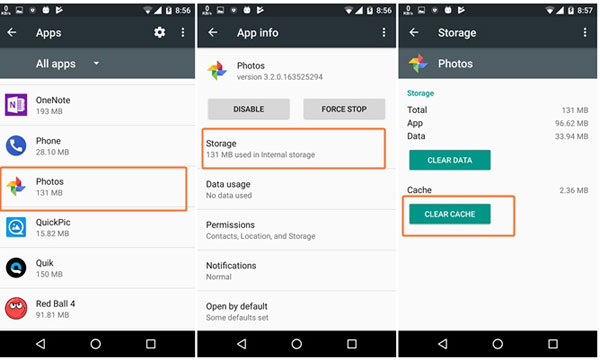
To resolve Google Photos backup issues caused by accumulated cache and data:
On Android:
- Navigate to "Settings > Apps > Photos".
- Tap on "Storage" and select "CLEAR CACHE" or "CLEAR DATA".
On iPhone/iPad:
- Go to "Settings > General > iPhone Storage".
- Locate Google Photos and choose "Delete App".
Solution 8: Reconnect Google Account
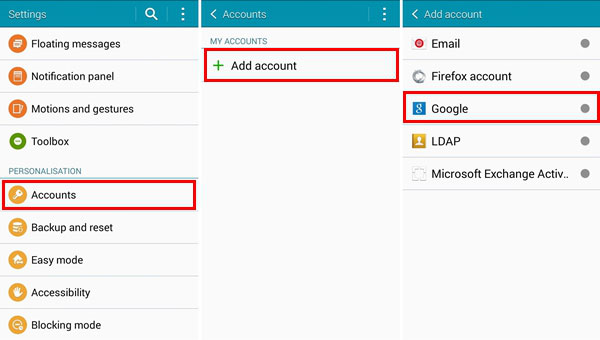
Logging out of the Google Photos-linked account and then logging back in. This may resolve the Google Photos not backing up. Here's how:
- Open the "Settings" menu, followed by "Users and Accounts".
- Select "Google" and tap "Remove Account" at the bottom of the screen.
- Reboot the device, return to "Users and Accounts"/"Accounts", and select "Add Account".
- Tap "Google" and log back in again.
Note: If Google Photos isn't backing up in the background on Android and doesn't respond, you may need to force-stop it from the App settings menu. Here's how: Open the "Settings" tab and navigate to "Apps". Find and tap on Google Photos. Select "Force Stop". Re-launch the app to check if it's working properly.
Solution 9: Update Google Photos
Older versions of the Google Photos app may contain unresolved errors, including the automatic backup issue. It's advisable to promptly update Google Photos to the latest version. Here's how you can make it:
- Open Google Play on your phone.
- Select "Menu" on the left side of the page and click on "My apps & games".
- Swipe the screen to locate Google Photos in the list of apps that need updating.
- Select "Update" to get the latest version installed.
Conversely, at times, issues with Google Photos backup not functioning properly stem from bugs in recent updates. Fortunately, Android users can revert Google Photos to its default state by uninstalling recent updates. Simply navigate to "Settings > Apps > Photos", tap the three-dot icon, and select "Uninstall Updates".
Part 3: Google Photos Still Won't Back Up? Try the Best Alternatives
* Option 1: Utilize MobiKin Backup Manager for Android
Are you in need of trusted backup software that can ensure a seamless Android backup experience? Look no further than MobiKin Backup Manager for Android (Win and Mac), also known as MobiKin Android Backup & Restore. This exceptional product is designed specifically for Android users and is unmatched in terms of professionalism, safety, and overall performance within the industry. With its assistance, you can effortlessly back up your entire phone to your computer quickly for convenient restoration.
Key highlights of MobiKin Backup Manager for Android:
- One-click to back up Android photos, videos, and more to PC smoothly.
- Restore your Android device from a backup as you desire.
- Support such files as contacts, messages, call logs, media files, apps, and more.
- Wi-Fi or USB connection, worry-free technical support, free trial, etc.
- Widely compatible with almost all Android devices.
- Value your privacy.
Once you've downloaded Android Backup & Restore for free, follow these steps to back up your Android phone to your computer using the software:
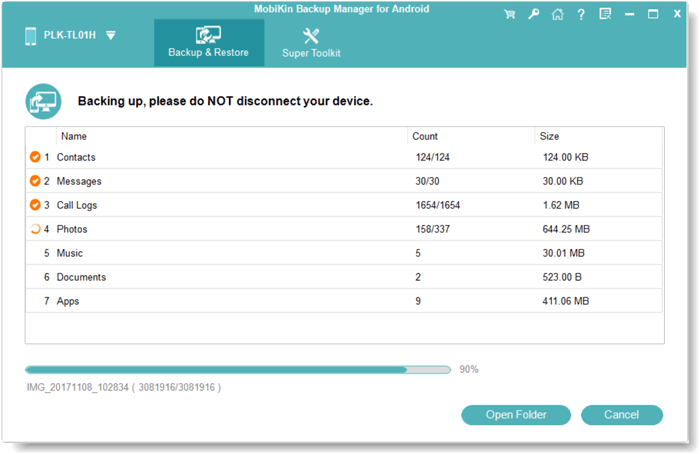
Step One. Start by downloading and installing the software on your computer. Then, start it and link your phone to the computer using a USB cable. If necessary, enable USB debugging on your Android device to ensure recognition.

Step Two. When the interface is accessible, you'll find options for "Backup" and "Restore". Choose "Backup", and you'll see a list of file types available for backup. Simply select the desired file type(s) and click the "Browser" button to specify where to save the content.

Step Three. After configuring your preferences, click on the "Back Up" button to begin the process of backing up your Android data to your computer.
Video Guide:
* Option 2: Utilize MobiKin Assistant for iOS
MobiKin Assistant for iOS (Win and Mac) is an essential tool for iPhone users, allowing them to effectively manage and safeguard their iOS data. With this versatile software, you can easily back up and manage your data without any inconvenience. The best part is that you can fully utilize your iDevice without the need for jailbreaking. This remarkable tool is considered the ultimate alternative to Google Photos, enabling you to seamlessly manipulate your iPhone as you expected.
Key highlights of MobiKin Assistant for iOS
- Back up all or particular files from your iPhone to your PC/Mac.
- Restore files to your iDevices directly.
- Transfer data between iOS and computer flexibly.
- Work for a wide range of items, including contacts, videos, photos, music, ebooks, SMS, notes, Safari, voice memos, etc.
- Manage iOS content on your computer without iTunes.
- Apply to almost all iOS devices, covering iPhone 15/14/13/12/11/X/8/7/6, iPad, iPod touch, etc.
- It doesn't let out your privacy.
Now, let's follow the steps to utilize MobiKin Assistant for iOS to back up your iPhone on your computer:
Step One: To begin, install and launch this program on your computer. Connect your iPhone device to the computer via USB. Once connected, the tool will automatically detect your smartphone, and the main interface will appear.

Step Two: Next, go to the left sidebar on the main screen. Here, you will see a list of accessible files on your iPhone. Select the relevant categories and choose the files you want to back up to your computer by ticking the checkboxes.
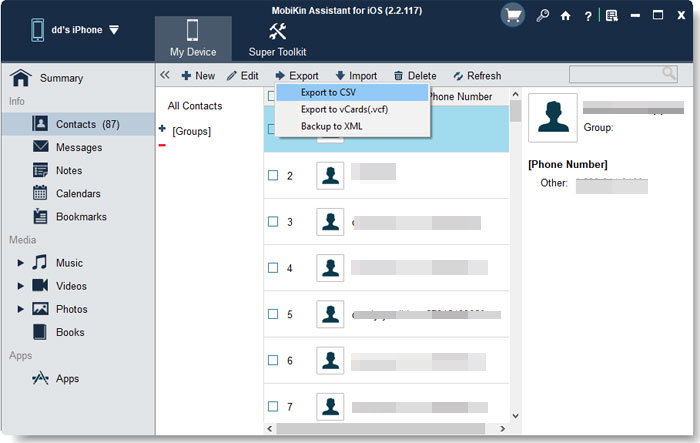
Step Three: After selecting the files, click on the "Export" option at the top to start transferring the files from your iPhone to your PC. Once the process is finished, you can view the detailed backup files on your computer.
Ending Words
Apart from the aforementioned solutions, you may also consider employing these techniques to address Google Photos not backing up. For instance, you can switch to the option of "Over Wi-Fi or Use Mobile Network", review your backup settings, connect your device to a charger, or remove any blank photo and video files.
Furthermore, you have the option to completely discard Google Photos and opt for its alternative solutions, as discussed earlier, in order to attain a reliable and superior backup experience, regardless of whether you are an Android or iOS user.
Related Articles:
4 Free Methods to Transfer Google Photos to iCloud Seamlessly [2024]
4 Ways to Download HEIC as JPG in Google Photos [Step-by-Step Guide]
Download Google Photos to Android Phone/Computer
5 Sensible Approaches to Transfer Photos/Pictures from Android to Android
[Full Guide] Why and How to Fix Photos Disappeared from iPhone?
6 Strategies on How to Recover Permanently Deleted Photos on Android


