8 Ways to Transfer Photos/Pictures from Phone to Computer [Android/iPhone]
Our smartphones have become the go-to devices for capturing memorable moments through photos. However, there may be situations where we need to transfer these precious items to our computers. Whether you're to create backups, free up space on iPhone/Android, or simply want to enjoy our images on a larger screen, how to transfer photos from phone to computer arises frequently.
Well, this page aims to address this common need and provide you with eight effective methods to seamlessly transfer photos from both Android and iOS devices to your computer.
- Way 1: How to Transfer Photos from Phone to Computer via Assistant for Android (Android)
- Way 2: How to Download Pictures from Phone to Computer via Google Photos (Android)
- Way 3: How to Upload Pictures from Phone to Computer by Bluetooth (Android)
- Way 4: How to Transfer Photos from Phone to Computer via Assistant for iOS (iPhone)
- Way 5: How to Upload Photos from Phone to Computer via iTunes (iPhone)
- Way 6: How to Put Pictures from Phone to Mac Computer via AirDrop (iPhone)
- Way 7: How to Transfer Pictures from Phone to Computer with USB Only (Android & iPhone)
- Way 8: How to Get Photo from Phone to Computer via Windows Photos App (Android & iPhone)
Way 1: How to Transfer Photos from Phone to Computer via Assistant for Android (Android)
MobiKin Assistant for Android (Win and Mac) is a specialized program designed for seamless data transfer between Android devices and computers, making it the most effortless method to transfer photos from Android. Additionally, it serves as a convenient assistant for managing device data on both PC and Mac. With this tool, you can quickly and easily copy all or selected pics across in just a matter of minutes.
Key Features:
- Selectively transfer photos from phone to computer.
- One-click to back up and restore Android data in batches.
- Apply to such files as pictures, music, videos, contacts, SMS, call logs, and more.
- Let you preview and selectively choose the data you want to transfer and manage.
- Efficiently manage, edit, export/import, and delete Android data on your computer.
- Enjoy the convenience of two connection options: USB and Wi-Fi.
- Compatible with over 8000 Android phones and tablets, such as Samsung, Google, Xiaomi, Huawei, OnePlus LG, Sony, Motorola, HTC, DELL, OPPO, and more.
- It doesn't compromise your privacy.
Learn how to transfer pictures from phone to computer with USB via Assistant for Android:
Step 1. Start by launching the software on your computer. Ensure you have downloaded and installed it. Next, connect Android to the computer using a USB cable.
Step 2. Once the connection between your phone and the computer is established, the software's main interface will appear, displaying various categories of manageable Android data on the left panel.

Step 3. Navigate to the "Photos" category and select "Camera" from the left menu. All the pictures from your Android phone will be displayed on the right side. You can now review and choose the specific photos you wish to transfer.
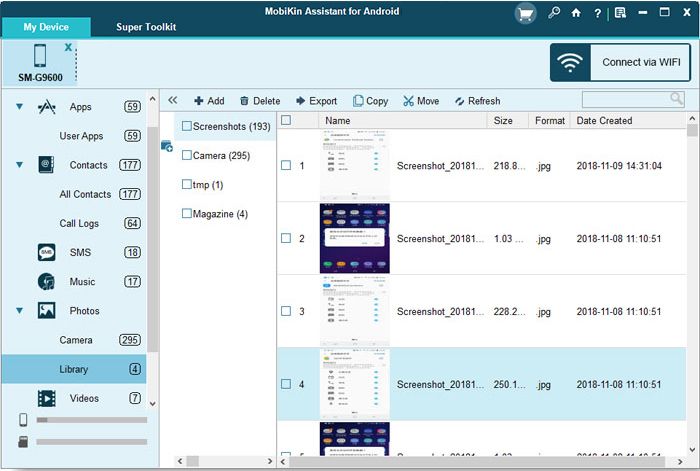
Step 4. Once you have made your selections, click on "Export" in the top menu. Choose the destination folder on your computer where you want to save the selected photos. Then, proceed to save all the chosen photos to that location.
You Might Also Enjoy:
- How to Move Pictures/Photos to SD Card on Android [A Comprehensive Guide]
- 4 Handy Tips to Recover Deleted Photos from iPhone without Computer
Video guide:
Way 2: How to Download Pictures from Phone to Computer via Google Photos (Android)
Google Photos has changed how it manages your photos. You can quickly transfer Android photos to your computer by uploading photos from Android to Google storage and downloading them to your PC using Google Images. Learn how to move pictures from phone to computer with Google Photos:
- Open Google Photos on your smartphone and transfer the desired photos.
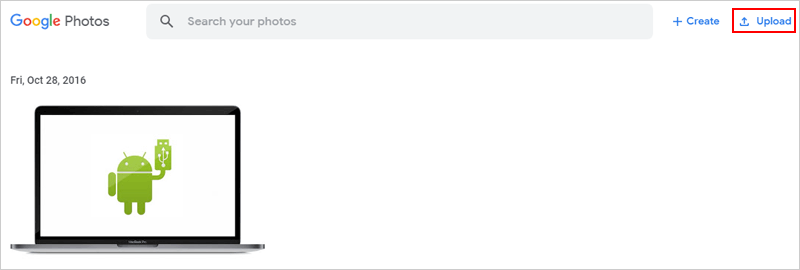
- Tap the "Upload" icon within the app and wait for the process to complete.
- If you don't see the "cloud" icon, tap the three-line button in the top-right corner of the app.
- Activate the "Back up now" option to upload your photos.
- To download specific photos, use your computer's web browser to visit photos.google.com.
- Select the desired images and click on the three dots icon. (How to delete photos from Google Photos?)
- Choose the "Download" option to save the photos on your PC.
Way 3: How to Upload Pictures from Phone to Computer by Bluetooth (Android)
Although Bluetooth is less popular and efficient than Wi-Fi, it can still be used for file transfers, especially when the latter is unavailable. Keep in mind that not all devices, especially desktops, and laptops, may have Bluetooth capability. Learn how to save pictures from phone to computer over Bluetooth:
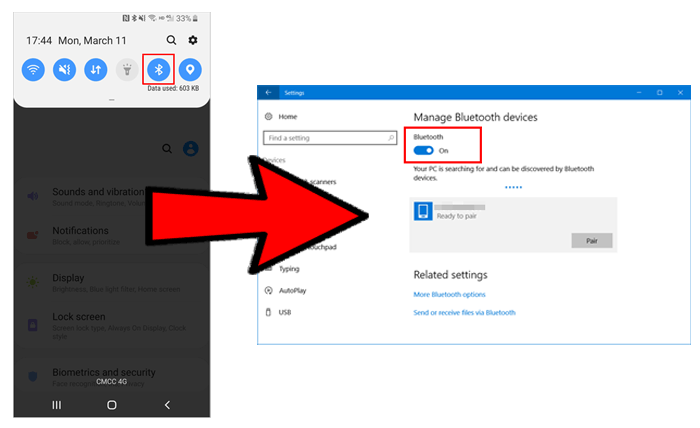
- Ensure Bluetooth is enabled and discoverable on both your phone and computer.
- Access your computer's Bluetooth settings and pair it with your Android phone.
- Enter the provided security code if prompted.
- In the Bluetooth settings, select "Send or receive files through Bluetooth" and choose "Send Files".
- Enable the feature on your computer to receive files from your phone if necessary.
- Find the desired file on your phone, use the "Share" option, select Bluetooth as the sharing method, and click "Finish" to save the file on your PC.
Other Passages You May Like:
- 6 Most Recommended Ways to Transfer Photos from Android to iPhone 14/13/12/11/X/8
- 4 Tried-and-tested Methods to Not Transfer Photos to New iPhone 14/13/12/11/X/8
Way 4: How to Transfer Photos from Phone to Computer via Assistant for iOS (iPhone)
As a reliable third-party software, MobiKin Assistant for iOS (Win and Mac) offers a convenient solution for transferring and saving files, including photos, from your iPhone to your computer. Serving as a robust assistant for iPhone users, it simplifies the transfer and management of various iOS content without errors. Moreover, its one-click backup and restore feature further streamline the process, making bulk file switching effortlessly.
Key Features:
- Transfer handpicked photos from iPhone to a computer.
- Effortlessly copy all pictures from iPhone to PC/Mac in a single operation.
- Efficiently move data between iDevices and computers/iTunes.
- Instantly back up and restore iPhone.
- Support a wide range of files, including photos, music, videos, contacts, text messages, notes, bookmarks, books, calendars, and more.
- Directly manage iOS items on a computer.
- Get on well with almost all iOS devices, including iPhone 14/14 Plus/14 Pro (Max), iPhone 13/13 Pro (Max)/13 mini/12/12 Pro (Max)/12 mini, iPhone 11/11 Pro/11 Pro Max, iPhone X/XR/Xs/Xs Max, iPhone 8/8 Plus, iPhone 7/7 Plus, iPhone 6/6S/6 Plus, iPod touch, iPad, etc.
- It doesn't let out your privacy.
How to get photo from phone to computer via Assistant for iOS?
Step 1. Begin by downloading and installing the tool on your computer. Launch the program and connect your iPhone to the PC using a USB cable. Once the connection is established, the program will detect your iPhone and present its main interface.

Step 2. On the left side menu, you will find various categories displaying file types from your iPhone. In this case, click on "Photos" to let the utility display all the images stored on your iPhone. Take your time to preview and select the specific pictures you wish to copy.

Step 3. Once you have made your photo selections, click on "Export" in the top menu. This action enables you to transfer the chosen iPhone photos to your computer. You also have the option to specify the desired output location where the transferred photos will be saved.
Video guide:
Way 5: How to Upload Photos from Phone to Computer via iTunes (iPhone)
For iPhone users, it is possible to create a designated photo folder and utilize iTunes, the official tool from Apple on Windows or Mac, to simplify the transfer process. See how to put pictures from phone to computer using iTunes:
- Connect your iPhone to a PC using a USB cable and ensure that you have the latest version of iTunes installed.
- If iTunes does not recognize your device, click on the device image displayed on the iTunes screen.
- In the iTunes interface, navigate to the "Photos" tab located in the left menu.
- Select the option "Sync Photos" and then choose "Sync Photos from".
- You can choose either "All folders" or "Selected folders", depending on your preference.
- Finally, click on the "Apply" button to initiate the transfer of photos from your iPhone to the PC.
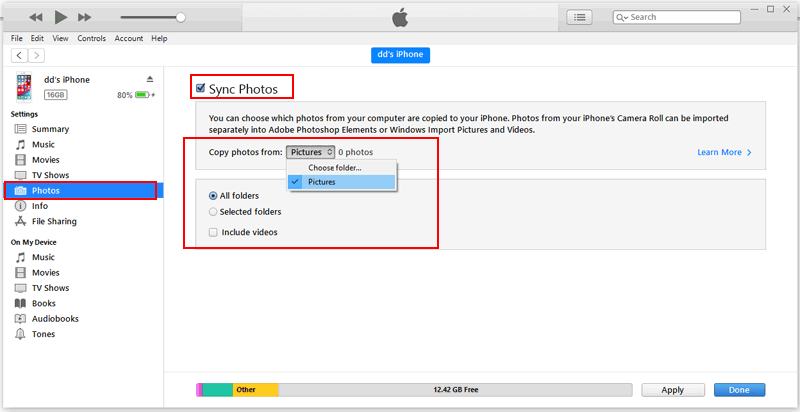
Keep in mind that iTunes transfers photos in their original format. If you have HEIC or HEIF format photos on your iPhone, ensure that your computer supports these formats or convert them to a compatible format before the transfer.
Way 6: How to Put Pictures from Phone to Mac Computer via AirDrop (iPhone)
Apple users have an additional wireless option available to them: AirDrop. With this feature, you can easily transfer images and videos between iPhone and Mac without the need to back them up to iCloud first. Know how to send pictures from phone to computer by AirDrop:
- Select the desired photos and videos on your iPhone that you want to transfer to your Mac.
- Tap the "share" option, and then choose AirDrop.
- Make sure that Bluetooth and Wi-Fi are enabled on both your iPhone and Mac. Also, ensure that you are within a range of 30 feet from the device.
- Your iPhone will initiate a quick search and display a list of nearby devices that support AirDrop.
- If your Mac is not visible, open Finder on your Mac and select the AirDrop option from the left panel. Then, choose the "Allow me to be discovered by" option at the bottom of the screen.
- Now, pick the device on your iPhone to which you wish to transfer your files.
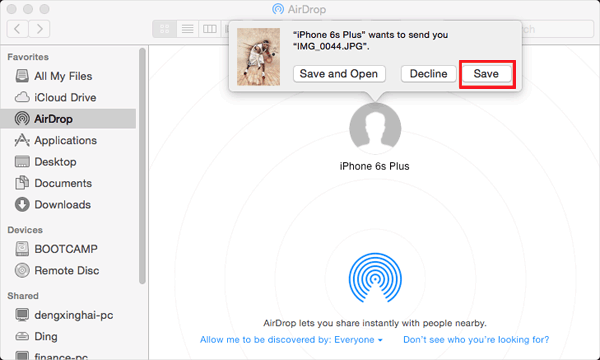
- A pop-up will appear on the receiving device. Choose the option to save pics on this Mac. (Can you AirDrop from iPhone to Android?)
Way 7: How to Transfer Pictures from Phone to Computer with USB Only (Android/iPhone)
Without a doubt, if you have a compatible USB cable, the easiest method to transfer your photos is by directly copying them from your phone.
* Upload photos from Android phone to computer via USB only?
- Connect your phone to a USB port on your PC.
- On your phone, change the USB connection setting to "File transfer" by swiping down from the top of the screen and tapping on the appropriate option.
- Open File Explorer on your Windows PC and navigate to your Android device.
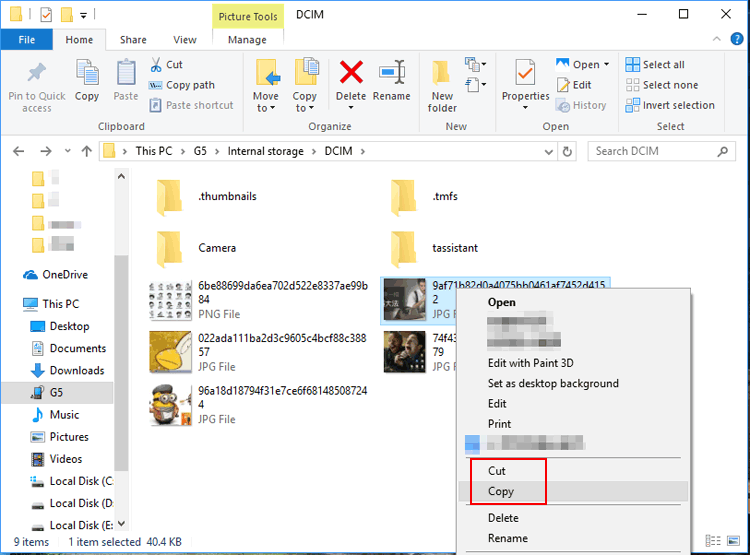
- Go through the "Internal Storage" or "Internal Shared Storage" folder to reach the DCIM subfolder, and then open the Camera folder to access your phone's photos. (Can you get pictures off a broken phone?)
- Open another File Explorer window to a local folder on your PC.
- Copy and paste or drag and drop the photos from your phone to your computer.
* Copy photos from iPhone to computer via USB only?
- Connect your iPhone to a computer via USB, ensuring that your device remains unlocked throughout the process.
- Open File Explorer on your computer.
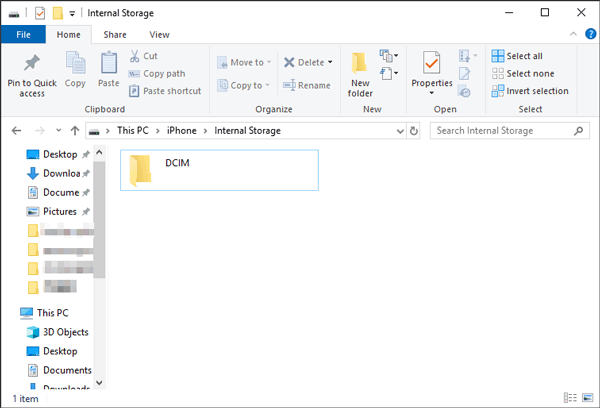
- From the left-hand list, select "This PC." Your iPhone will be displayed in the main window.
- Double-click on your iPhone to access its content and do the same action on the DCIM folder.
- Inside, you will find folders with names like 100Apple, 101Apple, and so on.
- To transfer photos, you can copy them to other locations on your computer.
- Keep in mind that deleting a photo will remove it from your iPhone as well, so exercise caution when copying or moving photos.
Way 8: How to Get Photo from Phone to Computer via Windows Photos App (Android/iPhone)
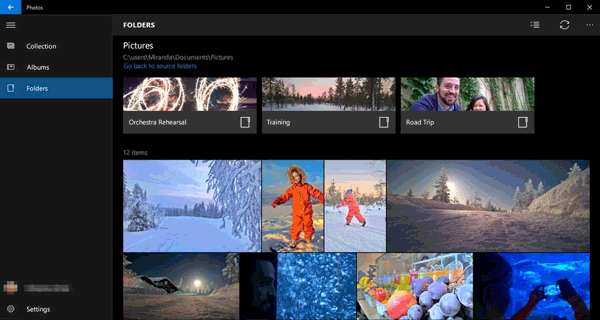
If your goal is to simply copy pictures from your Android or iPhone camera roll, the Windows Photos app can be utilized.
* Upload pictures from Android phone to computer using Windows Photos App:
- Launch the app on your PC and click on the "Import" button. Then, choose "From a connected device."
- Select your Android phone and grant permission for the app to gather all the photos from your device.
- Click the provided link to change the destination and pick another folder where you want the items to be imported.
- Use the drop-down menu labeled "Select" and opt for the choice of "All items".
- Mark the checkbox for Delete original items after import if you wish to remove the photos from your phone.
- When you're prepared, click on the Import button to begin the import process.
* Transfer photos from iPhone to computer with Windows Photos App:
- Connect your iPhone to your computer using the USB data cable.
- Unlock your iPhone and tap on "Trust" when prompted to establish a connection with the computer.
- The Photos app should open automatically. If it doesn't, you can launch it by searching for "Photos" in the "Start" menu.
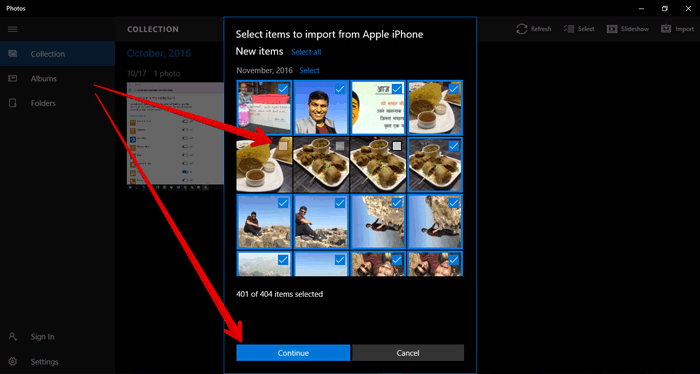
- In the Photos app, go to "Import" and select "From a USB device".
- The app will search for photos and videos on your iPhone.
- Now you can choose the specific videos you want to transfer and select the import destination.
- Once you've made your selections, click on "Import Selected".
In Closing
On balance, whether you're an Android enthusiast or an avid iPhone user, let us help you simplify the process of transferring photos from your phone to your computer. Get ready to embark on a hassle-free journey as we guide you through the recommended methods for the phone to computer photo transfer. All these measures ensure that your memories are securely and conveniently copied to your computer for safekeeping, sharing, and further enjoyment.
Related Articles:
4 Ways to Move Photos from iPhone to iCloud [with Additional Tips]
Can You Transfer Photos from iPhone to PC with Bluetooth? Answered in 2023
6 Strategies on How to Recover Permanently Deleted Photos on Android
Google Photos vs. iCloud: What Are the Differences Between Them? [2023]
10 Best Photo Managers for Android: Manage Android Pictures with Ease
6 Ways to Transfer Photos from Computer to iPhone Effectively


