How to Delete Photos from Android Phone Permanently? [5 Efficient Ways]
"Hi everyone, before donating my Android phone, I need some advice on how to permanently delete deleted photos from my Android phone. Any help would be greatly appreciated!" -- from Reddit
As time passes, our Android devices accumulate not just treasured moments but also redundant or blurry images. Whether you're preparing to wipe your phone before selling or simply seeking a thorough cleanup, the need to delete photos arises. The desire for privacy protection intensifies, urging us to remove all traces of our moments before passing the device on.
This guide is crafted to address precisely how to permanently delete photos from Android. We shall walk you through five effective methods to make your phone pictures disappear completely.

- Part 1: How to Delete Photos from Android Permanently (Unrecoverable)
- Part 2: How to Permanently Delete Photos in Android Using Google Photos
- Part 3: How to Delete Photos from Android Phone Permanently from Gallery
- Part 4: How to Permanently Delete Photos from Android via File Manager
- Part 5: How to Permanently Delete Photos on Android by Factory Reset
- FAQs for Permanent Photo Deletion on Android Phone
Go over the video below to learn this topic visually.
Part 1: How to Delete Photos from Android Permanently (Unrecoverable)
If you intend to give away your old Android phone, don't overlook the importance of wiping all data, not just photos. Even after a factory reset, some private information may still linger on your device. To ensure complete and irreversible erasure, you're recommended to utilize a specialized Android erasing program like MobiKin Eraser for Android without worry.
Main Features of MobiKin Eraser for Android:
- Permanently deletes photos from Android without a trace.
- Wipes out both Android internal memory and SD card.
- Erases other data types on Android, including contacts, SMS, call logs, videos, and more.
- Comes with 3 erasing levels named "Low", "Medium", and "High".
- A full-fledged file wiper for almost all Android devices, including Samsung, Motorola, OPPO, Huawei, Xiaomi, HTC, Google, and more.
- 100% safe to use.
How do you permanently delete photos so that they cannot be recovered? See how to make it with MobiKin Eraser for Android:
Step 1. Run Eraser for Android
Get the Eraser for Android program on your computer. Install and launch it and connect your Android device to the same computer through a USB cable. Next, ensure USB debugging is enabled as instructed.
Note: Since this data eraser will delete all your Android content without being recoverable, you're recommended to back up your photos on Android before deleting them. Here are the simple steps: 1. Connect your Android phone to the computer via USB. 2. Select File Transfer on your phone when prompted. 3. Copy photos from the DCIM folder to your computer. 4. Safely eject your phone.

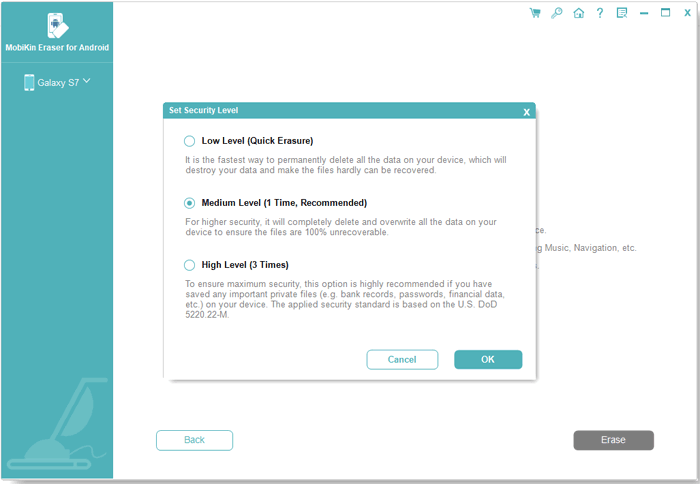
Step 2. Select the security level
Once your smartphone is detected, click the "Erase" button to proceed to the next window. Choose the desired security level and enter "delete" to confirm.
Step 3. Permanently delete photos
Click the "Erase" option to remove all data from your Android phone, including all photos. Wait for the erasing process to complete within a short period.
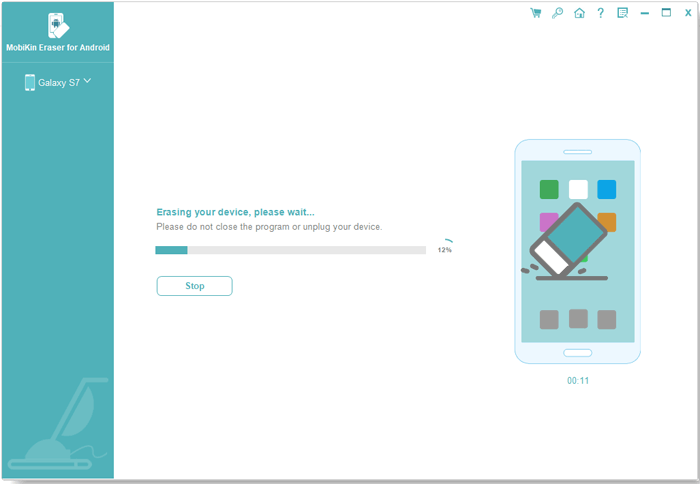
After data erasure, it is recommended to conduct a factory reset on your Android device to clear system data and settings. Follow the prompts for the reset, click "Continue", and all data will be permanently deleted from Android.
Video Guide:
Part 2: How to Permanently Delete Photos in Android Using Google Photos
Google Photos, developed by Google, is a photo-sharing and storage service. Most are familiar with the basic option, but for those who may not know, your phone's gallery has a Bin or Trash folder that retains deleted photos. Similar to a PC's recycle bin, it's essential to clear this folder after deleting photos. Here's how you can do it:
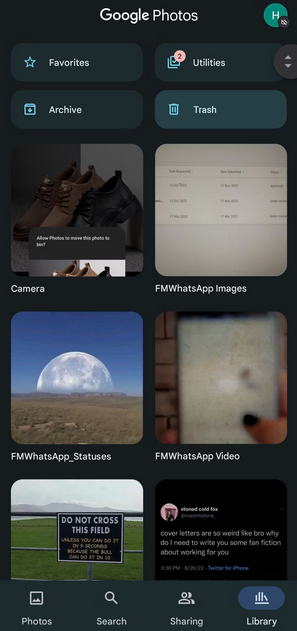
- Launch the Google Photos app on your Android cell phone and log in to your Google Account.
- Navigate to the "Library" tab located at the bottom of the screen.
- Pick the specific photo(s) or video(s) you wish to permanently remove.
- Click on the "Trash" icon positioned at the top-right corner of the screen.
- Press "Select" at the top-right corner of the screen.
- Choose the files you intend to erase permanently.
- Tap the "Delete" icon found at the bottom-left corner of the screen.
- Confirm your decision by tapping "Allow".
How to permanently delete photos from Android via Google Photos Web?
- Go to photos.google.com on your desktop browser.
- Open the desired photo.
- Click the "Delete" button in the upper-right corner and confirm.
- Choose "Move to trash" for immediate removal from the gallery.
- Access "Trash" from the left sidebar.
- Select the recently deleted photo.
- Click the "Delete" button in the upper-right corner to completely erase the picture.
- Even so, you can still recover permanently deleted pics from Google Photos afterward.
You May Also Like: How can I delete photos on Android but not Google Photos? Try these steps: 1. Turn on Backup in Google Photos (Profile > Backup & sync). 2. Delete photos from your Gallery or Files app. 3. Check Google Photos to confirm they’re still there 4. Use Free up space in Google Photos to remove local copies.
Part 3: How to Delete Photos from Android Phone Permanently from Gallery
The Gallery app is the default location for all cameras and other photos. You can now delete multiple or all photos at once. And if you make a mistake, it's easy to recover and restore them from within.
How to permanently delete photos from Android Gallery?
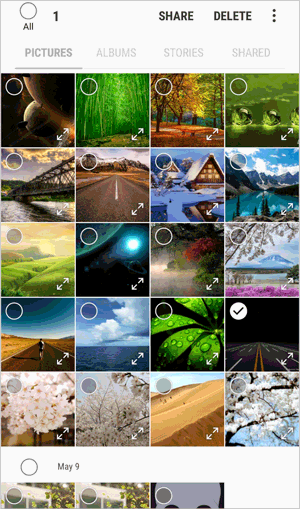
- Open the Gallery application on your Android mobile.
- Press the "Menu" button.
- Select "Camera Roll" to view all your Android images.
- Tap the three-dots button > "Select" > Mark the photos you wish to delete.
- Click the "trash" sign and confirm by selecting "OK".
- Go to the Trash/Bin folder, select all items, and permanently delete them.
Part 4: How to Permanently Delete Photos from Android via File Manager
If you prefer not to utilize a photo management application, a file manager application can also serve the purpose of deleting multiple photos. Such applications enable you to select several files and remove them simultaneously. Subsequently, you can empty the recycle bin within the application to ensure complete deletion.
To delete photos from an Android device via a File Manager:
- Install a trusted File Manager app from Google Play.
- Open the app and go to the folder with the files you want to delete.
- Select the files and tap the "Delete" icon.
- Check the "Recycle Bin" in the File Manager.
- If the files are there, clear the Recycle Bin for permanent deletion.

Part 5: How to Permanently Delete Photos on Android by Factory Reset
Suitable for situations like selling your phone to its next owner, a factory reset lets you erase all data, but it can still be recovered. To ensure irrecoverability, enable encryption before resetting. Remember to back up important data before proceeding, as this option deletes all data on your phone. Here are the directions for this way:
- Access your "Settings" from your Android device.
- Navigate to "System" and select "Advanced".
- Click on "Reset Options", then choose "Erase All Data (Factory Reset)".
- Proceed by clicking "Reset Phone".
- Enter a password or PIN when prompted.
- Finally, tap "Erase Everything" to start the factory reset.
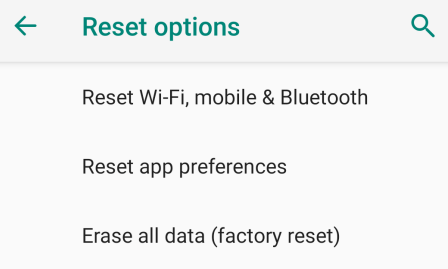
Before you make a factory data reset, enabling "Hardware Encryption" on your phone can ensure a complete and safe deletion. To do this: Go to Settings > Security and tap Encrypt phone (or Advanced > Encrypt & credentials). Ensure your phone is charged, as encryption may take up to an hour. Tap Encrypt phone again. If it fails, try again.
FAQs for Permanent Photo Deletion on Android Phone
Q1: Why can't I permanently delete photos from my Android phone?
- Deleted photos may be in the Trash or Recycle Bin; empty them for permanent deletion.
- Photos may still be in Google Photos if sync is enabled.
- Some File Manager apps or hidden folders may hold onto deleted photos.
- Photos may remain in app caches.
- Deletion might be interrupted, or your device may have storage issues.
Q2: What is the difference between regular deletion and permanent deletion?
- Regular deletion: Moves files to a trash folder, where they can be restored until the trash is emptied.
- Permanent deletion: Removes files completely by overwriting the storage space, making recovery nearly impossible.
Q3: Can I recover permanently deleted photos even after a factory reset?
If you completely delete photos and do not have a backup, the recovery may be difficult, but there is still a chance that you can try to recover them, here is an article - 5 desirable ways to recover photos after factory reset on Android - to learn about it.
In a Nutshell
In summary, maintaining the security of your photos is essential, as they may contain personal and sensitive content. To free up memory, use any of the mentioned methods. However, if you're giving away your phone, ensure complete privacy by using MobiKin Eraser for Android to permanently delete all content without being recoverable.
Related Articles:
5 Wonderful Ways to Transfer Photos from Android to Flash Drive
How Do I Transfer Photos to SD Card on Android Phone? 6 Tactics
How to Transfer Photos from Android to Android? 8 Flexible Approaches
5 Best Ways to Permanently Delete Photos from iPhone or iPad


