[2024 Updated] How to Backup iPad to Computer with/without iTunes?
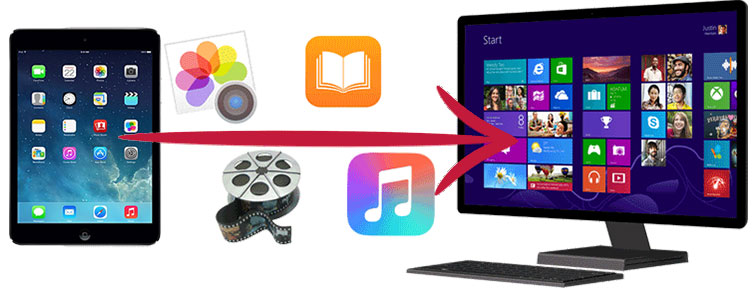
Your iPad is more than just an Apple device; it holds a wealth of personal settings and private information. As you use your iPad, it accumulates more data, increasing the risk of data loss due to deletion or other issues. As storage space dwindles, it's critical to back up iPad to computer to protect important files and free up storage space. To ensure your data is protected, here are the three best ways to back up iPad to PC or Mac with or without iTunes.
First, let's briefly compare these three methods:
|
Comparison
|
Supported Data Types
|
Speed |
Previewable & Selective |
Cons |
|
iTunes
|
Photos, Videos, Music, Ringtones, Settings, App data, etc. Learn more
|
Medium
|
No
|
When restoring to iPad, it will overwrite exiting files.
|
|
iCloud
|
Videos, Photos, SMS, Call history, Contacts, Settings, Browsing history, etc. Learn more
|
Slow
|
No
|
When restoring to iPad, it will overwrite exiting files.
|
|
Assistant for iOS
|
Contacts, Messages, Notes, Calendars, Bookmarks, Music, Voice Memos, Videos, Photos, Books, Apps. Learn More
|
Fast
|
Yes
|
No data overwriting and no data loss
|
Part 1: How to Back up iPad to Computer with iTunes
You can back up your files from iPad to your PC or Mac by using iTunes. It not only gives you the ability to back up contacts, photos, calendars, notes, messages, etc. on your iPad to your computer, but also encrypt your iPad backup. You can restore the iTunes backup to your iPad whenever you need. To back up iPad to iTunes on PC, please be sure you have installed the latest version of iTunes on your computer.
- Launch iTunes on your computer and connect your iPad to your computer via a recommended lightning USB cable which is in a perfect working condition.
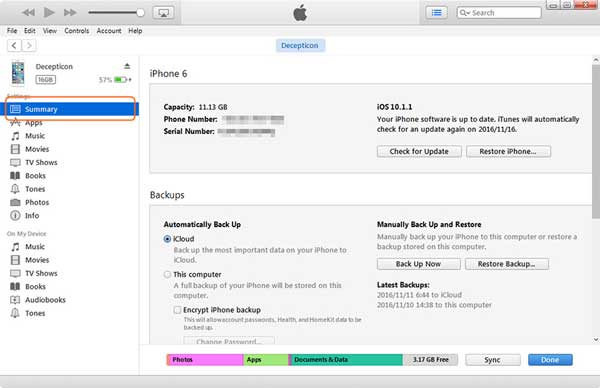
- iTunes will detect the connected iPad and show it on its interface. Click on the Device icon next to the category drop-down menu on the left side of the iTunes window and choose the "Summary" option.
- Tick "This Computer" option under "Automatically Back up" on the right side panel. If you need, you can check the "Encrypt" box and create a password to encrypt the iTunes backup for your iPad. Remember the password because you need it when you want to access your backup files.
- After all necessary settings above, you can now click on "Back Up Now" button to begin the backup process at once. When the backup has been completed, you can simply click "Done" button on the bottom right.
Part 2: How to Back up iPad to Computer with iCloud
How do you back up an iPad to a computer wirelessly without needing a computer or USB cable? You can use iCloud for automatic iPad backups over Wi-Fi. Ensure you have sufficient iCloud storage to accommodate your iPad data.
Here's how to back up your iPad to iCloud:
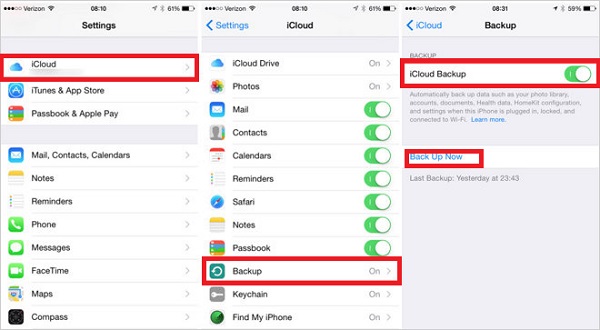
- Open the "Settings" app on your iPad and tap on [your name] at the top of the screen, then select "iCloud."
- Tap on "iCloud Backup."
- Toggle the switch to enable "iCloud Backup" for automatic backups. If you prefer to initiate a backup manually, tap "Back Up Now."
Remember, like iTunes backups, the data in an iCloud backup can only be restored to an iDevice.
Part 3: How to Back up iPad to Computer without iTunes/iCloud
The best way to back up an iPad to a computer is to use MobiKin Assistant for iOS, which is one of the newest tools to help users back up iPhone, iPad and iPod data on PC and Mac. As an alternative to iTunes, It enables you to transfer data from iOS device to computer and vice versa. It can also be taken as an iOS content manager that helps to manage your iPad/iPhone/iPod data on computer like deleting iPad photos, editing iPhone contacts, etc. It has already proven a lot of things:
Why choose Assistant for iOS for backing up iPad to computer:
- Back up iPad to computer completely or selectively.
- Preview and select your target files before you backup or restore them.
- Supports 14+ file types, including Video, Photo, Music, Contacts, Text Messages, Notes, Safari Bookmarks, Voice Memo, etc.
- Fully compatible with iPad 10/9/8, iPad Pro, iPad Air, iPad 4, iPad mini, the new iPad, iPad 2, and so on.
- It features fast, easy and powerful iPad data backup and restore.
Now, let's put MobiKin Assistant for iOS into practice to make iPad backup to computer:
Step 1: Launch Assistant for iOS and connect iPad to PC
To begin with iPad backup on PC, you need to connect your iPad to the computer first and launch the Assistant for iOS program after you install it on your computer. Once the detection of the software is done, your iPad information will be displayed in the main interface.

Step 2: Scan the iPad for specific files
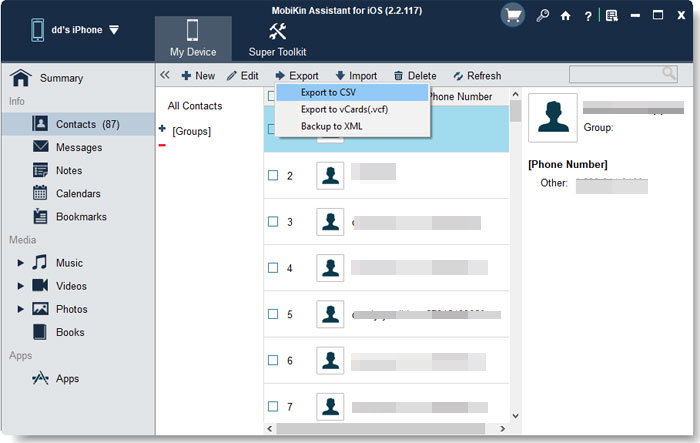
All iPad data will be categorized on the left side of the program screen. Tap on each category, quick scanning will be performed by the program automatically. You can preview and select the files you need on the right part.
Step 3: Start to back up iPad to computer
After selecting files, you can click "Export" button on the top to transfer your files from your iPad to PC. You can select a computer folder to save the files to be backed up. When the transfer is done, you can check the transferred files in the destination folder.
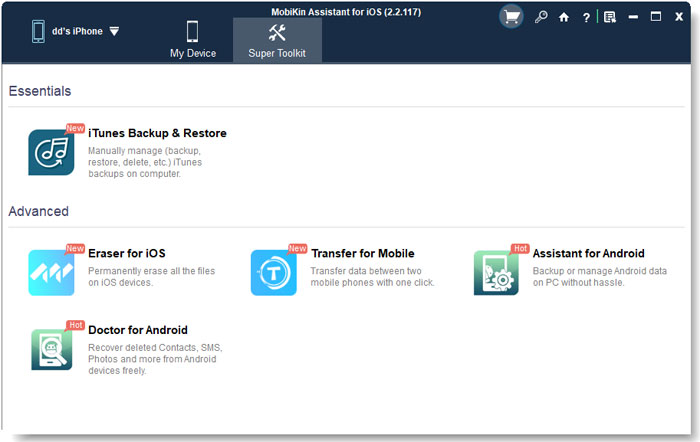
To back up all data on your iPad to your computer in one click, go to the "Super Toolkit" option in the upper navigation bar and select "iTunes Backup & Restore". Select the device you want to back up and specify the backup file location. Click "Backup" to start the backup process. Make sure your iPad stays connected throughout the backup process.
Video guide:
The Bottom Line
That concludes our overview of how to backup iPad to computer. Many users are reluctant to use iTunes because its interface is cumbersome and complicated, while iCloud's limited storage space and slow backup speed over Wi-Fi are frustrating. In this context, MobiKin Assistant for iOS stands out as an effective alternative for iOS data backup. It allows you to safely backup iPad data to your computer without relying on iTunes or iCloud.
Assistant for iOS is also a versatile tool that allows you to easily process and organize iOS data on your computer. If you find this information useful, please consider sharing this article to help others who may benefit from it.
Relative Articles:
6 Savvy Ways to Transfer Photos from iPad to Android [Step-by-step Guide]
How to Transfer Photos from iPad to iPad? 5 Ways You Must Know!
[Guide] How to Recover Deleted Photos from iPad with/without Backup?


