4 Best Ways to Back Up iPad Air/Pro/mini/4/3/2 to Mac/MacBook
Backing up iPad data is particularly important. After all, no one wants to lose documents, photos, and personal information that are important to them. Moreover, no Apple device can run and maintain good performance all the time. Upgrade failure, device loss, damage, system failure and other factors often easily occur on the iPad. Well, keeping a comprehensive iPad backup ensures you never lose anything important. If you want to know how to back up iPad to Mac, please don't miss this page. Here we collect four practical methods for you to easily back up iPad data on Mac.
Method 1: How to Back Up iPad to Mac with One-click
When it comes to iPad backup or management, a dedicated iOS backup tool will never let you down. MobiKin Assistant for iOS (Mac and Win) is one of them, which can help you make better use of your iOS device. In addition to backing up your iPad flexibly and easily, the software also features advanced controls to copy data from or to the device in a selective manner, or to freely manage iOS content on a larger screen.
MobiKin Assistant for iOS Excels in:
- Back up iPad to Mac/PC with one click, or selectively complete backup of specific data.
- Restore your backup to any iOS device without any data loss.
- Selectively transfer data between iDevices and computer/iTunes.
- Best iOS manager software to manage (add, delete, edit, copy, etc.) iOS content on a computer directly.
- Apply to overall iOS devices, including iPad Pro, iPad Air, iPad 4, iPad mini, the new iPad, iPad 2, iPhones, iPod touch, etc.
- It won't track your privacy.
How do I back up iPad to Mac with MobiKin Assistant for iOS?
Step 1. Connect your iPad to Mac
Install the downloaded program on a Mac. Launch it and connect your iPad to this Mac via USB. Click the "Trust" button on your device when asked. This will make your iPad trust your computer.

Step 2. View and choose any items to back up
Once recognized, choose any data types from the left menu of the software screen. Soon, you can preview and select the specific files on the right column.

Step 3. Start to back up iPad to Mac at once
After the selection, press the "Export" button and specify a location to store the data; the iPad to Mac data backup will commence immediately.
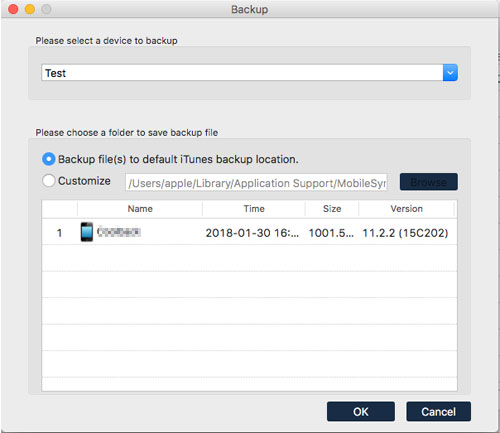
Alternatively, you're allowed to back up your iPad to Mac in bulk by going to the program's "Super Toolkit" > "iTunes Backup & Restore" > "Backup" > choose your iPad to back up > set an output folder > tap "OK".
Related Passages:
- A Quick Start Guide on How to Extract Photos from iPhone
- How Long Does It Take to Back Up iPhone/iPad to iCloud/iTunes? Here's The Answer
Method 2: How to Back Up iPad to Mac Computer via iCloud
Do you want to take an iPad backup on a Mac wirelessly? Well, iCloud gives you the option to complete it. This service makes it easy for you to automatically sync data like pictures, documents, photos, and iOS Settings to its cloud storage. You can set up automatic icloud backup or perform manual backup. Once completed, you can log in to the iCloud website on Mac to save the iCloud backup to your Mac.
How do I back up my iPad to Mac via iCloud?
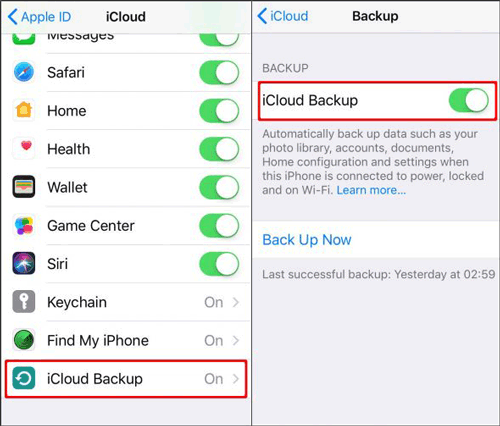
- Go to your iPad's "Settings" > "iCloud" > enable "iCloud Backup".
- Tap on the "Back Up Now" button to sync iPad data with iCloud. (iCloud backup taking forever?)
- Enter your Apple ID and passcode as required.
- Go to the iCloud website on your Mac.
- Input the same iCloud credential and save the backup file onto the Mac.
Method 3: How to Back Up iPad to Mac with iTunes
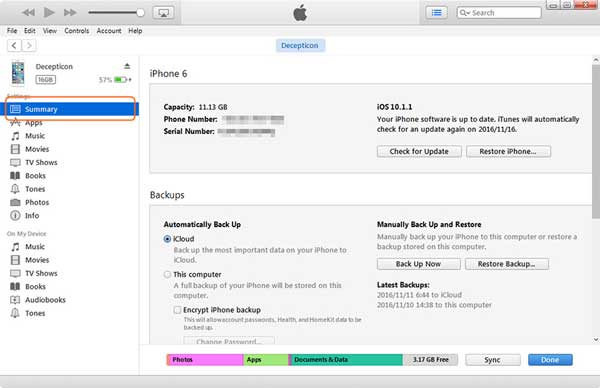
iTunes is equipped with an iOS data synchronization function, so it is not difficult to back up iPad to iTunes. And before starting the backup, you can select or deselect "Encrypted backup" as needed. However, iTunes performs one-click backup of all iOS data, which means you cannot selectively back up specified files.
How do I back up my iPad Air/mini/Pro/4/3/2 to Mac with iTunes?
- Connect your iPad to your Mac using a Lightning cable.
- Start the latest version of iTunes. (Your iPad cannot be detected due to the iTunes driver not being installed?)
- To have your device recognized, please trust your computer when prompted.
- After that, please choose your device name on your Mac. (Need to sync Health and Activity data or Apple Watch? Just check the "Encrypt [device] backup".)
- Create a password and save it somewhere before clicking "Back Up Now" to back up your iPad to this Mac.
Know More:
- What to Do If iPad Won't Restore or Update? Check the 7 Solutions Here
- [Easy Guide] How to Recover Data from Broken iPad Pro/Air/4/mini?
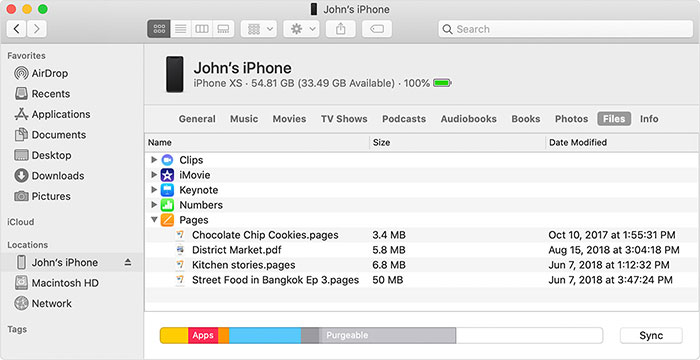
Method 4: How to Back Up iPad on Mac Computer Using Finder
As you may know, Apple retired iTunes in macOS Catalina or new. Yet, you still have the ability to run a backup on these Macs with an iTunes alternative - Finder. Here's how to back up iPad to Mac with Finder:
- On your Mac with newer macOS (Catalina or later), open "Finder".
- Link your iPad to your Mac through a USB cable.
- Follow the on-screen instruction to get your iPad identified.
- After that, select your iPad's name on Mac. (Mark "Encrypt local backup" if you want to save Apple Watch or Health/Activity files.)
- Create a password and tap "Back Up Now".
- Check if the backup is successfully created when the process ends.
Bonus: Tips to Manage iPad Backups on Mac
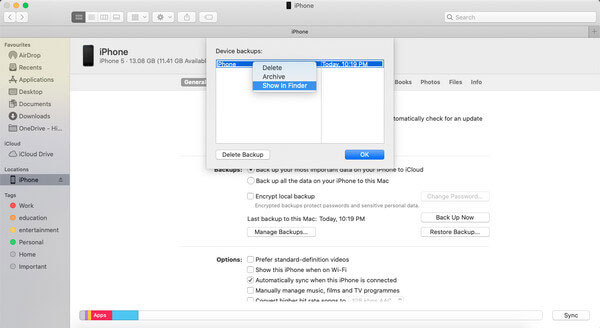
After backing up your iPad multiple times on your Mac, many backups will be created on your computer. These backups may be repetitive and unnecessary, but they occupy a lot of computer memory and make your backup management work more difficult. To easily view and restore them at any time, you can manage backup files directly on this Mac, such as deleting unnecessary backups to free up computer memory. Now let's see how to do it:
- Have your iPad connected to your Mac via USB cable.
- Open the "Finder" window by pressing "Command-N".
- Go to the "Locations" section and choose your device's icon.
- Go to the "General" > "Backups" > "Manage Backups" > "Device Backup".
- You can now manage or delete the iPad backups you ever made.
Words in the End
When it comes to backing up iPad to Mac, iTunes and MobiKin Assistant for iOS might be your first choice. Because iCloud is very inefficient and error-prone when performing tasks, it should only be used as an alternative. When choosing between iTunes and Assistant for iOS, if you want to flexibly backup and restore iPad, you only need to consider Assistant for iOS. That is because iTunes does not support selective backup and will overwrite the existing data of iPad when restoring backup content. Finally, if you have any questions or suggestions, please let us know below. Thanks!
Related Articles:
How to Restore iPad from iPhone Backup? 3 Worry-free Options Here
How to Back Up Android to Mac? (5 Free Ways)
How to Sync iPad with New Computer (PC & Mac) without Erasing?
3 Easy Methods to Remove MDM from iPad with/without Computer or Password
[Easy Guide] How to Transfer Files from Mac/Macbook/iMac to iPad?


