Top 8 Methods to Transfer Videos from iPhone to Mac/MacBook/iMac/Mac Pro
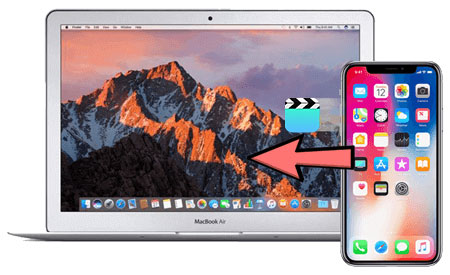
There are many benefits to transferring videos from iPhone to Mac, such as backing up precious memories, editing videos on a larger screen, or freeing up space on your iPhone. Transferring videos is a common task for many iPhone and Mac users, and there are multiple ways to do it. You can import videos using the built-in Photos app, transfer videos wirelessly using iCloud, or use specialized transfer software.
In this article, we'll share the best ways to easily transfer videos from iPhone to Mac. We'll also provide helpful tips and tricks so you can easily edit and manage the transferred videos.
- Way 1: How to Import Videos from iPhone to Mac via USB Cable Only
- Way 2: How to Transfer Videos from iPhone to Mac via Assistant for iOS [HOT!]
- Way 3: How to Transfer Video from iPhone to Mac Using iCloud Photos
- Way 4: How to Get Videos from iPhone to Mac Using Photos App
- Way 5: How to Move Videos from iPhone to Mac by AirDrop
- Way 6: How to Upload Videos from iPhone to Mac with Google Drive
- Way 7: How to Download Video from iPhone to Mac with Image Capture
- Way 8: How to Send Video from iPhone to MacBook via Email
Way 1: How to Import Videos from iPhone to Mac via USB Cable Only
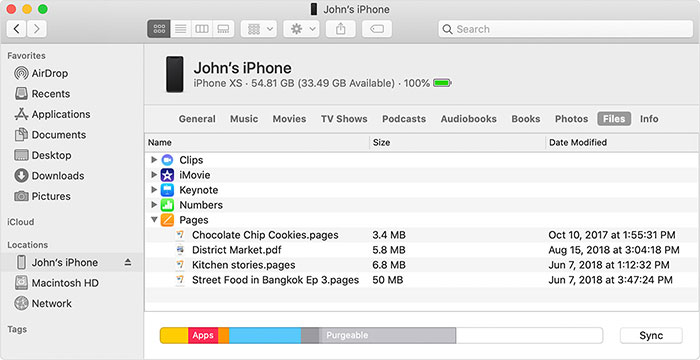
One of the simplest ways to transfer files between your iPhone and Mac is by connecting them directly. This method becomes effortless when you have a readily available USB cable. Here's the guide for how to get videos from iPhone to Mac with a USB cable only:
- Begin by connecting your iPhone to your Mac using a USB cable.
- Your iPhone might prompt you to verify and grant permission for the connection between the two devices.
- Next, launch the Finder window on your Mac and locate your iPhone under "Devices/Locations".
- Finally, navigate to the folder where your videos are stored on your iPhone.
- Copy the desired video clips and paste them onto any location on your Mac.
Way 2: How to Transfer Videos from iPhone to Mac via Assistant for iOS
If you want to transfer large video files from your iPhone to Mac without losing quality, you can use MobiKin Assistant for iOS (Mac and Windows). This tool allows you to transfer videos from various apps on your iPhone, including Photos, Movies, TV Shows, Home Videos, Music Videos, and more. It enables you to transfer multiple videos quickly and without compression, and also offers one-click transfer and backup options.
With iPhone Data Transfer, you can easily and efficiently manage and transfer all types of multimedia files, including videos, music, and photos, between your iPhone and Mac.
Main Features of MobiKin Assistant for iOS:
- Provides an easy way to transfer videos from iPhone to Mac/MacBook/iMac/Mac Pro, and vice versa.
- Transfer videos from iPhone to Mac or MacBook with original quality.
- Effortlessly back up and restore iPhone/iPad/iPod touch with a simple click.
- Supports a wide range of file types, including videos, contacts, text messages, photos, music, notes, bookmarks, books, calendars, and more.
- Manage, edit and delete your iOS data directly on your computer.
- Works well with almost all iOS devices, including iPhone 16/15/14/13/12/11/X/8/7/6, iPod touch, iPad, etc.
- It won't disclose your privacy.
Install the program after the free download. Then go through the easy guide for how to transfer videos from iPhone to Mac via MobiKin Assistant for iOS:
Step 1. Link your iPhone to your MacBook
Launch Assistant for iOS on your Mac and connect your iPhone to the Mac using a USB cable. (What to do when iPhone won't connect to Mac?) Then click the "Trust" button on your device to authorize the connection.

Step 2. Preview and pick the video clips you desire
The program interface will appear on your Mac, displaying all file types on the left-side menu. To transfer videos, click "Video" > "Movies/TV Shows/Music Videos", and all the items on your iPhone will be displayed for preview. You can now select the desired ones you wish to transfer to your Mac.

Step 3. Transfer videos from iPhone to Mac
After the selection, you can hit the "Export" button on the top screen to bring out the path-choosing dialog. Just choose a location on your Mac, and the iPhone video to Mac transfer will start off instantly.
Video Guide:
Way 3: How to Transfer Video from iPhone to Mac Using iCloud Photos
Enabling iCloud Photos on your iPhone and Mac allows seamless sync of videos across various iOS devices without a USB cable. Before proceeding, ensure sufficient iCloud storage to accommodate videos. (Not enough iCloud storage?) If needed, free up space or purchase additional storage from Apple. Now, check out the tutorial on how to download video from iPhone to Mac via iCloud Photos:
- On your iOS device, enable "iCloud Photos" in "Settings" > [your name] > "iCloud" > "Photos".
- Open "System Preferences" from the Apple menu.
- Access "iCloud" or "Apple ID", then select "iCloud".
- For macOS Catalina and later, click "Options" next to iCloud Photos; otherwise, check the box.
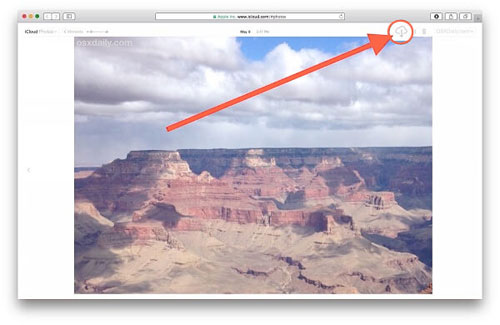
- To download photos or videos to your Mac from iCloud, visit iCloud.com.
- Sign in to your iCloud account, choose "Photos", and select the items you want to transfer.
- Click the "Download Selected Items" icon at the top right corner.
If you have videos shot in high resolution or 4K, verify that the video quality is maintained during the transfer. iCloud Photos preserves video quality, but it's always good to double-check.
Way 4: How to Get Videos from iPhone to Mac Using Photos App
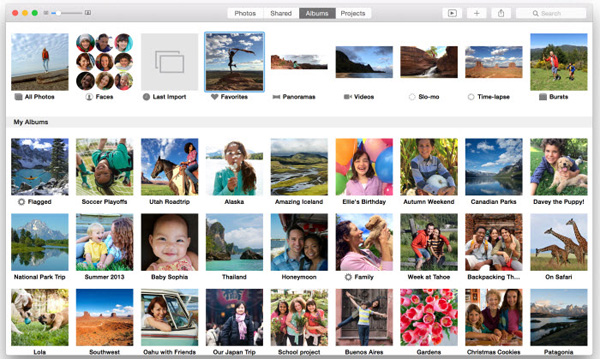
To utilize this approach, ensure you have an authentic USB cable and the Photos app installed on both your iPhone and Mac. After completing the transfer, you can delete the videos from your iPhone, freeing up space for capturing more moments. Next, let's figure out how to upload videos from iPhone to Mac with the Photos app:
- Connect your iPhone to your Mac using a cable.
- If Photos doesn't open automatically, launch the application.
- Locate and select your iPhone from the sidebar on the left side of Photos.
- Click "Import All New Videos" or choose specific videos and click "Import Selected".
- Your newly imported videos are now safely stored on your Mac.
Way 5: How to Move Videos from iPhone to Mac by AirDrop
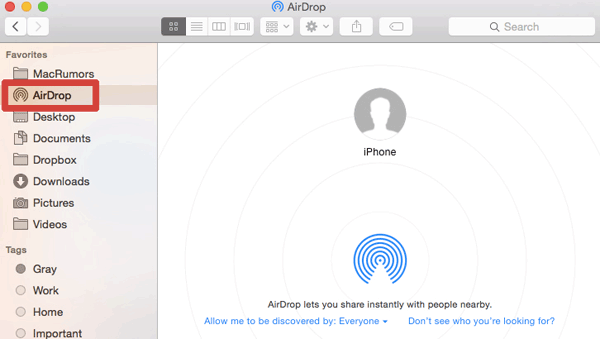
Before proceeding, enable Wi-Fi and Bluetooth on both your Mac and iPhone. Then ensure your iPhone runs iOS 7 or later and your Mac is with OS X Yosemite or newer. Then you'll see how to get videos from iPhone to Mac with this built-in feature on Apple devices:
- On your Mac, access "Finder" > "Go" > "AirDrop" and enable Bluetooth and Wi-Fi to activate AirDrop.
- Set the "Allow to be discovered by" option to either "Everyone" or "Contacts Only".
- Open "Control Center" on your iPhone by swiping up from the bottom of the screen.
- Tap "AirDrop" and choose "Contacts Only" or "Everyone" for discoverability.
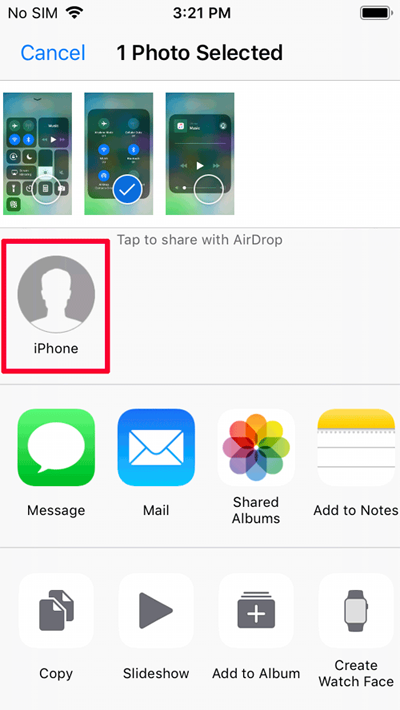
- Launch the "Photos" app on your iPhone.
- Select the videos you wish to transfer from your iPhone to your Mac.
- Click the "Share" button, then select your Mac's name from the AirDrop section to import the videos immediately.
Way 6: How to Upload Videos from iPhone to Mac with Google Drive
If you want to transfer over 2GB of videos hassle-free, you can try it with the renowned Google Drive app, a decent AirDrop alternative. It provides a generous 15GB of free storage, compatible with iOS, Android, macOS, and Windows, preserving video quality throughout. Now, we shall guide you through how to import videos from iPhone to Mac using Google Drive:
- Install the Google Drive app on your iPhone and log in using your Google account to begin.
- Launch the app and sign into your Google account.
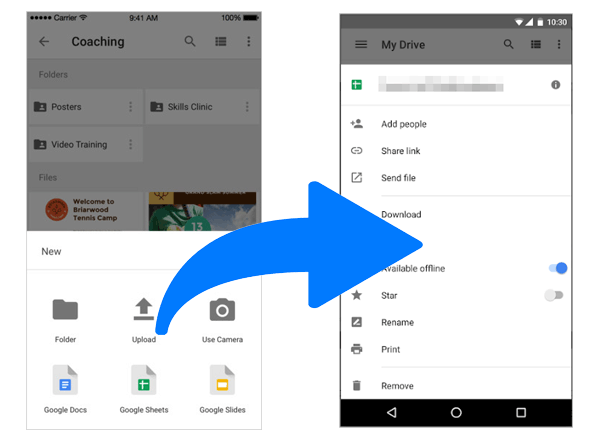
- Tap the "+" button in Google Drive, then choose "Upload" and navigate to the "Upload files" section.
- Select the videos you wish to transfer and tap "Upload" once more. Wait for the upload to finish.
- Next, access drive.google.com through your Mac's browser and log in to your account.
- Lastly, download the uploaded video files to your Mac.
Way 7: How to Download Video from iPhone to Mac with Image Capture
Image Capture offers the advantage of importing images to any folder on your Mac, bypassing the Photos app's restrictions. This feature is particularly useful for experienced photographers who prefer organizing photos in separate folders outside the Photos library. Now, we'll walk you through how to transfer video from iPhone to Mac via Image Capture:
- Connect your iPhone to your Mac using a USB cable and open Image Capture. A list of video files from your iPhone camera roll will be displayed.
- Choose the videos you wish to transfer to your Mac and click "Import". (You can transfer multiple videos by holding the "Command" key. To import all videos at once, click the "Import All" button.)
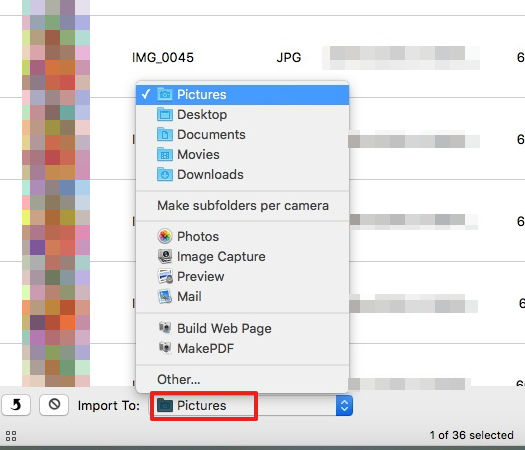
- A window will appear, allowing you to specify the destination folder on your Mac to save the iPhone videos.
- Select your preferred location and click "Import" to begin the transfer of the selected videos.
Way 8: How to Send Video from iPhone to MacBook via Email
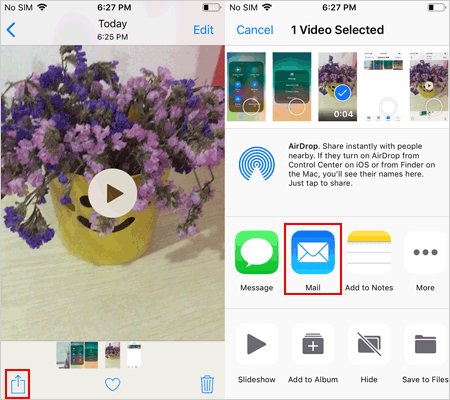
To wirelessly transfer videos from an iPhone to a Mac, using email for a few small file-size videos is a viable option. However, keep in mind that there might be limitations on the number of files you can attach or the overall size of the attachments, depending on your email service provider. Learn how to transfer videos from iPhone to Mac over Email:
- Select the videos you wish to transfer from your iOS device and tap the "Share" button.
- Then, opt for the Mail icon.
- Choose a mail account and complete the verification. The selected videos will be sent to your email address.
- Open the Mail application on your Mac and effortlessly view and download the videos.
The End
Overall, this guide is perhaps the ultimate resource you've been searching for. From traditional methods like using iCloud and the Photos app to more innovative wireless options, we've covered them all. And for those who seek a reliable, efficient, and versatile solution, we shall conclude this article by recommending MobiKin Assistant for iOS, a powerful tool that makes video transfers between iPhone and Mac a pleasant experience.
FAQ on Video Transfer from iPhone to Mac
Q1: Can I transfer videos from iPhone to Mac wirelessly?
Yes, you can use AirDrop to transfer videos from iPhone to MacBook wirelessly as long as both devices have AirDrop, Wi-Fi, and Bluetooth enabled. Also, make sure your iPhone and Mac are within a reasonable distance of each other.
Here's how:
- On your iPhone, open Control Center, press and hold the AirDrop icon, and select Everyone.
- On your Mac, open Finder > AirDrop, and select Everyone at the bottom of the window.
- Open the Photos app on your iPhone and select the video you want to send.
- Click the Share icon in the bottom left corner and select AirDrop.
- Select your Mac as the receiving device.
- On your Mac, click Accept in the pop-up prompt.
Q2: How can I transfer videos from iPhone to Mac without losing quality?
To avoid losing video quality, especially when transferring 4K videos, the best way is to upload them to iCloud. If you have iCloud Photos enabled on your iPhone, your videos will be uploaded in their original resolution.
To ensure original quality on your Mac:
- Enable iCloud Photos on your Mac.
- Open the Photos app on your Mac and go to Photos > Preferences.
- Under iCloud, select "Download Originals" to download your videos in full quality.
Q3: How can I transfer a large number of photos and videos between iPhone and Mac?
If you need to transfer a large number of files, including photos, videos, and music, you can use a dedicated tool like MobiKin Assistant for iOS. This software allows transferring multiple files at once at extremely fast speeds without any loss of quality.
Related Articles:
How to Transfer Videos from iPhone to iPad in 5 Simple Ways?
6 Useful Ways to Mirror iPhone to Mac Devices with USB or Wirelessly
How to Transfer File/Data Between iPhone and MacBook in 7 Easy Ways?
How Long Does It Take to Back Up iPhone to iCloud/iTunes? Here's The Answer


