iCloud Backup vs iTunes Backup: Which One Should We Choose?
We all have important data stored on our phones because we don't want to lose them because the device is unusable. Therefore, backing up our devices to ensure that the important information is properly stored is something we must do. Among the means of backing up iOS devices, there are two methods competing with each other, iCloud backup vs. iTunes backup. Both of them are very good and impressive when it comes to backing up the contents of the device.
Roughly speaking, iTunes is the traditional method of backing up data using a USB cable, while iCloud is a modern method of backing up the contents of the device via Wi-Fi. In this article, you will learn the detailed differences between iCloud backup and iTunes backup, so that you should know whether you should use iCloud or iTunes to back up your iOS data.
Part 1: What Are iCloud Backup & iTunes Backup?
What does iTunes backup save, and what does iCloud backup include? Well, before getting into these two questions, let's take a quick look at what iCloud backup and iTunes backup are.
What is iCloud Backup:
As Apple's online storage service officially released on May 31, 2011, iCloud backup enables its users to create a copy of data in its cloud server. And data can be restored or transferred to new devices. To do these, you should first connect your iPhone, iPad, or iPad to a WiFi network and ensure there's enough space available in the cloud.
What Does iCloud backup Include:
- Device settings.
- Home screen and app organization.
- iMessage, SMS, and MMS.
- Photos and videos on your iOS devices.
- Purchase items from Apple services (music, movies, TV shows, etc.)
- Ringtones.
- App data.
- Apple Watch backups.
- Visual Voicemail password.
What is iTunes Backup:
iTunes, a digital media playback application that automatically syncs your device when you connect it to your computer. And you can also back up your device manually at any time. It's able to process your iOS multimedia files, contacts, call logs, apps, etc. Unlike iCloud, iTunes backup files are stored in the C disk of a computer by default, rather than in the cloud space.
What Does iTunes Backup Include:
- Messages & Call Logs
- Memos, Calendar, and Bookmark.
- Mail cache/message/attachments.
- Media files.
- Photos
- Application data.
- iPhone Settings.
- Safari history.
- Offline data.
- Browse cache.
- Temp files.
Part 2: Major Differences between iCloud and iTunes Backup
In terms of iTunes vs iCloud backup, the main differences between them are mainly in backup location, storage space, accessibility, encryption, etc. Now, to let you have a more intuitive and clear understanding of them, we'll cover details in the following table:
|
iCloud Backup
|
iTunes Backup
|
|
Back up data on cloud storage |
Back up data on PC/Mac |
|
Offers storage up to 4TB (the first 5GB is free) |
The storage size is determined by your computer |
|
Allows you to make and use backup files from anywhere over WiFi |
Lets you create and use backup files from your computer |
|
WiFi connection |
USB connection |
|
Apple ID required |
No Apple ID required |
|
Incremental backup |
Full backup |
|
Always encrypts your backups |
Offers encrypted backups (it is off by default) |
Part 3: How to Use iCloud and iTunes to Back Up iDevices?
Some beginners of iTunes and iCloud may be unacquainted with the process of using them to back up iOS devices. Now let's describe how they work briefly:
How to back up iPhone/iPad/iPod to iCloud:
- Make sure your phone's battery is at least 80% charged.
- Connect your iDevice to a stable Wi-Fi network.
- Ensure there's enough space available in iCloud.
- If you are using iOS 11 or above, go to Settings > [your name] > iCloud > iCloud Backup. If the device is running iOS 10.2 or earlier, head to Settings > iCloud > Backup.
- Tap on "Back Up Now" to proceed. (My iPhone won't back up to iCloud? Here are the fixes.)
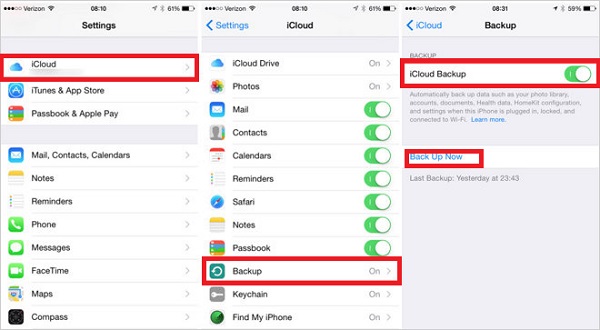
After the backup, you can check the backup files by going to "Settings"> [your name] > "iCloud"> "Manage Storage".
How to Back up iPhone/iPad/iPod to iTunes:
- Run the latest version of iTunes on your computer. (or open iTunes > Choose "Help" > "Check for Updates" if the tool is not up to date)
- Link your iPhone/iPad/iPod to the computer via a lightning USB cord.
- The device should be asked to trust this computer if it hasn't been trusted yet.
- Tap the iDevice icon at the upper-left corner of the interface, and your handset info will be listed on iTunes.
- Choose Summary > This Computer. (Want to encrypt your iOS backup? Just tick on "Encrypt iPhone backup" here)
- Press "Back Up Now" to commence. If there are no iTunes errors, the time to complete the backup will depend on how much content is synced.
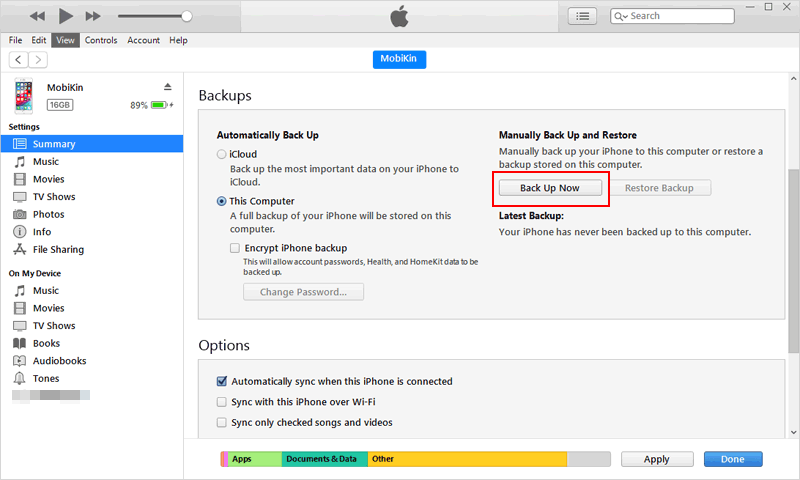
Once completed, you can find and view iTunes backup files on PC/Mac easily:
- For Win XP: \Users\(username)\AppData\Roaming\Apple Computer\MobileSync\Backup\
- For Win Vista/7/8/10: \Users\(username)\AppData\Roaming\Apple Computer\MobileSync\Backup\
- For macOS: /Library/Application Support/MobileSync/Backup/
Part 4: Pros & Cons of iCloud and iTunes Backup
For this part, we'll deliver the main advantages and disadvantages of using iCloud and iTunes to explore iCloud backup vs iTunes backup further. On top of that, you'll learn about the data types they don't work for.
iCloud Backup:
Pros:
- Easy to operate.
- Let you back up your iDevice wirelessly and automatically.
- Store all messages include iMessages and SMS.
- End-to-end encryption for securing privacy.
- Only when you enter your Apple ID can you access your iOS data.
Cons:
- A bit sluggish.
- You need to have a WiFi connection.
- You get only 5GB of free storage for backup.
- Less reliable on Windows.
- Limited collaboration support.
- Less straightforward than competing services/tools.
- Doesn't allow its users to choose which images, videos, etc., to sync.
Does not include:
- The files that you did not purchase from iTunes Store.
- Data that is already stored in iCloud.
- Items stored in other cloud services.
- Apple Pay info, Face ID/Touch ID settings, iCloud Music Library, and App Store content.
iTunes Backup:
Pros:
- It is another option you don't want to use for cloud backup.
- You don't have to worry about how to deal with your large files.
- Doesn't require a WiFi connection.
- Allow you to back up iDevices to an external drive.
Cons:
- Backups are nowhere near as fast as professional 3rd-party tools.
- The UI is complex and not user-friendly.
- Limited file formats are supported.
- Each update makes this tool more and more space-eating.
- Inconvenient for its users with multiple iDevices.
- It may also suffer from various lags in iDevice management.
Does not include:
- Content from the iTunes and App Store.
- My Photo Stream.
- Content synced from iTunes.
- Face ID or Touch ID settings.
- Activity, Health, and Keychain data.
- Apple Pay info and settings.
Part 5: Back Up iOS Devices with the Best iCloud/iTunes Alternative
Are you still wondering whether to choose iCloud or iTunes? Simply have a look at their alternative first. You don't need to worry about the inefficiency of your backup procedure, and you don't have to sigh at the sporadic iCloud or iTunes backup errors. MobiKin Assistant for iOS (Win and Mac) is the best replacement for iCloud and iTunes. It lets you back up your entire iOS data flexibly, and the previous content will not be covered after data restore.
Brief Overview of Assistant for iOS:
- One-tap to back up all or specific data from iOS devices to PCs/Macs.
- Work for various iOS data types, including Video, Photo, Music, Contacts, Messages, Notes, Bookmarks, Voice Memo, etc.
- Perform tasks without launching iTunes, and no data loss occurs all through.
- Manage and edit iPhone/iPad/iPod data and iTunes backups on computer.
- Back up and restore content between iDevices with one click.
- Apply to various iOS devices, including iPhone 16/15/14/13/12/11/X/8/7/6, iPod, iPad, etc.
- It never interferes with its users' privacy.
Now, just download the right version of the program and give it a shot with its free trial.
How to back up iOS devices using MobiKin Assistant for iOS?
Step 1. Connect your iPhone to your computer
Install and launch Assistant for iOS on your computer. Connect your iPhone/iPad/iPod to the computer with a USB cable. Then this program will recognize your device automatically, and its main screen will turn up immediately.

Step 2. Select desired data for backup
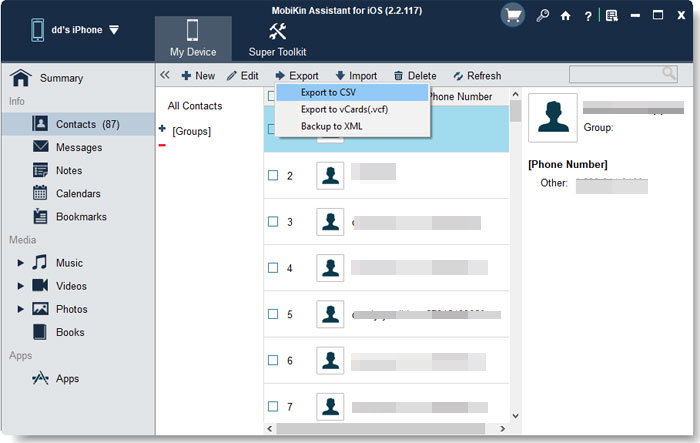
You can find a list of iOS file categories at the left sidebar. Just click the data type(s) and select the specific files you'd like to back up by marking them.
Step 3. Back up iPhone data to the computer
Tap the "Export" button at the top menu to transfer from your device to your computer. After it is done, you can check the content on this computer directly.
This program also allows you to back up your iOS device in batches. All what you need to do is going to choose "Super Toolkit" > "iTunes Backup & Restore" > files selection > "Backup". For details, please get into this page: Two efficient methods to back up and restore iPhone without iTunes.
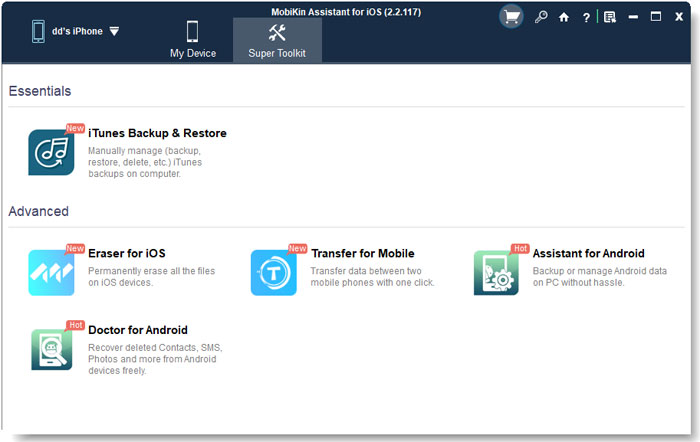
Video guide on how to use Assistant for iOS to backup your iPhone:
Final Words
That's all about the differences between iCloud backup and iTunes backup. All in all, both backup methods are safe and reliable, and they ensure that your data is stored in a secure location. You can use either iCloud backup or iTunes backup, but for the best protection, we recommend that you use both backup options.
If you want a more flexible backup plan, try the best iPhone backup software MobiKin Assistant for iOS to selectively transfer data between your Apple device and computer. If you like this article, you can share it to help more people.
Related Articles:
How to Cancel iCloud Storage Plans by Yourself?
Effective Ways to Transfer iCloud Backup to Samsung Galaxy


