How to Fix iPhone Not Syncing with iTunes/Computer [11 Methods & 1 Alternative]
It can be disheartening when you are trying to sync your iPhone with iTunes and encounter issues that prevent the process from working smoothly. And there are multiple situations where you may need to sync your iPhone with iTunes, such as when you want to back up your data, transfer files, or update iOS.
In this article, we will provide 11 quick fixes that can help you resolve "iPhone not syncing with iTunes". Plus, we will also introduce an iTunes alternative to assist you in syncing your iPhone to your computer/iTunes without trouble. Yet before proceeding, let's first understand what invites this phenomenon.
Part 1: Why Won't My iPhone Sync with iTunes?
There are several reasons why iPhone won't sync with iTunes. And some of the common underlying causes include:
- Outdated iTunes/iOS.
- iTunes driver is not installed.
- Failed USB Connection.
- Security Software Like Antivirus Programs.
- The System Is Running Low on Memory.
- Corrupted iTunes Library.
- Incorrect Syncing Options.
- Wrong Data & Time on Computer.
- Outmoded System Drivers.
- Disabled iCloud Sync.
Check Also:
- Finding Methods to Connect iPhone to iTunes? Here!
- Top 4 Solutions to Fix iPhone Unavailable without Data Loss
Part 2: Fix iPhone Not Syncing with iTunes via 11 Hot Tips
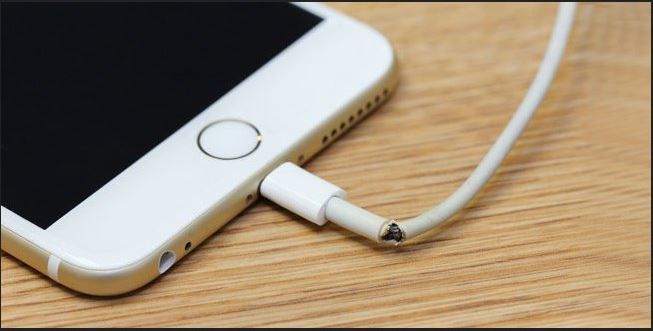
Tip 1: Try another USB cable or port
To avoid "iTunes not syncing with iPhone", it is recommended to use a dependable USB cable when linking your smartphone to your computer. Improper USB cables are often the cause of such issues. Therefore, you'd better inspect the USB cable before connecting your iPhone 14/13/12/11/X/8/7 to your computer.
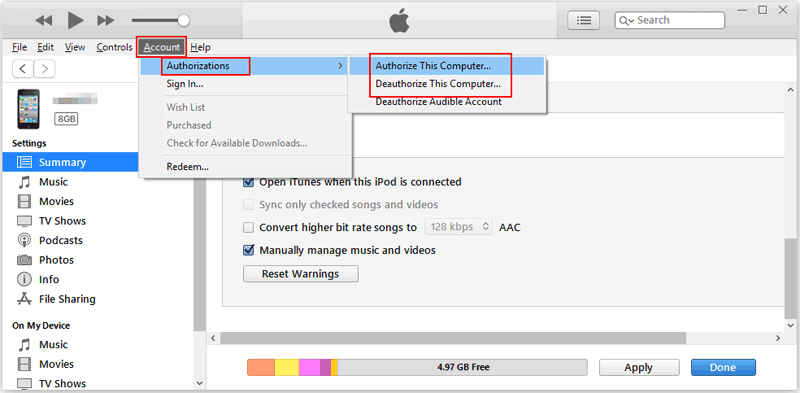
Tip 2: Reauthorize iTunes
- On a Windows PC, connect your iPhone to your computer and open iTunes; click on the "device" button that resembles a phone and go to the "Account" section in the new window; from the drop-down menu, select "Authorizations" and tap "Authorize This Computer".
- On a Mac, open iTunes and go to the menu bar at the top of your screen; choose "Store" and select "Authorize This Computer" to fix "iPhone won't sync with iTunes".
Tip 3: Verify data & time on your computer
To troubleshoot "iPhone won't sync with computer", check your computer's date and time settings first:
- On a PC, right-click the time in the lower right corner and select "Adjust Date/Time".
- On a Mac, go to the "Apple" menu > "System Preferences" > "Date & Time".
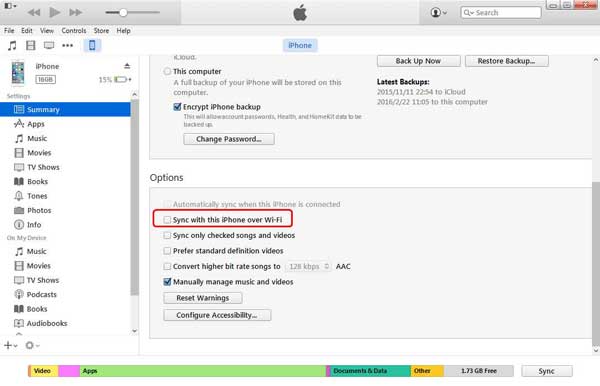
Tip 4: Sync iPhone with iTunes wirelessly
You can now perform the sync process wirelessly by turning on the Wi-Fi sync option in iTunes. If the option is already enabled, just toggle it off and on again to troubleshoot "iPhone won't sync to iTunes". To activate this feature, navigate to the "Summary" tab on the left side of the iTunes interface and check the "Sync with this iPhone over the Wi-Fi" option in the right panel.
See More:
- 6 Workarounds to Recover Deleted Files from iPhone with/without Backup
- How to Back Up Your Android Phone to PC in 2023?
Tip 5: Consolidate iTunes media files
This method is especially applicable to the iTunes error 54 that occurs when you can't sync iPhone due to media files saved in different folders. You can consolidate your iTunes media files as follows:
- Open iTunes and go to "File" > "Library".
- Tap "Consolidate Files..." or "Organize Library" with the "Consolidate files" option checked.
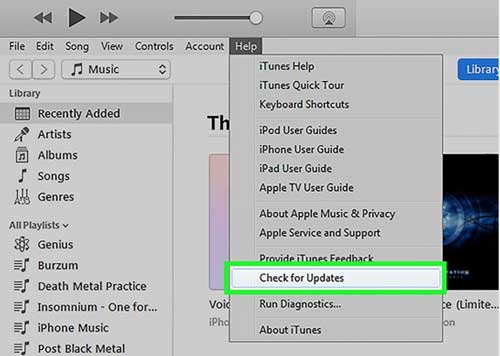
Tip 6: Update iOS and iTunes
- Update your iPhone's iOS: Open the "Settings" app, select "General" > "Software Update" > "Download and Install" > "Install Now" to fix iPhone not syncing.
- Update iTunes on your computer: Run the software and click on "Help" > "Check for Updates". If a new version is available, follow the on-screen instructions to update it.
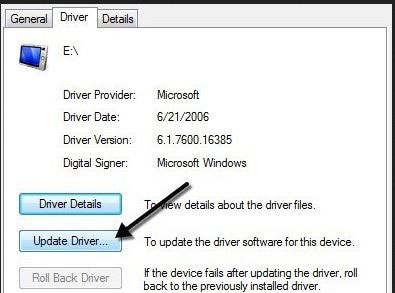
Tip 7: Update the system driver
- To tackle the iPhone sync problems, open "Device Manager" on your computer.
- Locate "Portable Devices" under "Network Adapters".
- Right-click on "Apple iPhone" and select "Update Drivers".
- Browse for drivers from C:\Program Files\Common Files\Apple\Mobile Device Support\Drivers.
- Once done, launch iTunes and your iPhone should be visible.
Tip 8: Create another iTunes library
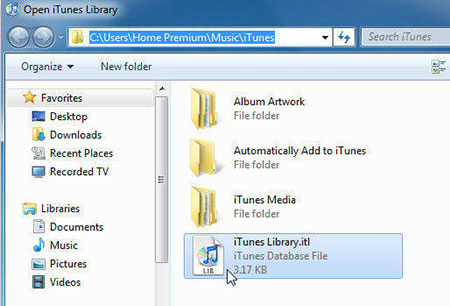
"My iPhone won't sync to iTunes"; It could result from a corrupted or duplicated iTunes library. To fix this, follow these steps:
- Hold down the "Shift" key and launch iTunes.
- Choose "Create Library" and reopen iTunes to see if the new library works for syncing data from your iPhone to iTunes.
- Navigate to "My PC" > "Music" > "iTunes" and rename the old iTunes Library as "outdated" or "corrupted".
- Find the most recent library in the "Previous iTunes Library" and copy it.
- Paste the library into the current iTunes and rename it as "iTunes Library.itl". (How to transfer purchases from iPhone to iTunes library?)
Tip 9: Turn off iCloud Sync
Enabling iCloud sync on your iPhone can also cause the "problem syncing iPhone to iTunes". To ensure that this is not the case, do as the drill demonstrates:
- Go to "Settings" on your iPhone.
- Click on your iPhone's name and select "iCloud".
- Turn off any options related to iCloud to prevent it from interfering with syncing on iTunes.
Tip 10: Factory reset iPhone
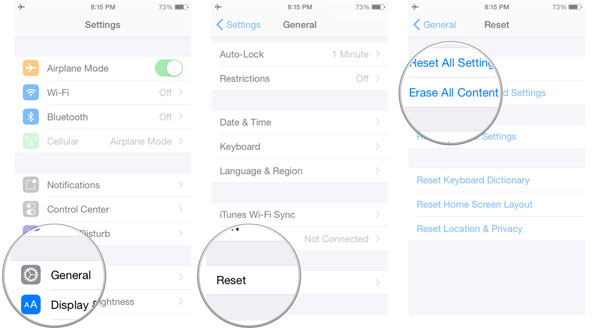
Before resetting your iPhone, ensure you have a backup of all your important data, including contacts, photos, documents, and more. Then disable "Find My iPhone" by going to "Settings" > [Your Name] > "Find My" > "Find My iPhone" and turn off the switch. Next, here's the trick to fix "iPhone won't sync to computer" by doing a factory reset on your device:
- Go to "Settings" > "General" > "Reset" > "Erase All Content and Settings".
- You will be prompted to enter your passcode and Apple ID.
- Tap "Erase iPhone" to factory reset your iPhone.
- Once it is finished, your iPhone will reboot and display the "Hello" screen.
- Follow the on-screen instructions to restore your iPhone from your backup.
Tip 11: Restart iPhone, iTunes, and computer
Restarting your iPhone, iTunes, and computer can help resolve various issues related to "iPhone won't sync with iTunes on Mac/PC". Here, please follow the simple steps to potentially settle the matter and improve your device's overall performance:
- To restart your iPhone, press and hold the "Power" button until the "Slide to power off" option appears; swipe the power off slider to the right; wait a few seconds until the screen goes black; press and hold the "Power" button again until the Apple logo appears on the screen.
- To relaunch iTunes, close iTunes if it is open; reopen the program on your computer.
- To restart a PC, click the "Start" button in the bottom left corner of your screen; tap the "Power" > "Restart".
- To reboot a Mac, click on the "Apple" menu, select the "Restart" option, and click "Restart" to confirm.
Part 3: Utilize the Best iTunes Alternative to Sync iPhone Smoothly
Are the ten quick workarounds not working for you? If not, there is an alternative way to sync your iPhone to your computer without iTunes. One option is to pick MobiKin Assistant for iOS (Win and Mac) for convenience. This professional product allows you to easily sync your iOS device to your computer flexibly within minutes. Additionally, you can also use this utility to manage your iOS data with minimum effort.
Why select MobiKin Assistant for iOS?
- Sync your iPhone with your computer seamlessly with a single click.
- Select and sync specific data from your iPhone to your PC/Mac easily.
- Effortlessly restore your iPhone/iPad/iPod touch from your computer.
- Selectively transfer data between iOS devices and computers with ease.
- Compatible with a wide range of data types, including Contacts, Text Messages, Videos, Photos, Songs, eBooks, Notes, Safari Bookmarks, Voice Memos, Podcasts, Ringtones, Playlists, and more.
- Let you directly manage iOS files on any computer.
- Apply to overall iDevices, including iPhone 14/14 Plus/14 Pro (Max), iPhone 13/13 Pro (Max)/13 mini/12/12 Pro (Max)/12 mini, iPhone 11/11 Pro/11 Pro Max, iPhone X/XR/Xs/Xs Max, iPhone 8/8 Plus, iPhone 7/7 Plus, iPhone 6/6S/6 Plus, iPod touch, iPad, etc.
- It won't let out your privacy.
How to sync your iPhone with iTunes/computer via Assistant for iOS?
Step 1. Connect your iPhone to your computer using a USB cable and launch the installed software. Follow the on-screen prompts to make sure your device is recognized. Once it is, you'll see the following screen.

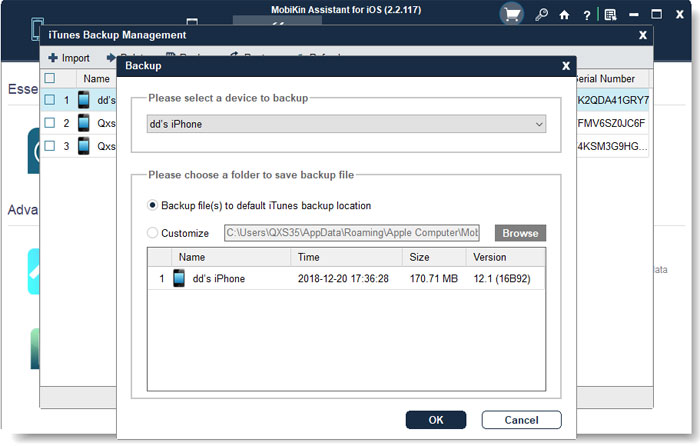
Step 2. Click on "Super Toolkit" > "iTunes Backup & Restore". Then a window will pop up. Just choose "Backup" from the top interface.
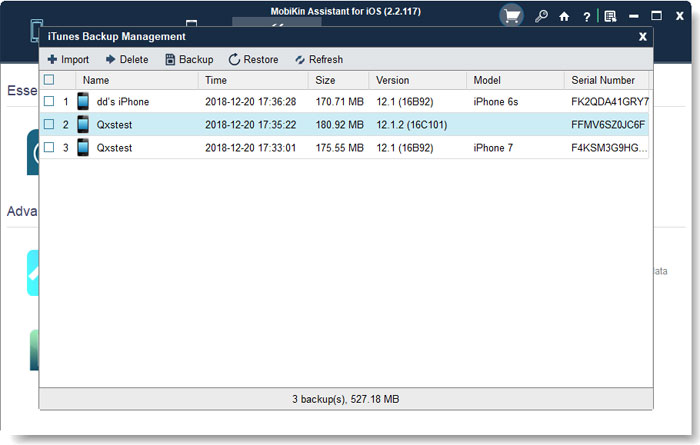
Step 3. Select your device to back up and choose the option "Backup file(s) to default iTunes backup location" or customize the location. At last, please tap on "OK" to start syncing your iPhone with iTunes/computer.
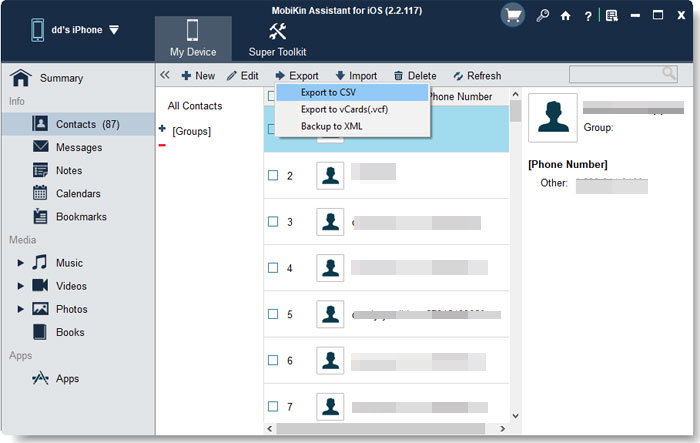
Note: Do you want to selectively sync your iPhone with your computer using this program? Quick Navigation: Pick the data types you wish to back up from the left-side menu when you get to the main screen of the program. Next, preview and select the specific items on the right. Finally, click "Export" from the top menu and save the selected iPhone files to the connected computer.
The End
In conclusion, having an iPhone not syncing with iTunes can be quite discouraging. However, there are several quick methods that are perhaps applied to fix the issue timely. If the going gets tough, don't hesitate to try a dedicated iTunes substitute like MobiKin Assistant for iOS. This powerful program can provide you with an even better syncing experience, in addition to managing your iPhone data on your computer without any hassle.
Related Articles:
How to Transfer Photos from Mac to iPhone? [6 Easy Ways Included]
How to Back Up iPhone before Upgrading to iOS 17: Tips the Experts Swear by
How to Troubleshoot Error 9006 on iTunes Efficaciously? Here's the Real Fix
iPhone Update Issues: 20 Common iOS Update Problems & Fixes
Detailed Tutorial on How to Back Up iPhone to Google Drive
9 Fixes to iTunes Could Not Back Up iPhone Because an Error Occurred


