Top 6 Ways to Transfer Files from Mac to iPhone [Fast & Easy]
Sharing files between devices is a common need in our daily lives. It is very important to learn how to transfer files from Mac to iPhone. Depending on the method, you can choose a wired transfer method or wireless transfer.
- To transfer data from Mac to iPhone or from iPhone to Mac using a cable: use MobiKin Assistant for iOS or Finder.
- To transfer data from Mac to iPhone wirelessly: AirDrop, Email, iCloud Drive or Dropbox.
Next, we introduce these six methods to you in detail. Whether you want to transfer files from Mac to iPhone or send files from iPhone to Mac, these methods will help.

- Part 1: Transfer Files from Mac to iPhone with Assistant for iOS (5 Minutes Way)
- Part 2: Copy Files from Mac to iPhone with AirDrop
- Part 3: Move Files from Mac to iPhone with Finder
- Part 4: Transfer Data from Mac to iPhone via iCloud Drive
- Part 5: Transfer Files from Mac to iPhone via Dropbox
- Part 6: Copy Files from Mac to iPhone via Email
Part 1: Transfer Files from Mac to iPhone with Assistant for iOS
To transfer files between Mac and iPhone, especially large files, you need an efficient tool that saves both time and money. MobiKin Assistant for iOS is the ideal choice. With this tool on Mac, you can transfer various types of iPhone data between iOS devices and Mac. In addition to importing files from Mac to iPhone, it also allows you to back up iPhone to Mac and manage data by easily editing, deleting or transferring files.
Why people choose MobiKin Assistant for iOS?
- Transfer files from Mac to iPhone, and vice versa, including contacts, SMS, notes, calendars, bookmarks, music, videos, photos, books and apps.
- Delete, edit and manage iPhone/iPad/iPod data on Mac freely.
- Uninstall apps with 1 simple click.
- Backup data from iOS device to iTunes default backup location and restore iTunes backup to your target device with ease.
- Support all available models of iOS devices, including the latest iPhone 16/15/14/13/12/11/X/8/7/6, etc.
Get the free trial version of the Assistant for iOS program from the buttons below. Then, follow the step-by-step instructions of how to transfer data from Mac to iPhone by using this tool.
Step 1: Connect your iPhone to the Mac computer
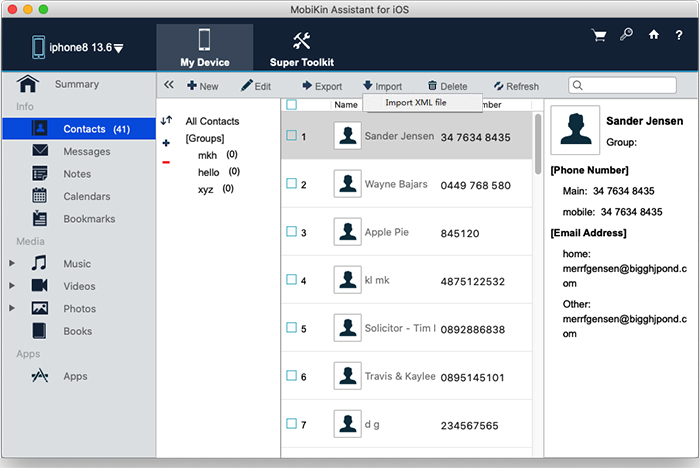
Download and install the program on your Mac. Open it and connect your iPhone to the Mac with a USB cable. Press on the button of "Trust" on the pop-up window of your iPhone and make it detectable by the Mac. After the connection, you can see the program interface like this:

Step 2: Copy files from Mac to iPhone
Navigate to the left side panel to choose the file types you want to transfer. For example, if you wish to import contacts from Mac to iPhone, you can choose the "Contacts" tab from the left, click the button of "Import" from the top menu to upload the contacts from Mac to your iPhone. Just follow the same way to copy other files from Mac to iPhone.
Video Guide:
If you want to perform a reverse transfer to export data from iPhone to Mac, you can click to read the article about how to transfer files from iPhone to Mac.
Part 2: Copy Files from Mac to iPhone with AirDrop
Applies to: Photos, Videos, Websites, Locations, and More
AirDrop is a built-in tool in Apple devices, you can see it on your iPhone, iPad and iPod. It allows you to share pictures, music, videos, files and other content between different devices. But transfer via AirDrop is very time consuming because it only supports dragging and dropping one content at a time. This means that when you transfer files from Mac to iPhone, you can only transfer file one by one. Therefore, this method is only suitable for transferring a small number of files.
Step 1: Turn on AirDrop on iPhone and Mac
On iPhone: Unlock your iPhone and swipe up from the bottom of the iPhone screen to enter "Control Center". For iPhone X, you should swipe down from the upper-right corner of the phone screen to enter the Control Center. Press "AirDrop" and set your iPhone to be discovered by "Contacts Only" or "Everyone". The former means your iPhone can only be found by the person in your contact list and the latter means any iOS devices and Mac machines that use AirDrop can find your iPhone. (AirDrop not working on iPhone?)
On Mac: Navigate to "Finder" > "Go" > "AirDrop" and turn on "Bluetooth" and "WiFi" to enable AirDrop on your Mac. Set you Mac to be discovered by "Contacts Only" or "Everyone".

Step 2: Use AirDrop to transfer files from Mac to iPhone
Once the Mac and iPhone are connected successfully, you can select the files you need and start the transfer process immediately. Here, we set transferring contacts from Mac to iPhone as an example.
Go to Contacts app on your Mac and select a contact you want to transfer to iPhone. Then, click the "Share" button and select AirDrop. Now, choose your iPhone as the receiving device and go to your iPhone to tap the "Accept" button in order to confirm the transfer.

Part 3: Move Files from Mac to iPhone with Finder
Applies to: Music, Movies, TV Shows, Books, Photos, and Documents
If you're using a Mac with macOS Mojave or later, Finder will be your go-to for device backup and data syncing, replacing the old iTunes method. Finder lets you easily transfer files from your Mac to your iPhone or iPad.
To transfer files from your Mac to your iPhone/iPad using Finder:
- Connect your iPhone or iPad to your Mac using a USB cable.
- Open Finder and select your device from the sidebar.
- In the "Files" tab, you'll see the apps on your iPhone/iPad that support file sharing.
- Drag files from Finder to the apps you want to use with those files.
- Once the sync is complete, you can access the files in the apps on your device.
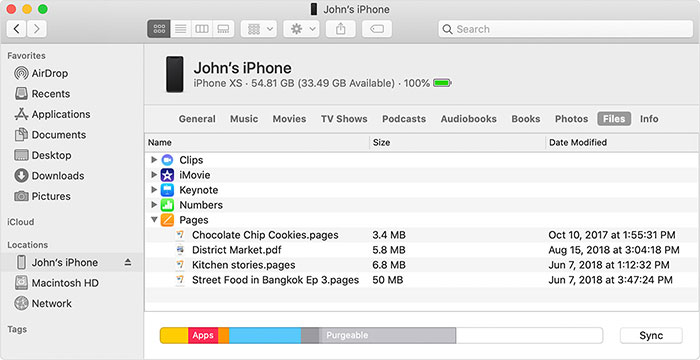
In addition to USB transfers, Finder also lets you sync content between your Mac and iOS devices over Wi-Fi.
Part 4: Transfer Data from Mac to iPhone via iCloud Drive
Applies to: Word documents, PowerPoint, Excel files, and more.
iCloud Drive lets you store files in the cloud and access them from iCloud.com, Mac, PC, and iOS devices. You can choose which folders and files to save in iCloud Drive, and once enabled, you'll be able to access your files on all your devices with the same Apple ID. (If iCloud Drive isn't syncing, see our article on how to fix it.)
To sync files between iPhone and Mac via iCloud Drive:
- Turn on iCloud Drive on your iPhone and Mac.
- Upload the files you want to transfer to iCloud Drive from the source device.
- Download the files from iCloud Drive on the destination device.
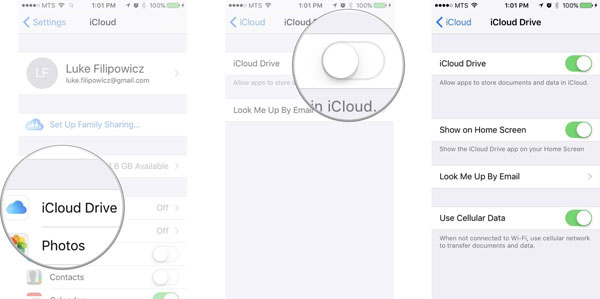
- On iPhone: Go to "Settings" > [your name] > "iCloud" and turn on "iCloud Drive."
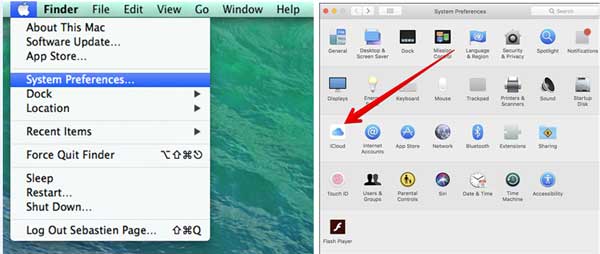
- On Mac: Go to "Apple menu" > "System Preferences" > "iCloud" and select "iCloud Drive."
For more information about uploading and downloading files using iCloud Drive, see the user guide on Apple Support.
Part 5: Transfer Files from Mac to iPhone via Dropbox
Applies to: Supported Files: Photos, Videos, Word Documents, Excel Files, PPTs, Text Files, Zip Files, Audio Files...
Dropbox is a cloud service that helps you move files between iPhone and Mac in one click, including images, music, videos, documents, and more. However, because this tool is cloud-based, it requires you to connect your device to the Internet. If you want to learn how to use Dropbox to send files from Mac to your iPhone, you can follow the instructions below.
- Go to the official website of dropbox and sign in to your account info. If you have no Dropbox account, you should create a new one.
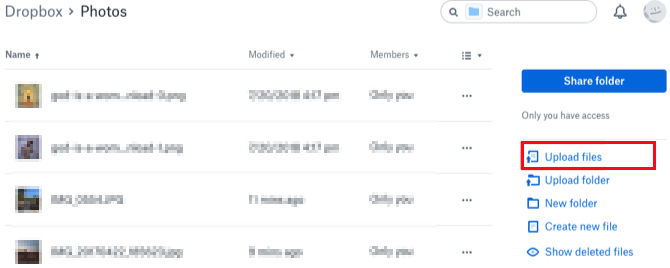
- On the interface of Dropbox webpage, click "Upload files" so as to import files from Mac to Dropbox.
- Download and install Dropbox app on your iPhone. Launch it and sign in your account info you used on Dropbox website.
- Check the transferred files and choose to download them to your iPhone.
Part 6: Copy Files from Mac to iPhone via Email
Applies to: photos, videos, documents, ...
Any file that can be added as an attachment to an email can be transferred between Mac and iPhone. You should make sure that there is enough storage space to download the email attachment and that both your devices are connected to a stable network.
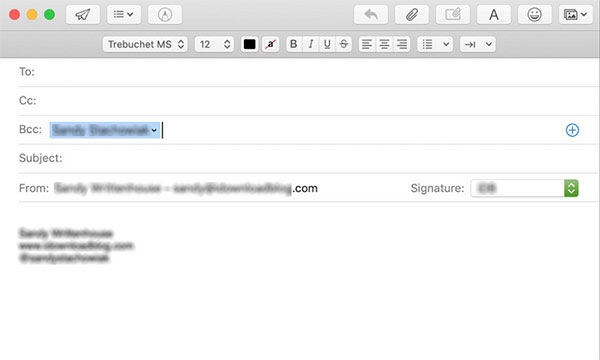
- Open your email app, create a new email and attach the file, then send that email to yourself.
- On your iPhone, open your favorite email app and view that email message. You can now choose to view the attachments and save them.
The Bottom Line
Above we have introduced six methods to transfer files from Mac to iPhone, each tailored to different needs and preferences. Among them, MobiKin Assistant for iOS (Mac) stands out as a complete solution. This third-party tool overcomes the limitations of other methods and offers several advantages, such as support for multiple file types, fast transfer speeds, file preview capabilities, and iTunes-like features. Give it a try and enjoy its all-in-one functionality!
Related Articles:
6 Tips: How to Transfer Photos from Mac to iPhone? (#2 is Awesome)
How to Transfer Photos from iPhone to Mac (7 Ways Offered)
How Can I Send Messages from Mac to iPhone or Android Easily


