How to Export iPad Photos to External Hard Drive - 7 Top Ways
"I have photos on my iPad Pro that I want to transfer to my external drive. Is there any easy method to accomplish this? Thank you!" -- Apple Support Communities
Apple fans often use iPad for photo taking or photo post-processing. Sometimes, the device may be running out of space. And in this juncture, it's urgent to transfer photos to a hard drive, flash drive, computer, etc., for safekeeping before deleting pictures on the iPad to make room for it.
So, here comes a question - how to transfer photos from iPad to external hard drive? OK, we will gather the top 7 ways to resolve this issue in this passage.
- Part 1: Export iPad Photos to External Drive on PC
> Way 1: Using Assistant for iOS
> Way 2: Via Windows/File Explorer
> Way 3: Using Photos App
> Way 4: Via iCloud - Part 2: Transfer Photos from iPad to External Hard Drive on Mac
> Way 1: Via Image Capture
> Way 2: Using Mac Photos App - Part 3: Transfer Photos from iPad to Hard Drive without Computer
- FAQs on iPad Transfer Photos to Hard Drive
Part 1: How to Export iPad Photos to External Drive on PC
Here are four ways to transfer photos from an iPad or iPhone to an external hard drive on a Windows PC, whether you're using Windows 8, 10, 11, or later:
Way 1: Using Assistant for iOS
To transfer photos from iPad to external hard drive, the best way is using a professional iOS data transfer and backup tool called MobiKin Assistant for iOS (Win and Mac). This incredible tool is designed to help transfer, back up, restore and manage your various iOS data in a well-rounded way. With it, you can preview all the detailed info of iPad photos and albums on a computer before selecting your desired items from iPad to an external hard drive, computer, flash drive or other storage devices.
Why choose MobiKin Assistant for iOS:
- Transfer photos from iPad to computer/external hard drive/flash drive without quality loss.
- You can back up iPad fully with one click, or preview and selectively back up specific data on iPad.
- Manage iOS content on a PC/Mac directly.
- An user-friendly interface helps you complete the process smoothly and quickly.
- Work properly on full iPad models, including the latest iPad 10, and works well with iPhone and iPod touch.
- It never lets out your privacy.
How to move pictures from iPad to external hard drive via Assistant for iOS?
Step 1. Install and run Assistant for iOS on your computer. Link your iPad and the external hard drive to this computer through USB cords. Trust the PC and then follow the prompts to get the linked devices recognized by the program.

Step 2. Select "Photos" from the left panel. View and tick on the pictures you want to transfer. Finally, tap "Export" from the top screen, change the storage path to the external hard drive, and then start to move the selected photos onto the portable hard drive.

Video Guide:
Way 2: Via Windows/File Explorer
File Explorer in Windows 10/11 (named Windows Explorer in Windows 8/7) is capable of saving iPad photos to external hard drive. Yet, it can process photos from iPad Camera Roll only. Here are the steps:
- Connect both the iPad and external hard drive to a computer.
- Open "This PC"/"My Computer".
- Find your iPad under Devices and drives.
- Unlock your iPad.
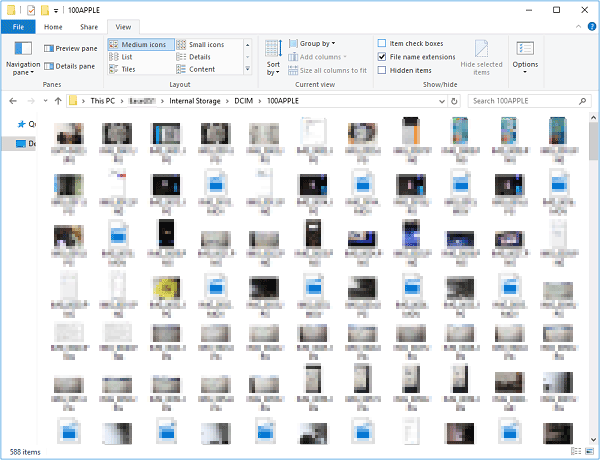
- Go to "Internal Storage" > "DCIM" > "100APPLE".
- Open the folder, and you will see all the pictures.
- Drag and copy your desired images to your external hard drive.
If you've deleted or lost your precious photos on iPad by mistake, there's no need to worry. Follow this guide to recover deleted photos from iPad easily.
Way 3: Using Windows Photos App
Windows Photos is a built-in app in Windows 10 and 11 that allows you to manage, edit, and transfer photos. You can use this program to easily transfer photos from iPad to portable hard drive on your Windows computer.
- Connect your iPad and external hard drive to your computer.
- If the Photos app doesn't open automatically, search for "Photos" in the Start menu and launch the app manually.
- In the Photos app, click the "Import" button in the upper-right corner and select "From connected devices." Select your iPad from the list (for Windows 11 users, you may need to select "Import > From USB drive" instead.).
- Your computer will immediately load all the photos and videos. Once loaded, select the images you want to import.
- In the "Import Items" window, select "Change Destination" in the upper-left corner. From there, select a folder on your external hard drive as the storage location.
- Once you've selected the photos and the destination folder, click "Import [number] items" in the lower-right corner to begin the transfer process.
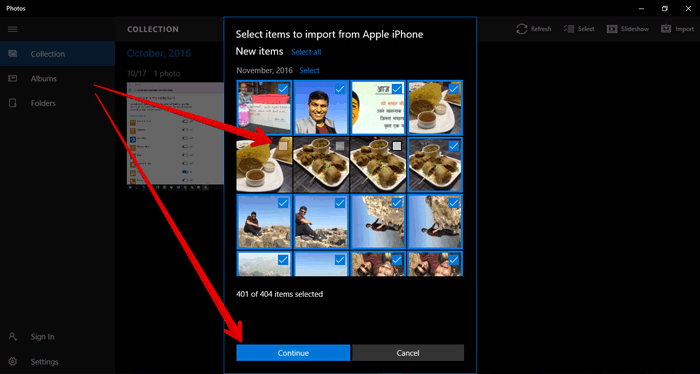
Using the Microsoft Photos app that comes pre-installed with Windows is a convenient way to transfer photos from iPad/iPhone to an external hard drive without iTunes.
Way 4: Via iCloud
By toggling on the iCloud Photos option on your iPad, you are enabled to upload the pictures to iCloud. Then it's easy to download whatever you want from the Cloud to the external hard drive.
Pick up your iPad to transfer photos to hard drive via iCloud as follows:
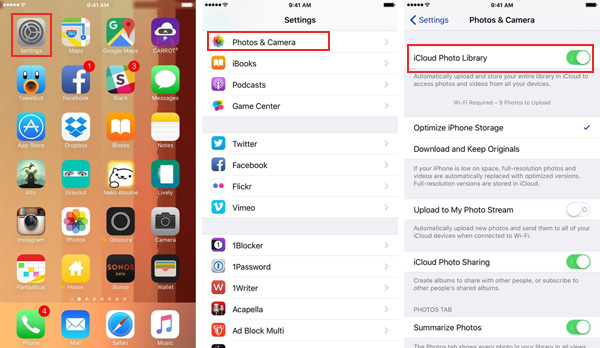
- Go to "Settings" > [your name] > Apple ID on the iPad.
- Touch "iCloud" > "Photos" > enable "iCloud Photo Library".
- This will upload your iPad photos to iCloud automatically.
- Log in to icloud.com on a Web browser.
- Go for "Photos" > "Albums" > "All Photos".
- The pictures on your iPad will appear in the folder.
- Connect your hard drive to your PC/Mac.
- Choose your desired photos and click "Download".
- Save the items to your external hard drive.
Part 2: How to Transfer Photos from iPad to External Hard Drive on Mac
There are two ways to transfer images from your iPad to an external hard drive on a Mac. These same methods can also be used to move images from your iPad/iPhone to a MacBook Air.
Way 1: Via Image Capture
Image Capture facilitates you to take photos and upload them to a Mac from DCs, iDevices, and other devices with a camera. Next, you can copy your required images to your hard drive without a hitch.
How to transfer photos from iPad to hard drive via Image Capture?
- Attach the external hard drive and iPad to your Mac.
- Make sure the Mac computer can identify it.
- Open "Image Capture" on your Mac.
- Select your iPhone from the "Devices" section.
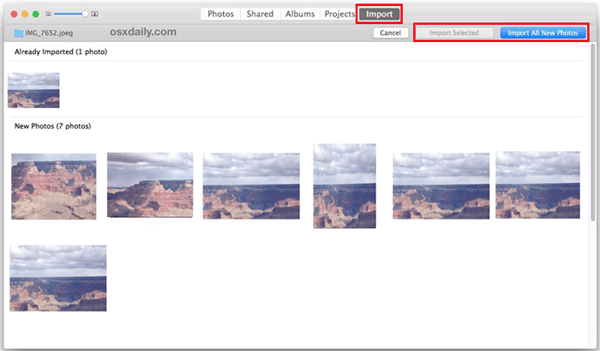
- Click the "Import" from the menu.
- Handpick the images you want to transfer from your iPad.
- Choose "Import Selected "/"Import All New Photos" to move photos to the external hard drive. (Can't import photos from iPhone/iPad to Mac or hard drive?)
Way 2: Using Mac Photos App
The Photos app (termed iPhotos in earlier versions) is built in Mac OS X 10.10.3 or later. It gives you the option to transfer photos from iPad to Mac or external hard drive.
To save photos/videos from iPad to external hard drive with the Photos app, you should:
- Link your iPad and hard drive to a computer.
- Run the Photos app and start your iPad.
- Press "Trust" on the Pad to trust this computer as a reminder prompts.
- Click "Import from the Photos app" on the upper-right corner.
- Tap "Import from a USB" or "Import from Camera".
- Select the pictures you want from your iPad to import and hit "Import" > "Continue".
- Find the external hard-disk drive as the location and save the images there.

If you're a Mac user with a computer running Mac OS X Yosemite or earlier, you can click Import All.../Import Selected on the iPhotos app to load iPad photos to the Mac or hard drive after the connection.
Part 3: How to Transfer Photos from iPad to Hard Drive without Computer
If your iPad is running iPadOS 13, you can directly move pictures from an iPad to a self-powered external hard drive. To start things off, you need to establish a connection between the devices via a powered hub or Apple's Lightning-to-USB3 Camera Adapter.
How to transfer photos from iPad to external hard drive without a computer?
- Connect the hard drive to the iPad via a lightning to USB adapter.
- You can also make the connection with an adapter/hub that supports both your iPad's and hard drive's connector.
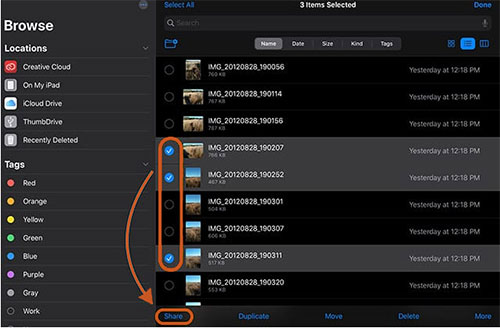
- On your iPad, open the Files app.
- Click Browse to check if your hard drive has been connected or not.
- Go to Photos app > choose the photos you need to transfer.
- Tap "Share" at the bottom left corner.
- Hit the Options to choose your photo options.
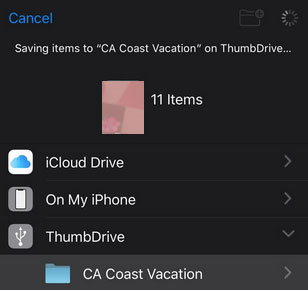
- If everything goes well, tap Save to Files > choose your hard drive as the destination > tap Save.
- The screen will pop up a message saying that it's saving your items to the external hard drive.
FAQs on iPad Transfer Photos to Hard Drive
Q1: Does transferring iPad photos to an external device affect image quality?
In most cases, the original resolution and quality of the photos remain intact when using the Microsoft Photos app, iCloud Photos, Image Capture, or third-party apps like Assistant for iOS.
Q2: How to transfer photos from external hard drive to iPad?
Well, is there any way to move photos from a portable hard drive to an iPad? Of course! Follow the directions below to do the transfer for your photos reversely:
- Link your external drive to your iPad. (you need an external power source for the hard drive.)
- Open the Files app > tap the Browse button.
- Tap "open the external drive" under the list of Locations.
- Open the photos and videos folder.
- Select the pictures you'd like to move to your iPad.
- Tap the Share icon.
- Choose Save Image from the share sheet.
- Save external drive images to the Photos app on your iPad.
Summary
That's all for today's post. You can take any of the techniques above to save photos from iPad to external hard drive at your disposal. Personally, to make the trip of transmission easier and faster, you might as well pick MobiKin Assistant for iOS, the full-fledged iOS data transfer and management software. This tool categorizes all your iPad photos by critical attributes and is much more labor-saving in selecting and copying what you want from your iPad to a hard drive.
Related Articles:
How to Transfer Photos from iPhone to External Hard Drive? [6 Ways]
6 Best Ways to Transfer Photos from iPad to Flash Drive
How to Transfer Photos from iPhone to iPad Easily (iPad Pro/Air/mini)
Best 5 Ways to Transfer Photos from Android to iPhone/iPad in Minutes


