Top 5 Ways to Transfer Photos from iPad to Mac/MacBook
Thanks to iPad's excellent screen and the display effect, high-resolution HDR photography works can be absolutely gorgeous demonstrated on the iPad. While for Mac users, sometimes they need to move images from iPad to their Mac, for they have to convert or organize pictures on it, or simply free up the memory of their iPad. So, a query - how to transfer photos from iPad to Mac might bother them.
In general, the most classic approach is to pick Photos/iPhotos app. Yet is there any other solutions apart from this? OK, in today's how-to guide, we'll cover 5 different ways on moving photos from iPad to Mac.

- Way 1: How to Transfer iPad Photos to Mac with Photos App
- Way 2: How to Put Photos from iPad to Mac with Assistant for iOS [Hot!]
- Way 3: How to Copy Photos from iPad to Mac via iCloud
- Way 4: How to Move Photos from iPad to Mac via AirDrop
- Way 5: How to Copy Pictures from iPad to Mac Using Image Capture
Way 1: How to Transfer iPad Photos to Mac with Photos App
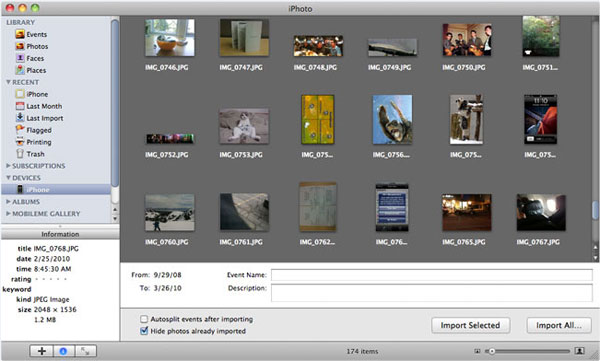
This means has proven to be the easiest one. After open Photos app on Mac, just select desired pics to import them to your Mac. Yet for some Mac computers with old macOSes, there's no built-in Photos app in it. But you can choose iPhotos instead. And the steps to use the both are almost identical. Here's how to transfer photos from iPad to Mac with Photos app:
- Plug your iPad into Mac computer through a USB or Lightning cable.
- Photos app should start automatically. (If not in actual fact, hold down "Option-Command" and double-click the "Photos" icon to launch it)
- Tap iPad icon under the Devices header. Then choose the images you'd like to import, click on "Import" and specify a location on Mac.
- Click "Import Selected" to get photos to Mac. Assume you want to import all the stuff, just tap "Import All New Items" button.

Note: Before proceeding with the steps, make sure your iPad is unlocked when connecting it to your Mac. Additionally, verify that your Mac has enough storage space for the photos you plan to transfer.
Way 2: How to Put Photos from iPad to Mac with Assistant for iOS
Are you looking for a fast and effective way to transfer photos from iPad to Mac? Try MobiKin Assistant for iOS - a reliable third-party tool designed to quickly and easily transfer photos from iPhone or iPad to Mac, even when dealing with large quantities of photos. Whether you want to transfer all photos or just select a few based on your preferences, this professional tool has you covered. In addition to transferring photos between your device and computer, Assistant for iOS also offers convenient photo management features.
Core Features of MobiKin Assistant for iOS:
- Import photos from iPad to Mac/MacBook/iMac or PC totally or selectively.
- Move data between iPad/iPhone/iPod and computer.
- Transfer and manage files like Photo, Video, Music, eBook, Contacts, SMS, Notes, Bookmarks, Calendar, Apps, etc.
- Intuitive directions on screen to ensure error-free operations.
- It doesn't track any of your privacy, so you can make use of it without any worries.
- Work well on various iDevices, including iPad 10/9/8, iPad Pro, iPad Air, iPad mini, iPad 4, the new iPad (iPad 3), iPad 2, etc.
How do I transfer photos from iPad to Mac with Assistant for iOS?
Step 1. Connect iPad to Mac and launch the program
After you download and install Assistant for iOS on Mac, just connect iPad to this Mac via a USB cable and then open the tool. Touch "Trust" button to trust this computer on your iPad, then the interface will appear on the Mac.

Step 2. Preview and choose desired images for transfer
You can see all the data types of iPad categorized on the left panel. Simply click "Photos" tab, and all images on your iPad will be detected. Then preview the pics, and select the ones you need to move to Mac.

Step 3. Move photos from iPad to Mac
After the selection, press the "Export" button from the top menu. Then choose a location on Mac from the drop-down items. This software will now transfer your pictures over in no time.
Be careful not to pull out the cable until the procedure ends, as this might result in data loss, and you'll have to restart the task.
Video Guide:
In addition to photos, you may also need to transfer videos from iPad to computer. Click the link below to learn how to do it:
Way 3: How to Copy Photos from iPad to Mac via iCloud
Apple's iCloud is a cloud storage and syncing service that allows users to store and access files, images, and other data on multiple devices. How to transfer photos from ipad to mac wirelessly using iCloud Photos. Before you begin, make sure both your iPad and Mac are logged in with the same Apple ID. Also, check if your iCloud storage has enough capacity to accommodate all the images.
Once confirmed, follow these steps to to get photos from iPad to Mac using iCloud:
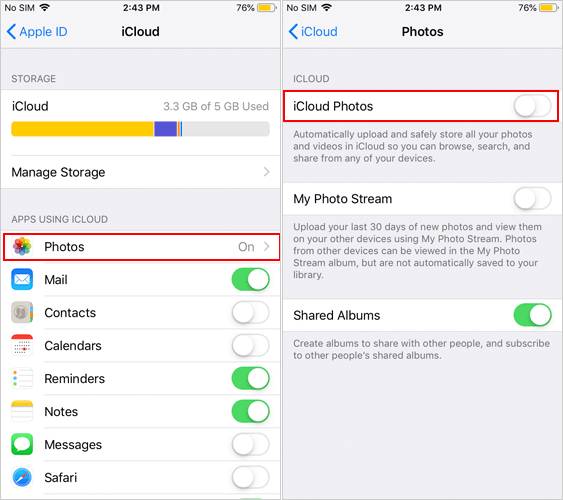
- On your iPad, go to Settings and tap your Apple ID at the top. Then, select iCloud and make sure Photos is enabled. If not, toggle the switch to activate it.
- On your Mac, open System Settings by pressing the F4 search key and typing in the app name.
- Click on your Apple ID and go to the iCloud tab. Enable iCloud Photos by moving the slider next to Photos.
- Select the iCloud Photos option and select Download Originals to This Mac.
- iCloud will start syncing your iPad photos with your Mac. After the sync is complete, you can view the photos on your Mac using the Photos app.

You can also download iCloud for Windows on PC to transfer photos from iPad/iPhone to PC if you want to do that on Windows computer.
Way 4: How to Move Photos from iPad to Mac via AirDrop
Turn on AirDrop, WiFi, and Bluetooth features on both devices before the use. Then set the transfer permissions, select the photos for migration, and share them with your Mac computer. After the transfer, advise you to switch off AirDrop on both iPad and Mac.
Note that AirDrop only works for a fourth-generation iPad or newer, or a Mac computer running OS X Yosemite and higher. Let's see how to transfer photos from iPad to Mac wirelessly using AirDrop:
- Open AirDrop on iPad: go to "Settings > General > scroll to AirDrop"; then choose "Everyone" option from the drop-down list to enable this feature.
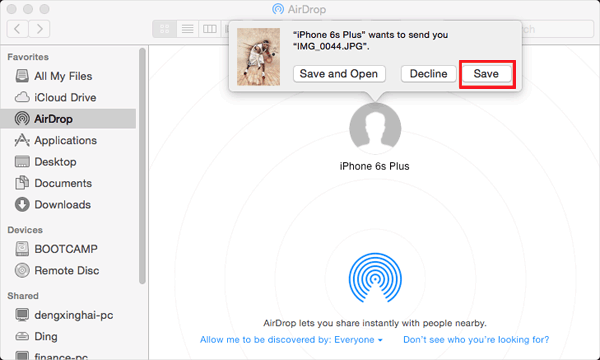
- Toggle on AirDrop on Mac: open "Finder > Go > AirDrop"; and ensure AirDrop is switched on by choosing "Everyone" from the pull-down menu.
- Open "Photos" app from iPad, and select the images you wish to send to Mac. Afterwards, choose "Share" from the bottom.
- Choose your Mac as the receiver, and accept the transfer request to "Save" the incoming pictures on Mac.

Please turn off the "Personal hotspot" in both iPad and Mac while picking this method. Besides, if you find the data cannot be moved, please restart Bluetooth & Wi-Fi, and transfer photos in stages.
Windows users may need to transfer files from their PC to their iPad for portability and access anywhere, anytime. Click the link below to learn how.
Way 5: How to Copy Pictures from iPad to Mac Using Image Capture
Image Capture comes integrated with any macOS devices. It offers no organizational tools like Photos/iPhotos app, yet is helpful for collating images from various sources with no need for any drivers. And among others, it lets you transfer photos to Mac from iPad with ease. Read the following guide to see how to transfer photos from iPad to Mac with USB using image capture:
- Link your iPad to Mac via a USB cord.
- Start the Image Capture app from your Mac computer.
- Choose your iPad from the device list, and choose the images you need to import to Mac.
- Choose the location where you'd like to save the pictures.
- Tap on "Import" or "Import All" to migrate photos from iPad to Mac.

After the completion, you can check the photos you imported just now. They should be tagged as green check marks.
Note: Image Capture will add 1.5MB of empty data to every single file during use, which will cause unnecessary space waste for Mac computer.
Final Words
That's all there is to today's article. Concerning how to download photos from iPad to Mac/MacBook Pro/MacBook/iMac, safe, fast and flexible is the priority for most people honestly. In this sense, MobiKin Assistant for iOS (Mac) can fully meet your requirements. Whichever approach you go for, hope you will have a good time in doing this.
Finally, here's an extra tip: Mac is a smart photo manager; in addition to allowing you to edit pictures, it also gives you the freedom to create intelligent gallery, or make physical albums, calendars, cards, etc.
FAQs on How to Transfer iPad Photos to Mac
Q1. Can I transfer photos directly from iPad to Mac?
Yes, you can easily transfer photos from iPad to Mac using a USB cable. Simply connect your iPad to your MacBook and open the Photos app on your Mac to see the import screen with all the available photos. You can then select an album to import or create a new one. To transfer specific photos, select the photos you want and click "Import Selected Photos".
Q2. How do I find photos imported from iPad on Mac?
To find your imported iPad photos, open the Finder app and navigate to the Home directory. From there, go to the Pictures folder and right-click on Photo Library. Select "Show Package Contents" and open the Main Files folder to see all the photos that have been transferred.
Q3. Why can't I transfer photos from iPad to Mac?
To transfer photos wirelessly, both your iPad and Mac must be connected to the same WiFi network. If either device doesn't have WiFi enabled or is connected to a different network, your Mac won't be able to access the photos. Please check the settings of both devices to make sure they are connected to the same network.
Related Articles:
How to Transfer Music from iPhone to Mac/iMac/MacBook?
How to Transfer Photos from Camera to iPad for Windows/Mac?


