[8 Methods] How to Transfer Photos from iPhone to External Hard Drive?
In this age of capturing numerous memories using our iPhones, the essential requirement to transfer photos from iPhone to an external hard drive, whether for optimizing iPhone speed or ensuring a reliable backup, has become paramount. Whether for creating space on your device or ensuring a secure backup, the process of transferring photos from your iPhone to an external hard drive is essential. This guide explores various methods tailored to different scenarios, ranging from traditional computer-based transfers to direct transfers without the need for a computer.
Discover hassle-free ways to safeguard your cherished moments by efficiently moving your iPhone photos to an external hard drive.
- Way 1: The Easiest Way to Transfer Photos from iPhone to External Hard Drive [Simple Clicks]
- Way 2: Transfer Photos from iPhone to External Hard Drive with Photos on Windows
- Way 3: Transfer iPhone Photos to External Hard Drive with Windows File Explorer
- Way 4: Import Photos from iPhone to External Hard Drive with Image Capture on Mac
- Way 5: Transfer iPhone Photos to External Hard Drive with Photos on Mac
- Way 6: Move Photos from iPhone to External Hard Drive via iCloud
- Way 7: Back up iPhone Photos to External Hard Drive via iTunes
- Way 8: Transfer Photos from iPhone to Hard Drive without Computer
Way 1: The Easiest Way to Transfer Photos from iPhone to External Hard Drive
As the best program to transfer photos from an iPhone to an external hard drive. MobiKin Assistant for iOS (Win and Mac) can quickly scan out lots of photos after the connection between the computer and your iDevice. Then it'll clearly display all sorts of your iPhone photos on the computer according to their types. This lets you browse and select the items easier. It serves as a great iPhone file Explorer/Manager and does well in work efficiency and security.
Some features of MobiKin Assistant for iOS
- Transfer all kinds of photos from iPhone to PC/Mac and then external hard drive fleetly.
- Process data like Photos, Videos, Notes, Contacts, SMS, Books, Safari Bookmarks, Music, Voice Memos, Podcasts, Playlists, etc.
- Back up and restore content between iOS devices and iTunes easily.
- Manage iOS data on your computer directly.
- Apple to a full range of iDevices, covering iPhone 15/14/13/12/11/X/8/7/6, all iPod touches, iPads, etc.
- It never tracks its users' privacy.
How to transfer pictures from iPhone to external hard drive with Assistant for iOS:
Step 1. Connect your iPhone to a computer
Install and launch Assistant for iOS on your computer after the download. Connect your iPhone to the computer via a USB cable. Next, follow the pop-up directions to have your device recognized.

Step 2. Transfer iPhone photos to the computer
Choose "Photos" from the left sidebar to preview and mark whatever you want. Subsequently, tap "Export" from the top menu to save them on the computer.

Step 3. Move photos to the external hard drive
Plug your external hard drive into this computer and send all the iPhone pictures to it from your computer.
Guess You Like:
- [5 Ways] How to Transfer Pictures from iPhone to Flash Drive Quickly?
- 6 Ways to Transfer Photos from Computer to iPhone Effectively
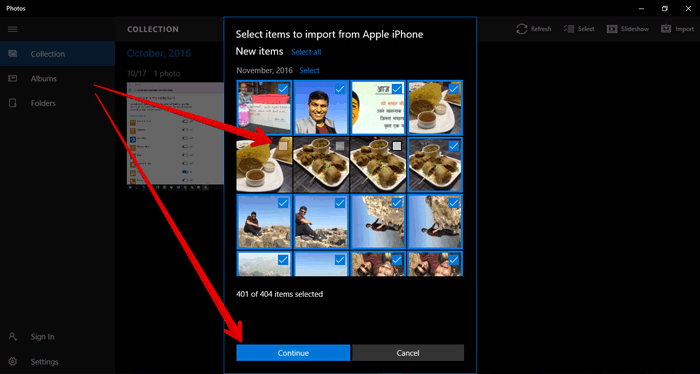
Way 2: Transfer Photos from iPhone to External Hard Drive with Photos on Windows
Copying pictures from your iPhone to your computer can be effortlessly done using the Photos app on Windows. Just follow these straightforward steps:
- Connect your iPhone to your PC using a USB cable and open the Photos app, accessible from the Start menu.
- Once the app is open, click on the import option located in the top right corner.
- Choose the specific images you wish to import.
- Ensure that the external hard drive, intended for transferring the images, is connected to your PC.
- Initiate the import process and designate the external hard drive as the destination for the transfer.
Way 3: Transfer iPhone Photos to External Hard Drive with Windows File Explorer
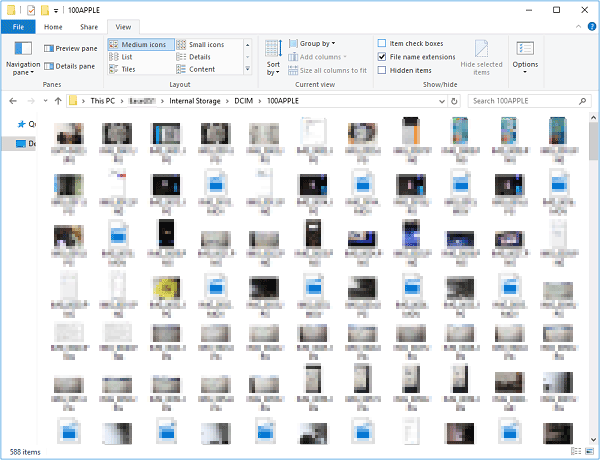
File Explorer in Windows 10 (termed Windows Explorer in Win 8/Win7) helps transfer data from iPad/iPhone to external hard drive. But it only works for pictures from the DCIM folder. So, if you want to transfer iPhone photos from other sources, please turn to other methods.
How to export iPhone photos to external hard drive with File Explore?
- Unlock your iPhone and connect it to your PC via USB cables.
- Plug the external hard drive into the same computer.
- A prompt should pop up on your iPhone asking you for permissions.
- Click on "Allow"/"Trust" to go on.
- On you computer, go to This PC > Apple iPhone > Internal Storage > DCIM > 100APPLE.
- You will see all the pictures in your iPhone Camera Roll.
- Copy your iPhone photos and paste them to your external hard drive.
You May Also Like:
- How to Transfer Photos from iPhone to Mac (7 Ways Offered)
- How to Transfer Photos from iPhone to Android? - Top 5 Ways
Way 4: Import Photos from iPhone to External Hard Drive with Image Capture on Mac
Image Capture is the exclusive feature of Mac computers. It can transfer photos from iOS devices or DCs to a Mac easily. Yet sometimes, Image Capture doesn't show up in your iPhone photos. To fix this, you can update your Mac and try again.
How to store iPhone photos on external hard drive with Image Capture?
- Connect your iPhone and hard drive to a Mac computer.
- Open the iPhone and trust the computer.
- Open "Image Capture" on the Mac and choose your iPhone from the "Devices" tab.
- Click "Import To" from the pop-up menu.
- Choose to store the images to your external hard drive.
- Opt for "Import All" to select the images you want to move and click "Import".

Way 5: Transfer iPhone Photos to External Hard Drive with Photos on Mac
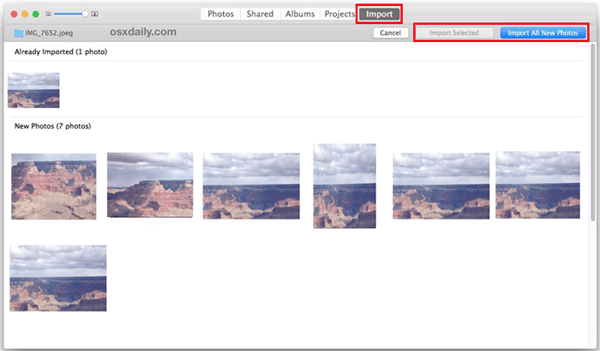
To transfer images from your iPhone to an external drive using a Mac, you can employ the Photos app, which follows a process similar to that on Windows. The steps are as follows:
How to copy photos from iPhone to external hard drive with Photos on Mac:
- Connect both your iPhone and the external hard drive to your Mac.
- Run the "Photos" app on the Mac computer.
- Go to the "device" section to select your iPhone.
- Click "Import to" and choose to save the imported pictures to your external drive.
- Hit "Import All New Photos" or select the photos you need to transfer to the Mac.
- Press "Import xxx Selected" to save the items on your hard drive.
Way 6: Move Photos from iPhone to External Hard Drive via iCloud
To transfer iPhone photos to external hard drive via iCloud service, you should first turn on "iCloud Photos" on your iPhone, log in to iCloud for Windows on your PC, do some settings, and then get the items onto your external hard drive.
How to save iPhone photos to external hard drive via iCloud?
- On your iPhone, go to its Settings > [your name] > iCloud > Photos > enable "iCloud Photos".
- Download, install, and open iCloud for Windows on the device.
- Sign in with the Apple ID you are using on your iPhone.
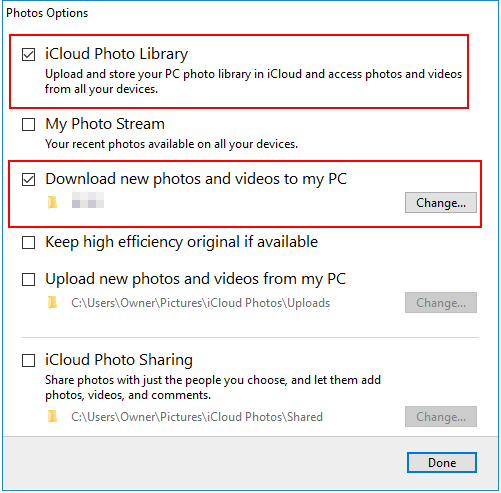
- Click "Options" next to "Photos".
- Check "iCloud Photo Library" and "Download new photos and videos to my PC" options.
- Attach the external hard drive to this computer.
- Tap "Change" under "Download new photos and videos to my PC".
- Set the default location as your hard drive.
- Click on Done > Apply.
Way 7: Back up iPhone Photos to External Hard Drive via iTunes
To do this, you should first sync your iPhone to iTunes and then import them to the external hard drive. For the process to go smoothly, please run the latest version of iTunes, or you may encounter iPhone not syncing with iTunes.
How to download photos from iPhone to external hard drive via iTunes?
- Open iTunes on your PC or Mac.
- Connect your iPhone to the computer with a lightning USB cord.
- Select your device icon on the iTunes window.
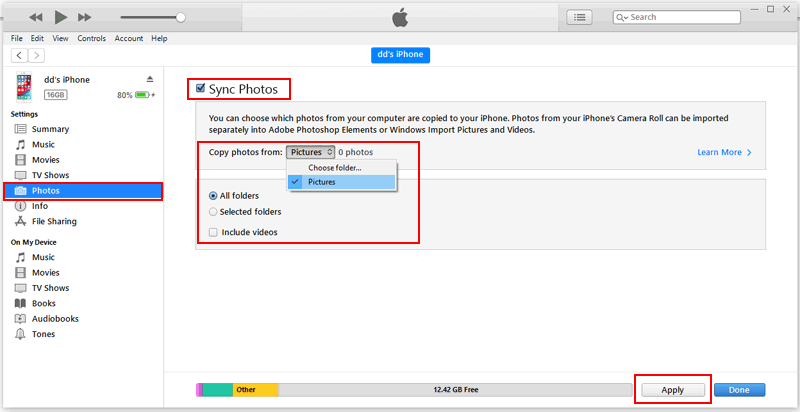
- Click "Photos" on the left menu.
- Tick on the box nearby "Sync Photos".
- Select "Pictures" from the drop-down menu under "Copy photos from".
- Choose the options listed below and click "Apply".
- Connect your external hard drive to the computer.
- Copy your wanted photos to the drive.
Way 8: Transfer Photos from iPhone to Hard Drive without Computer
When you find yourself on the move or without access to a computer, the need to transfer photos from your iPhone to an external hard drive arises. In such situations, bypassing a computer, you can directly transfer photos from your iPhone to an external hard drive using compatible external storage devices designed for iOS devices. Let's explore how to get pictures off iPhone to external hard drive without the need for a computer.
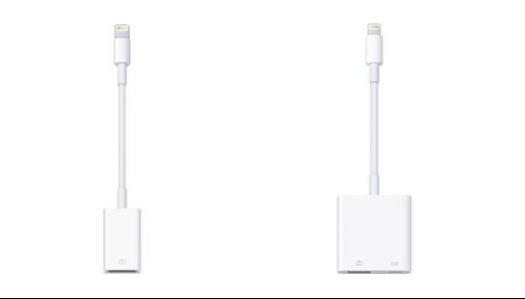
- Ensure you possess either an external hard drive specifically designed for iPhones or a lightning-to-USB adaptor. These accessories enable a direct connection between your iPhone and the external hard drive.
- Navigate to the "Files" app on your iPhone and go to "Browse" to confirm the successful connection of the external hard drive.
- Launch the Photos app, select the photos you wish to transfer, tap the "Share" button, and choose "Save to Files." Subsequently, designate the external hard drive by selecting "On My iPhone."
Conclusion
In brief, if you only want to transfer a small number of photos, you can choose any of the methods above. However, some may have a large number of iPhone photos for migration, and they are housed in different folders. Given this, you probably take some factors into consideration, such as the preview, search, selection, and transfer efficiency. As such, it is recommended that you go for MobiKin Assistant for iOS, which makes your transfer journey safe, simple, and smooth.
Related Articles:
How to Transfer iPhone Files to Flash Drive?
How to Transfer iTunes Library to External Hard Drive?
3 Ways to Transfer Photos from Android Phone to USB Flash Drive
Five Easy Ways to Transfer Photos from Phone to Laptop without USB
[Solved!] How to Transfer Photos from iPhone to iPhone without iCloud?


