[2024] How to Transfer Photos from iPhone to USB/Flash Drive Quickly?
In the realm of digital photography, the need to transfer photos from iPhone to USB drive has become increasingly common. This process allows users to create backups, free up storage space on their devices, and conveniently share memories. With numerous methods available, ranging from computer-assisted approaches to direct transfers via specialized flash drives, users can choose the most suitable option based on their preferences and circumstances.
In this guide, we will explore various techniques, providing step-by-step instructions to empower users in effortlessly transferring their cherished photos from their iPhones to USB/flash drive solutions.
- Way 1: How to Transfer Photos from iPhone to USB with Assistant for iOS
- Way 2: How to Transfer Photos from iPhone to Flash Drive via Windows Explorer
- Way 3: How to Transfer iPhone Photos to Flash Drive via Photos App
- Way 4: How to Transfer Pictures from iPhone to Flash Drive by Mac Image Capture
- Way 5: How to Save Photos from iPhone to Flash Drive via iCloud
- Way 6: How to Download Photos from iPhone to Flash Drive via Email
- Way 7: How to Transfer Photos from iPhone to USB Stick without Computer
Way 1: How to Transfer Photos from iPhone to USB with Assistant for iOS
If you prefer a straightforward method without complications, the following approach is not only simpler but also comes with no limitations. By using MobiKin Assistant for iOS (Win and Mac), you can effortlessly transfer photos from your iPhone or iPad to a flash drive, computer, or other external drive with just one click. This application is compatible with both Mac and Windows operating systems, and here are some key features of its photo transferring capabilities:
Major Features of MobiKin Assistant for iOS:
- Move numerous photos directly from iPhone/iPad to USB.
- Transfer all types of photos, including Camera Roll, Live Photos, Screenshots, and more.
- Maintain the original quality of the pictures with no loss.
- Additionally, other content such as music, videos, contacts, and messages can also be transferred.
- Work on overall iOS devices, including iPhone 15/14/13/12/11/X/8/7/6, iPod touch, iPad Pro/4/mini/Air, etc.
To proceed, download Assistant for iOS on your computer for free, and then follow the steps outlined below to export photos from iPhone/iPad to flash drive on both Mac and Windows.
Step 1. Install and launch MobiKin Assistant for iOS on computer. Connect your iPhone to the computer via a USB cable. Press "Trust" on your iPhone to trust this computer when prompted. Connect your USB flash drive to your computer.
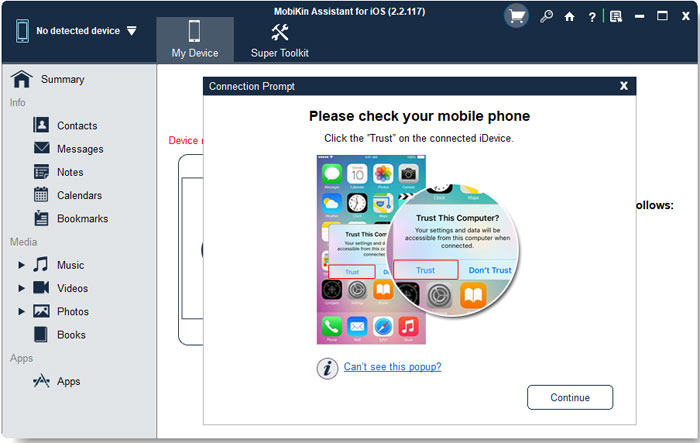
Step 2. After the connection, choose the "Photos" tab from the left menu of the interface, preview and mark the pictures you want to transfer.
Step 3. Click "Export" from the top menu to save them on computer. Here, you can change the export path to your flash drive. After that, the software starts moving photos from your iPhone to the USB stick.
You May Also Like:
- 3 Ways to Transfer Photos from Android Phone to USB Flash Drive
- How to Transfer Large Videos from iPhone to PC? (5 Ways)
Way 2: How to Transfer Photos from iPhone to Flash Drive via Windows Explorer
As Windows is unable to get advanced permissions from Apple iPhone, only photos from Camera Roll can be moved to PC, and thereby transfer to USB flash drive over. This method is not suitable for transferring photos from other photo libraries to your flash drive. If you wish to transfer or save all your photos, you may find photo transfer tools like MobiKin Assistant for iOS more effective.
- Link your iPhone to the Windows PC with a USB cable. Then tap "Trust" on your phone as prompted.
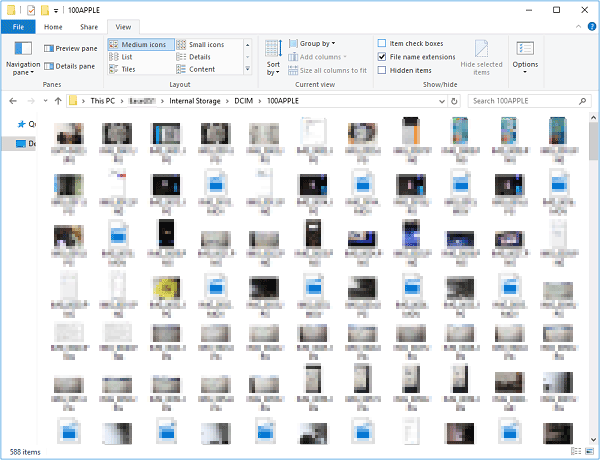
- Click This PC/My Computer > [your iPhone name] > DCIM > Internal Storage folder > open DCIM folder > 100APPLE. Then find the pics you want for transfer, and copy them to computer.
- Insert your USB flash drive to this computer, locate the photos you just moved to PC. Then drag and drop them to the folder of flash disk.
Way 3: How to Transfer iPhone Photos to Flash Drive via Photos App
To upload photos to flash drive from iPhone on Mac, make sure that you have the latest version of iTunes on Mac. Also, you're only allowed to transfer Camera Roll photos from iPhone to the flash drive. Other non Camera Roll photos like iCloud sharing photos, iTunes synced photos, Live Photos can't be exported to your Mac. Thus, for both Win and Mac users, you can jump right to Way 1 , if you intend to copy all photos from your phone.
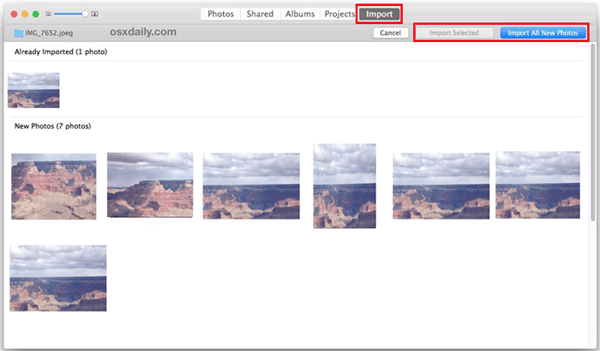
- Connect your iPhone to Mac computer via a USB cord. Photos app should open automatically. If not, just run it on your Mac manually.
- Tap on "Import" from the screen of the tool > Select images you want to transfer, and click on "Import Selected" or "Import All New Photos" to move pictures from iPhone to Mac.
- Plug in USB flash drive to this Mac, and find it in the Finder.
- Preview and choose your desired photos from another Finder windows. Then copy and paste them to the location of your USB drive.
Way 4: How to Transfer Pictures from iPhone to Flash Drive by Mac Image Capture
Mac Image Capture provides a highly convenient method for iPhone and Mac users to transfer photos. As it is an integrated feature, the process is streamlined when connecting your iPhone and USB drive to your Mac.
How to copy pictures from iPhone to flash drive by Mac Image Capture:
- Connect your iPhone and flash drive to your Mac, and launch Image Capture.
- Locate your iPhone in the device list on the left side of the interface. Your photos will be displayed.
- At the bottom of the Image Capture window, choose a destination to save your photos. Subsequently, click either "Import" or "Import All" to initiate the transfer process.

Way 5: How to Save Photos from iPhone to Flash Drive via iCloud
Ensure there is sufficient iCloud storage before proceeding. This approach involves uploading all your photos to iCloud and subsequently downloading them to any connected computer. However, it is crucial that your iCloud free space exceeds the photo storage requirements. With a default 5GB of free space, consider upgrading your iCloud storage for additional photo storage capacity.
How to transfer photos from iPhone to memory stick via iCloud:
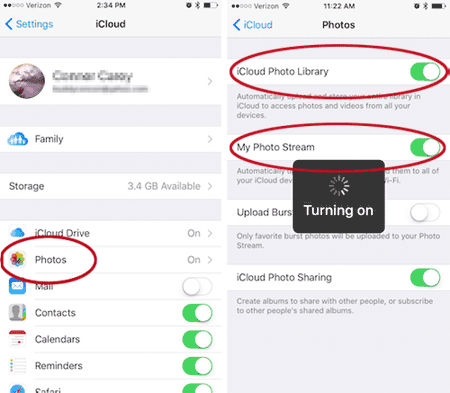
- Access the iPhone "Settings", enter the Apple ID, and navigate to "iCloud" > "Photos".
- Toggle the iCloud Photo switch; subsequently, once connected to Wi-Fi, photos and videos on the phone will be uploaded to the iCloud account.
- Download and launch iCloud on your computer. Visit https://www.icloud.com/ in a web browser.
- Sign in to iCloud and proceed to the Photos app. Click the Photos tab located in the upper left of the page.
- Choose the desired photo for download. Hold down Ctrl (Windows) or Command (Mac) while clicking on each photo to be downloaded.
- Click the Download button. Insert the USB disk and create a new folder named "iPhone Pictures."
- Copy and paste the imported image files from the computer to the USB. Alternatively, you can use the same steps to transfer photos from iPhone to a Sandisk device.
See Also:
- 3 Simple Ways to Transfer from SD Card to iPhone
- How to Transfer Photos from Computer to Phone in 8 Ways? [Android/iPhone]
Way 6: How to Download Photos from iPhone to Flash Drive via Email
it is feasible to utilize email as a means to transfer photos from iPhone to a flash drive, although the quantity is limited, typically within 25MB.
How to transfer photos from iPhone to USB flash drive via email:
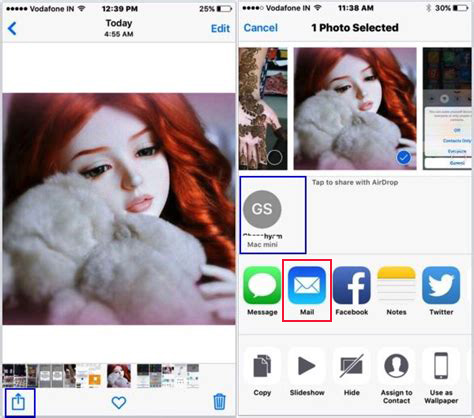
- Launch the Photos app on your iPhone and choose one or more pictures.
- Tap on "Share" and opt for "Mail" to initiate the transfer.
- Enter the email address and send the email.
- Transition to your computer, log in to the designated email address, and download the images.
- Insert the flash drive into the computer and proceed with transferring the downloaded pictures.
Way 7: How to Transfer Photos from iPhone to USB Stick without Computer
When exploring methods for transferring photos from iPhone to a flash drive without the assistance of a computer, the lightning-to-USB flash drive emerges as a practical solution. With USB sticks designed for this purpose, like the SanDisk iXpand Flash Drive, you can seamlessly move photos from iPhone to USB Drive without the need for a computer.
- Directly plug the USB stick into your iPhone.
- Navigate through the flash drive's dedicated app to access the photo collection on your iPhone.
- Select and initiate the transfer of pictures from your iPhone to the USB drive.
As an alternative approach, consider employing a lightning-to-USB connector or an iOS-compatible adapter. Connect the USB stick to the USB end, and attach the Lightning end to your iPhone, allowing you to transfer iPhone pictures to the flash drive without relying on a computer.
Verdict
By now, I trust you've grasped the process. As evident, importing iPhone photos to USB is achievable whether or not you have a computer. Simply opt for the most convenient method to transfer photos from your iPhone to Sandisk, Samsung flash drive and many more flash drives based on your need.
A crucial reminder is that the chip within the USB flash drive possesses a finite lifespan. Hence, it's not ideal for prolonged photo storage. To enhance its longevity, consider placing it in a storage box to provide shockproof, dustproof, and waterproof protection.
Related Articles:
Best 5 Ways to Transfer Photos from Android to iPhone in Minutes
How to Transfer Photos from iPhone to Samsung? [9 Ways]
How to Transfer Music from Mac to iPhone 15/14/13/12/11/X?
6 Ways to Transfer Photos from Computer to iPhone Effectively


