[Full Guide] How to Transfer Photos from PC to iPad with Ease?
Photos play a vital role in storing and sharing information, so people often need to transfer pictures between devices for backup or sharing. The new 10.9-inch and 12.9-inch iPad Pro are particularly suitable for viewing and editing photos, making them a great choice for working with visuals. Therefore, there is an increasing demand to transfer photos from PC to iPad so that you can modify or view them away from your desktop or laptop. If you are still unclear about how to transfer photos from PC to iPad, here are five effective methods for you to choose from.
- Part 1: How to Transfer Photos from PC to iPad with iOS Transfer (Recommended!)
- Part 2: How to Transfer Photos from Computer to iPad with iTunes
- Part 3: how to Load Photos to iPad from PC via iCloud
- Part 4: How to Move Pictures from PC to iPad with Google Photos
- Part 5: How to Transfer Pictures from Computer to iPad with Email
Part 1: How to Transfer Photos from PC to iPad with iOS Transfer
Can you transfer photos from PC to iPad without iTunes? Of course you can. Whether you want to transfer photos from iPad to PC or transfer photos PC to iPad, iOS Transfer will help. As a professional iOS data transfer tool, it can transfer files between iPhone/iPad/iPod and PC/Mac or between two iDevices. iOS Transfer helps you always keep data safe & put data in the right place. (Assuming you want to transfer photos from iPad to PC/Mac, you can go to: How to transfer photos from iPad to computer)
Main Features of iOS Transfer:
- Easily and quickly transfer photos from PC to iPad, and vice versa.
- Transfer data from computer to iOS devices, from iOS devices to iOS devices, and from iOS devices to computer.
- Sync data from iPhone, iPad and iPod to iTunes.
- Supports 18+ types of data, including photos, videos, music, contacts, text messages, TV shows, ringtones, podcasts, documents and so on.
- Fully compatible with overall iPad models and iOS versions, including iPad 10/9/8, iPad Pro, iPad Air, iPad mini 1-4, the new iPad, iPad 2, iPad, and iOS 18/17/16, etc.
How can I transfer photos from computer to iPad with iOS Transfer?
Step 1. Download, install and launch the iOS Transfer on your computer. Connect your iPhone to the computer with a USB cable and wait until the iPhone is recognized by the program.
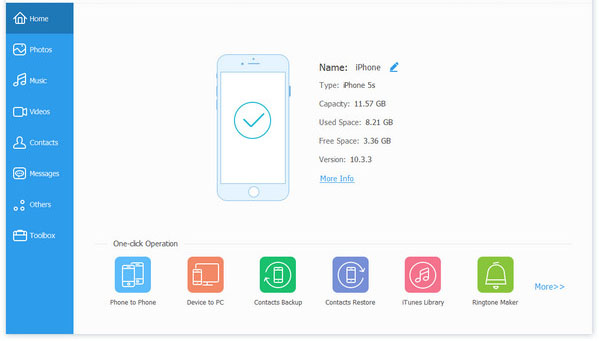
Step 2. On the primary interface, you can see all iPhone data are categorized on the left side bar. Just select the "Photos" category and click the "Add" button followed by "Add File" or "Add Folder" on the top menu.
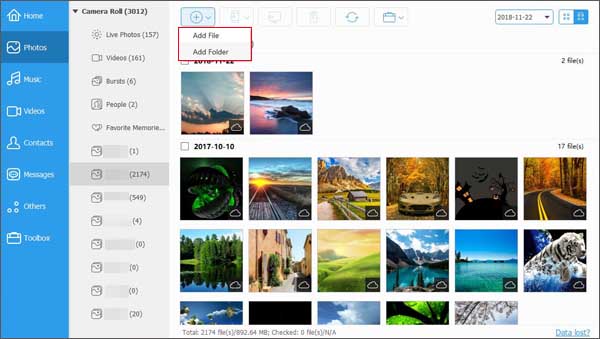
Step 3. Locate to the folder that your photos are stored on your computer, select the photos you need and click "Open" to import photos from computer to the connected iPad.
Part 2: How to Transfer Photos from Computer to iPad with iTunes
Although iTunes has many limitations and flaws, it is still the first choice for people when they need to transfer files between their computers and iOS devices. Below, we will show you how to transfer photos from computer to iPad with iTunes.
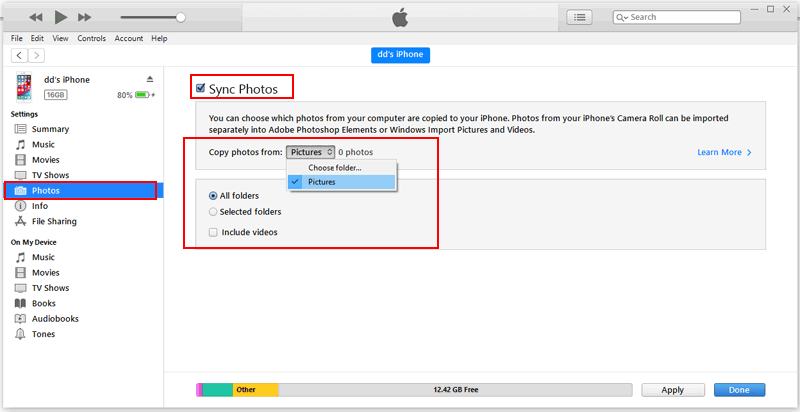
- Make sure you have installed the latest version of iTunes on your computer. Open it and connect your iPad to the computer.
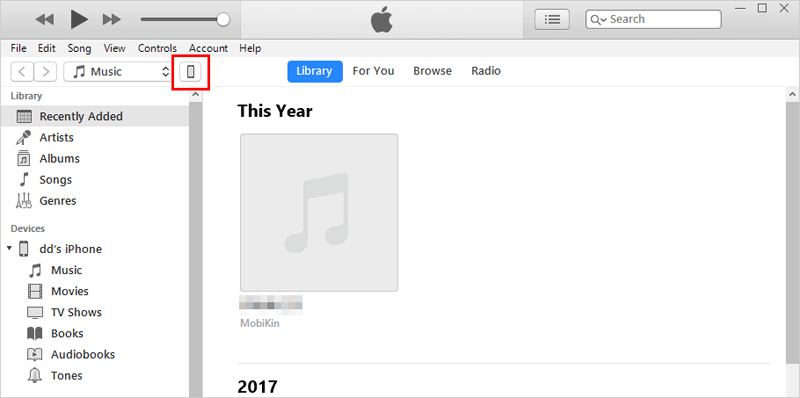
- Once your iPad is connected, you can turn to iTunes and click the Devices icon at the upper left corner of the screen.
- From the left side bar, choose "Photos" tab and check the box of "Sync Photos" > "Copy Photos from".
- Select "Choose Folder..." or "Pictures" and locate to the folder where your photos are located or directly select the photos you need.
- When the selected folder or pictures has been loaded, you can click the "Apply" button on the bottom right corner.
Cons:
- iTunes Sync will overwrite all images in your Photo Library, but images in your Camera Roll will remain intact.
- Only one folder can be synced at a time.
Part 3: How to Load Photos to iPad from PC via iCloud
Instead of installing additional programs, you can also use iPhone build-in service - iCloud photo library to export photos from computer to iPad. Before starting with this method, you should make sure that you have enough iCloud storage to save your photos. We also have post telling you everything you need to know about iCloud backup.
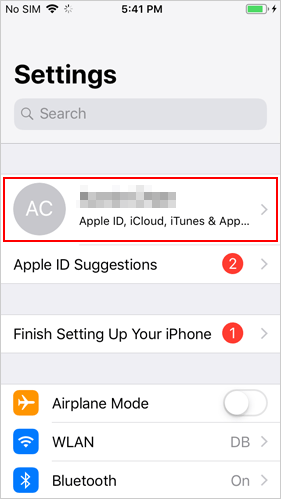
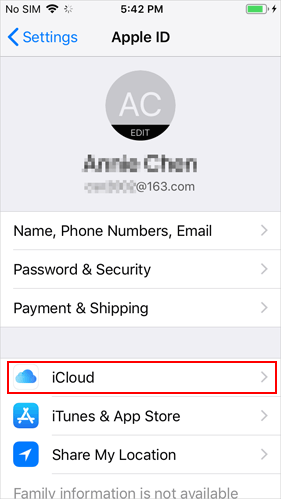
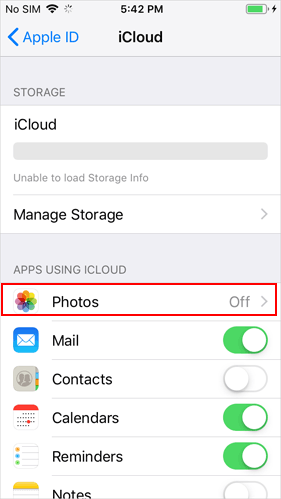
- Unlock your iPhone and go to click "Settings" > your name > "iCloud" > select "Photos" > enable "iCloud Photo Library".
- Download iCloud for Windows on your computer, run it and then log in with your account.
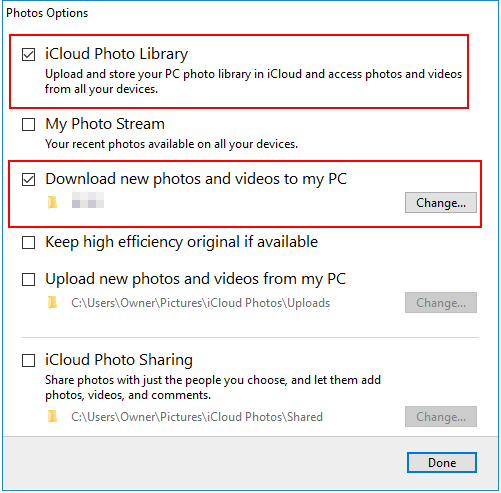
- Go to "Photos" followed by "Options" and then enable the option of "iCloud Photo Library".
- Turn on the option of "Upload new photos and videos from my PC" and then click on "Change" button under this option to choose the folder that you have saved the photos you want to transfer from PC to your iPad.
Cons:
- iCloud only provides 5 GB of free storage. If you exceed this limit and iCloud storage full, you will need to purchase additional iCloud storage to accommodate more photos.
- Make sure your iPhone is connected to a reliable and fast internet connection. Uploading large amounts of photos can be time-consuming, and a poor connection may cause the process to stall or fail.
Part 4: How to Move Pictures from PC to iPad with Google Photos
You can also use Google Photos to import photos from PC to iPad. But this method is a little bit complicated because you have to go through the complex steps like below: (Google Photos not backing up?)
- Go to visit https://photos.google.com/ on your PC and sign in with your Google account.
- Navigate to the upper right corner of the screen to choose the "Upload" option. Then choose the photos that you want to transfer from your PC to iPad.
- After selecting all the photos you need, you can tap on "Open" to begin to upload the photos to Google account.
- Download, install and launch the Google Photos app on your iPhone. Sign in with the same Google account.
- Now you can download the uploaded pictures to your iPhone.

Cons:
- Google Drive and Google Photos offer only 15 GB of free storage. If you need to transfer more photos than this limit, you'll have to upgrade your storage plan.
Part 5: How to Transfer Pictures from Computer to iPad with Email
It is workable to use Email to transfer pics from computer to iPad, as long as you don't need to send too many photos.
- On your PC, compress the folder that contains the photos you want to transfer to iPad.
- Open your mailbox on your PC and log in to your email account.
- Open a new Email composure then attach the ZIP file you just created. Put your own email address as the recipient.
- Turn to your iPhone, log into the recipient Email account and check the email you have just sent from yourself. Now, you can download the attached files to your iPhone.

Cons:
- Email attachments have size limits, so they are only suitable for sending one or two images at a time.
The Final Words
The five different ways that this article provides can help you realize the task of transferring images from PC to iPad. Each of these methods has its own advantages, but it also has its own drawbacks. You can compare them from the details above. I think using iOS Transfer is the most time-saving method. Because it can not only copy pictures from the computer to the iPad, but also supports the transfer of 18 other files. Its interactive design allows you to enjoy a lot of convenience. Don't hesitate, just try it. If this guide helps, don't forget to share it with your friends.
Related Articles:
[Full Guide] How to Transfer Videos or Movies from Mac to iPad?
Top 4 Methods to Transfer ePub Files to iPad in 2024
How to Transfer Photos from iPad to iPad? 5 Ways You Must Know!
How to Transfer Large Videos from iPhone to PC? (5 Ways Included)


