5 Most Effective Ways to Transfer Music from iPhone to iTunes Library
Creating a list of your favorite songs on your iPhone is a huge and systematic task. It might be costly and time-consuming. And it can be a struggle to recollect some old music resources at present. So when you want to back up and manage the tracks on your computer, or just transfer them to the iTunes library, it's imperative to find some practical methods to ease the work. OK, we shall explore how to transfer music from iPhone to iTunes in this quick guide. And hopefully, you'll find them rewarding.
- Option 1: How to Transfer Songs from iPhone to iTunes Directly [Purchased Music]
- Option 2: How to Transfer Music from iPhone to iTunes in One Go
- Option 3: How to Move Music from iPhone to iTunes over Wi-Fi
- Option 4: How to Copy Music from iPhone to iTunes with File Sharing
- Option 5: How to Import Music from iPhone to iTunes Using Shortcuts
- Extra: Tips to Transfer Music from iPhone to Finder
Option 1: How to Transfer Songs from iPhone to iTunes Directly (Purchased Music)
iTunes offers you the opportunity to back up your iPhone, restore it from a backup, and manage your iTunes library. With this traditional tool, you also have the ability to transfer your purchased songs to its library from your Apple device.
How do you transfer music from iPhone to iTunes directly?
- Install and run the most recent version of iTunes on your computer.
- Go to "Account" > "Authorizations".
- Choose "Authorize This Computer" to give the system the permissions and use your iCloud account.
- Sign in to your Apple ID and password before clicking "Authorize".
- Use a USB cable to link your iPhone to the computer.
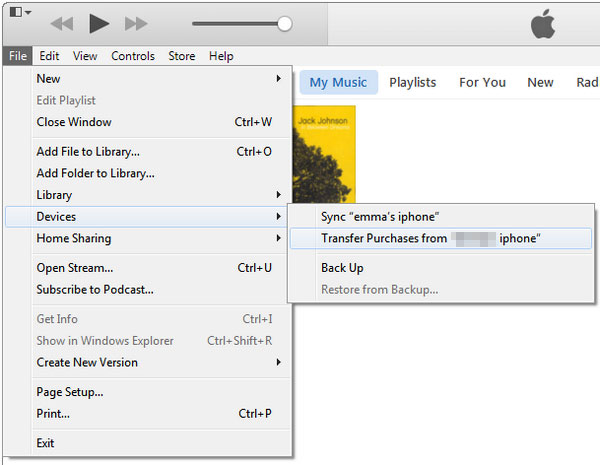
- Go for "File" > "Devices" > "Transfer Purchases from [your iPhone name]".
- Once done, click "Recently Added" from the left panel of iTunes to verify the newly imported music.
You Might Also Like:
- [SOLVED] 5 Ways to Sync Music Between Android Phone/Tablet and Computer
- Top 4 Solutions to Fix iPhone Unavailable without Data Loss
Option 2: How to Transfer Music from iPhone to iTunes in One Go
Do you have a lot of purchased and unpurchased music files on your iPhone? Want to transfer all these items to the iTunes library at once without complex configuration? iOS Transfer. It allows you to have a pleasant transmission journey in this regard. As a professional and full-fledged iOS management software, it doesn't just make you comfortable with file sharing.
Impressive features of iOS Transfer:
- Transfer music from iPhone to iTunes library and the other way around.
- Move files among iOS devices, computers, and iTunes.
- Support such files as music, playlists, ringtones, photos, podcasts, audiobooks, voice memos, movies, home videos, TV shows, contacts, text messages, WhatsApp, WeChat, Messenger, notes, etc.
- Manage iOS music and other items from a computer independently.
- It is a great iOS file manager, serving as a music editor, contact assistant, and photo organizer.
- Work well with virtually all iOS devices, including iPhone 14/14 Plus/14 Pro (Max), iPhone 13/13 Pro (Max)/13 mini/12/12 Pro (Max)/12 mini, iPhone 11/11 Pro/11 Pro Max, iPhone X/XR/Xs/Xs Max, iPhone 8/8 Plus, iPhone 7/7 Plus, iPhone 6/6S/6 Plus, iPod touch, iPad, etc.
- It won't let out your privacy.
How to transfer music from iPhone to iTunes library with iOS Transfer?
Step 1. Run iOS Transfer and link your iPhone to your computer
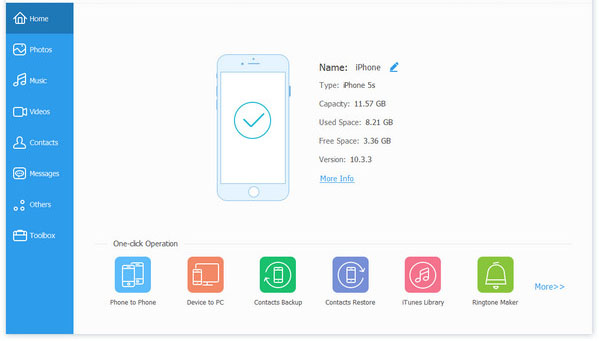
Connect your iPhone to a computer with an applicable USB cord. Then start the software after the free download and installation. When the automatic recognition is done, you'll see the interface in the screenshot below.
Step 2. Choose the "Music" tab
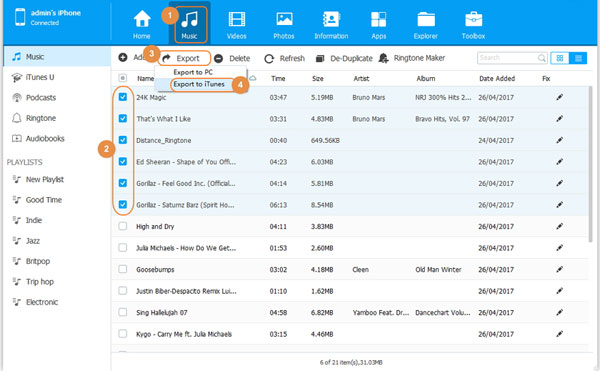
Go to the "Music" tab from the left of the interface. Then you will see all the songs categorized on the program and preview all the details.
Step 3. Transfer music from iPhone to iTunes
Mark the songs you want to copy to the iTunes library. Next, tap "Export" > "Export to iTunes" to copy all your selected music files to the library without damaging their original quality.
Option 3: How to Move Music from iPhone to iTunes over Wi-Fi
If you run iTunes on your computer, the iPhone and machine are using the same Wi-Fi network. When setting up syncing items with iTunes using the network, your connected device will appear on the tool's interface for file migration. Learn how to transfer music from iPhone to iTunes free with Wi-Fi:
- Attach your iPhone to your computer with the cable that came with the device.
- Open iTunes and tap your device's name when the iPhone is recognized. (iTunes couldn't connect to this iPhone?)
- Click "Summary" > choose the type of song you want to move.
- Choose "Sync Music" and mark any of the music type(s) you want to transfer.
- Press "Apply" to begin the music auto-sync.
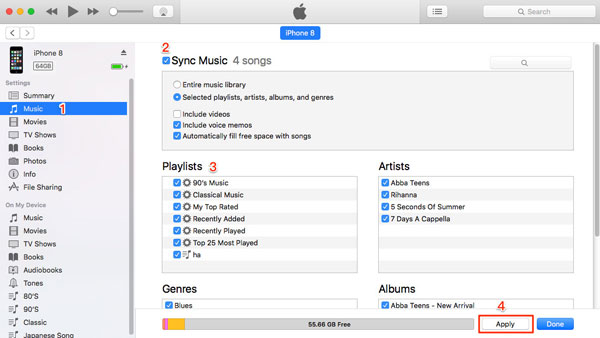
If you want iTunes to alert you before the auto sync, please head to iTunes' "Summary" > "Automatically sync" when you connect your iPhone. And after you delete a song playlist from the iTunes library, the deleted item will also disappear from your iDevice without warning.
See More:
- [Top 5 Methods] How to Transfer Music from Android to iPhone In Minutes?
- Is It Possible to Mirror iPhone to PC without Software? [SOLVED]
Option 4: How to Copy Music from iPhone to iTunes with File Sharing
As another feature of iTunes, file sharing is able to copy data from your iPhone to the iTunes library and reversely. This functionality takes effect when you use apps that support this feature to share music, photos, videos, etc. Here's how to move songs from iPhone to iTunes with File Sharing:
- Use a USB cord to plug your iPhone 14/13/12/11/X/8 into your Windows PC.
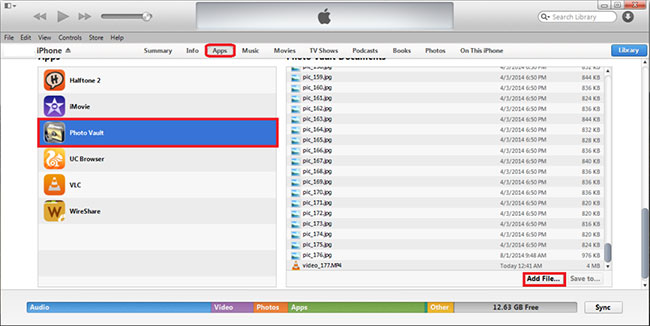
- Run iTunes on the PC and click the "device" sign in the iTunes interface.
- Select "File Sharing". And you will get a list of apps that support file sharing.
- Choose the one you want to transfer files from.
- Pick the items you are to import to iTunes and tap "Save to".
- Specify the target location to save the stuff and press "Save To" again.
Option 5: How to Import Music from iPhone to iTunes Using Shortcuts
People used to be enthusiastic about downloading MP3s from websites. But over time, many tools have been able to make music streaming easier. For example, through iTunes, you can get music, concert recordings, or lectures directly on your computer with the aid of shortcuts.
How to put music from iPhone to iTunes via Shortcuts?
- Check the downloaded audio files from your "Downloads" folder or somewhere on your computer's disk.
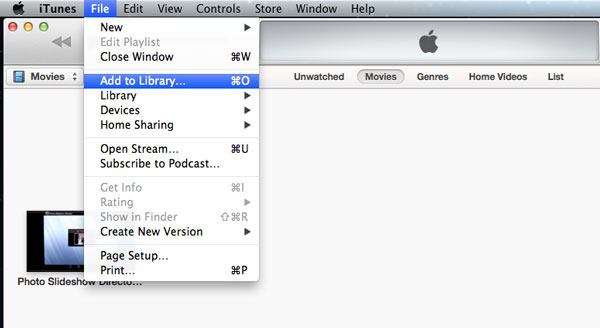
- Launch iTunes, tap the "File" menu, and click "Add to Library".
- When a window pops up, navigate to the folder of the files you want to copy.
- Choose the files or folders you wish to add.
- Tap "Open" to create a shortcut in iTunes to the songs.
- Check all iTunes-added files by going to the "Music" option from the drop-down menu nearby the top-left corner of the iTunes screen.
- Select "Songs" and tap the "Date Added" column to see the most recent songs you added.
Extra: Tips to Transfer Music from iPhone to Finder
iTunes has retired on macOS Catalina or newer. Yet, the good news is that Finder acts as an official alternative to iTunes, letting you sync, back up, restore, and update your iPhone without iTunes. Here, we'll take you through the easy steps to transfer music from iPhone to Finder:
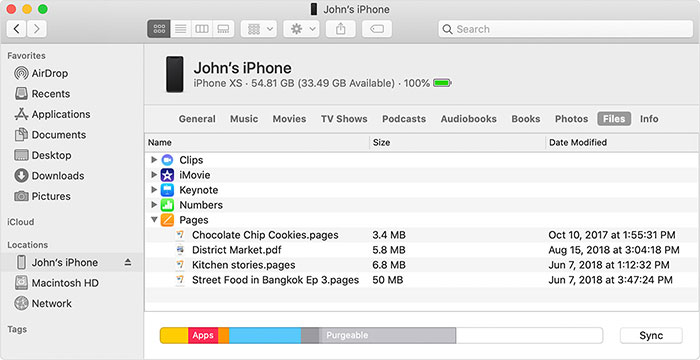
- Open Finder on your Mac and connect your iPhone to it via USB.
- The iPhone's icon will turn up in the sidebar of the Finder window.
- Select the device and choose to trust it.
- Pick the type of content you want to sync to Finder as the image shows up.
- Tap "Apply" > "Sync" to commence.
Roundup
It's time to wrap up this passage. Overall, we explained five popular ways to transfer music from iPhone to iTunes. And objective, most of the techniques are related to iTunes itself, more or less. Additionally, iOS Transfer has obvious advantages over the rest. On the one hand, it can directly transfer all kinds of purchased and non-purchased songs in your iPhone to iTunes at once. On the other hand, it also provides a nearly perfect solution for the comprehensive management of iPhone music and other items.
Related Articles:
How to Troubleshoot Error 9006 on iTunes Efficaciously? Here's the Real Fix
11 Effective Tactics to Troubleshoot 0xE80000A Error on iTunes
4 Tips to Transfer Music from iPhone to Computer without iTunes
3 Best Methods to Add Music from iTunes to iPhone 14/13/12/11/XR/Xs/8/7?
8 Productive Ways to Fix iTunes Stuck on Preparing iPhone for Restore


