[Full Guide] How to Transfer Videos or Movies from Mac to iPad?
Watching movies on the iPad is a great way to kill time. Transferring videos or other files from Mac computer to iPad has become a task that people often do in daily life. So, how much do you know about how to transfer video from Mac to iPad? Do you use iTunes to put video on iPad from Mac every time? If so, you need to re-plan your iOS data transfer path. After all, iTunes, as we all know, is a difficult application to use.
In this guide, we will introduce you to five methods on how to transfer movies from Mac to iPad. And there is a way to transfer videos in batches from Mac to iPad within a few minutes. Let's learn them one by one.
- Way 1: How to Transfer Movies from Mac to iPad using iTunes
- Way 2: How to Add Videos to iPad from Mac via Email
- Way 3: How to Put Video on iPad from Mac with iMessage
- Way 4: How to Move a Movie to iPad from Mac Using AirDrop
- Way 5: How to Transfer Video from Mac to iPad via iOS Transfer (5 Minutes Way)
Way 1: How to Transfer Movies from Mac to iPad Using iTunes
First, you can use iTunes to import video from Mac to iPad. This is also the most commonly used method for users to transfer files from Mac to iPad. However, users must first add movie files to the iTunes library, and then transfer them from iTunes to iPad. Let's briefly introduce the steps below.
- Launch iTunes on your Mac and connect your iPhone to the Mac using a USB cable.
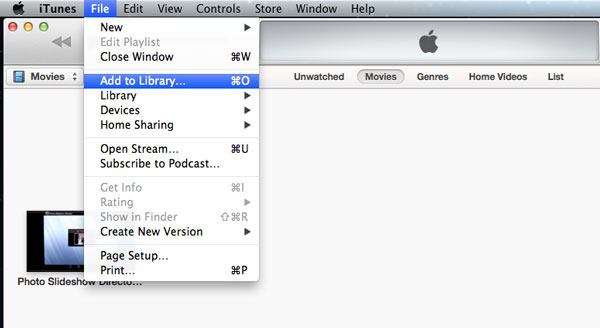
- On the iTunes screen, click on the "File" > "Add to Library" option to import the videos you want to transfer to iPad into iTunes library.
- Click the iPad icon on iTunes, and choose the "Summary" > "Movies" tab.
- You can see all videos in the iTunes library on the right panel.
- Check the option of "Sync Movies", and select the videos that you want to transfer from Mac to iPad.
- Click "Sync" at the bottom right corner after you have selected the movies to transfer.
- After that, iTunes will start to download movies from Mac to iPad immediately.
Next you just need to wait for the completion of the video synchronization. The completion time depends on the size of the videos you choose to transfer. One thing to note here is that if you use iTunes to transfer movies from Mac to iPad, the existing movies on the iPad will be deleted.
Check If You Need:
- 3 Best Ways to Backup and Restore iPhone (#3 is Excellent)
- How to Share Music on iPhone? (4 Simple Ways Included)
Way 2: How to Add Videos to iPad from Mac via Email
You can also attach the video you want to transfer as an email attachment, and send the video from Mac to iPad via email. However, this method is only suitable for a small number of video files, because all mail servers have restrictions on the size of attachment files. For example, Gmail restricts attachment files to be less than 25MB. Now let's take a look at how to use email to move a movie to iPad from Mac.
- On your Mac, open a web browser and log in to your email account.
- Click "Compose" to create a new mail.
- Enter your own email address as the recipient.
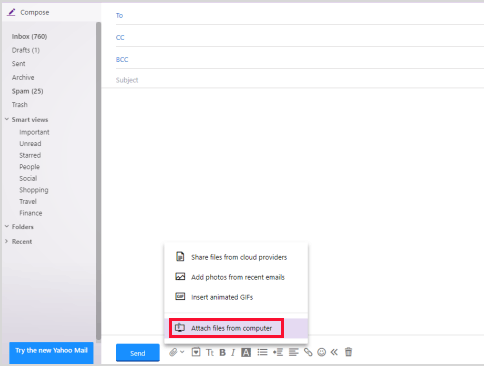
- Click the "Attach files" icon to select the video that you want to transfer from the Mac as attachment.
- Send the email.
- After the email is successfully sent, log in to your email account on your iPad.
- Receive the mail you just sent from the Mac, tap the attached video files and download it to your iPad.
Way 3: How to Put Video on iPad from Mac with iMessage
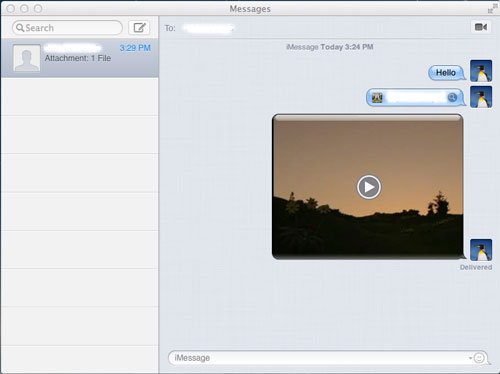
If you are using Mac OS X Mountain Lion, then you can also use the iMessage app to send movies from Mac to iPad. All you need to do is to first edit the video on the Mac and then drag and drop it into the input box of iMessage, click Send, and then receive the video file from the iPad. After that, you can play this video directly on iPad, or save it to iPad Camera Roll, or even use other apps to open it.
Check If You Need:
- How to Transfer Photos from iPhone to Laptop? 4 Solutions for You!
- Top 4 Ways on How to Transfer Photos from Laptop to iPhone
Way 4: How to Move a Movie to iPad from Mac Using AirDrop
AirDrop can wirelessly share files between two nearby Macs, Mac and iPhone, or Mac and iPad. All in all, you can use AirDrop to wirelessly send videos, photos, websites, locations, etc. to nearby iOS devices. The following steps will show you how to use AirDrop to transfer videos from iPad to Mac.
- Open the AirDrop feature on your iPad. (You can go to the page https://support.apple.com/en-hk/HT204144, to learn how to open AirDrop on iPad)
- On your Mac, go to "Finder" > "Go" > "AirDrop", and turn on Bluetooth and WiFi. This will launch AirDrop automatically.
- In the AirDrop screen, choose "Allow to be discovered" by "Everyone" or "Contacts Only". Here, we suggest you choose to be seen by everyone.
- Now, you should see the iPad in the AirDrop window on Mac, and the Mac should be shown in AirDrop on iPad.
- You can drag and drop the videos onto the icon representing your iPad.
- Tap on "Accept" on your iPad to receive the video files.
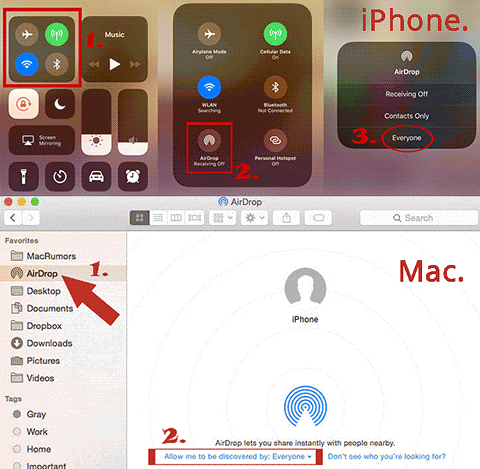
To move videos from Mac to iPad via AirDrop, you should make sure that your Mac supports AirDrop feature firstly. Otherwise, you need to draw support from other methods.
Way 5: How to Transfer Video from Mac to iPad via iOS Transfer
Using third-party software, such as iOS Transfer (Mac version), to transfer videos from Mac to iPad, is definitely your best choice. This software is a professional iOS data and file transfer tool. It is specially designed for Mac users to share a dozen types of files between iOS devices, iTunes and Mac computers. Using this software, you can transfer unlimited movies from Mac, iMac or Macbook to iPad within a few minutes.
Main Features of iOS Transfer for Mac?
- Transfer videos from Mac to iPad/iPhone without using iTunes.
- Copy not only videos, but also SMS, photos, songs, books, voice memo, ringtone, podcast, playlist, etc. from Mac to iPad, and vice versa.
- Transfer videos, photos, music from iPod to Mac or iTunes library.
- Effortlessly back up text messages, voice memos, notes and contacts from your iOS devices.
- Easy to use, intuitive interface and fast transferring speed.
- Fully compatible with overall iPhone, iPad and iPod, including iPad Pro, iPad mini, New iPad, iPad Air, iPad 4, iPad 2, iPad, etc.
Below are the steps to transfer videos from Mac to iPad via iOS Transfer. Let's free download the software and take the following steps.
Step 1: Launch iOS Transfer and connect your iPad
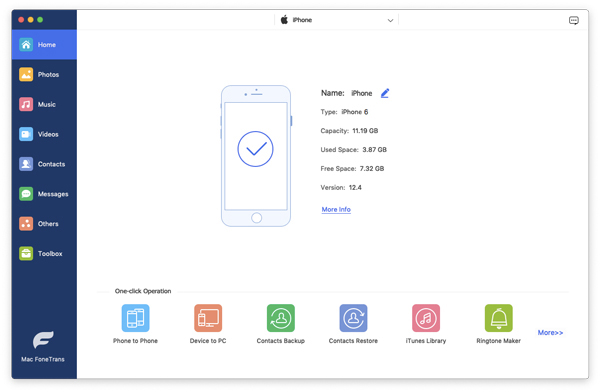
Download and install the iOS Transfer for Mac software on your Mac. Run it and connect your iPad to the Mac via a compatible USB cable. Once the connection is successful, the software will automatically recognize your iPad and display you with the following interface:
Step 2: Select the videos to transfer
The left column shows all the file types that can be transferred. Choose the "Videos" tab, and turn to the top menu to hit on the button of "+", browse for the videos on the Mac you want to transfer and upload them from Mac to your iPhone.
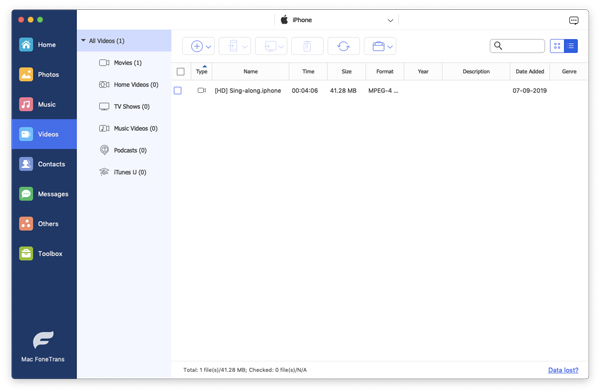
Wait for a while, all selected videos or movies will be copied to your iPad. This iOS Transfer software can also transfer videos from Mac to iPhone. Compared with iTunes, this software is more simple and effective, and it can also help you better manage your iOS data and files.
The Bottom Line
In this article, we mainly discussed how to transfer video from Mac to iPad Pro/Air/mini/4/2. We showed you five different methods one by one. You can choose a method you like to copy your videos according to your needs. If you have other better methods, please also leave us a message.
Related Articles:
6 Tips: How to Transfer Photos from Mac to iPhone? (#2 is Awesome)
How to Transfer Photos from iPhone to Mac (7 Ways Offered)
How Can I Send Messages from Mac to iPhone or Android Easily
[5 Ways] How to View iPhone Text Messages on Computer/Mac?
How to Sync Songs from Mac to iPhone 12/11/X/8 Plus/8/7
Best Free Ways to Transfer Music from iPhone to Computer in 2021


