How to Fix FaceTime Photos Not Saving on iPhone/iPad? 9 Solutions!
"I'm on iOS 18.1.1, none of my photos I take while FaceTiming my wife save anywhere, but her photos save and she is on the same version. I've hard reset the phone, restarted it, turned off FaceTime and FaceTime photos and re-enabled them and still nothing. Anything else I can do to fix this issue?"
- From Apple Support Community
You are not the only one who has this question, "Why are my FaceTime photos not saving or showing up in the Photos app?" Many iPhone users face this problem, where they either see a notification saying that the FaceTime Live Photo was saved but it does not appear in the Photos app, or nothing happens when they press the Live Photo button during a call.
This problem often occurs, especially after iOS updates on older iPhones. Fortunately, there are several ways to troubleshoot and fix this problem. Let's go through these solutions one by one.

Part 1: Where Are FaceTime Photos Saved?
When you take a FaceTime photo, it's saved directly to the Photos app on your iPhone or iPad. These Live Photos are stored in your photo library, just like any other photo taken with your device's camera.
To find your FaceTime photos:
- Open the Photos app on your iPhone or iPad.
- Your most recent photos are displayed by default.
- You can use the search bar at the top to find photos by date, location, or keyword.
- You can also browse photos by year, month, or collection.
- If you have iCloud Photos enabled, your FaceTime Live Photos will be uploaded to iCloud, making them accessible on all your Apple devices. (iPhone Live Photos Not Working?)
- You can create a specific album for your FaceTime Live Photos in the Photos app to keep them organized.
Part 2: Why Are My FaceTime Photos Not Saving?
There are a number of factors that may cause FaceTime Live Photos to not save. Understanding these potential causes can help you identify the root of the problem and then troubleshoot effectively.
- Privacy restrictions: Incorrect settings may prevent photos from saving. Both you and the person you're calling will need to adjust privacy settings to allow FaceTime Live Photos to save correctly.
- Low storage space: If your device is low on storage space, photos from FaceTime cannot be saved. Delete unnecessary files, apps, or data to free up space. Alternatively, use iCloud to store your photos.
- Unstable network connection: A reliable internet connection is essential for apps like FaceTime to work properly. Check your network to make sure it's stable and strong.
- iOS system issues: Problems within the iOS system may disrupt FaceTime functionality. This may be caused by an outdated version of iOS or a system glitch. Keeping iOS updated can help resolve many similar issues.
See Also
Part 3: How to Fix FaceTime Photos Not Saving?
Fix 1: Restart iPhone
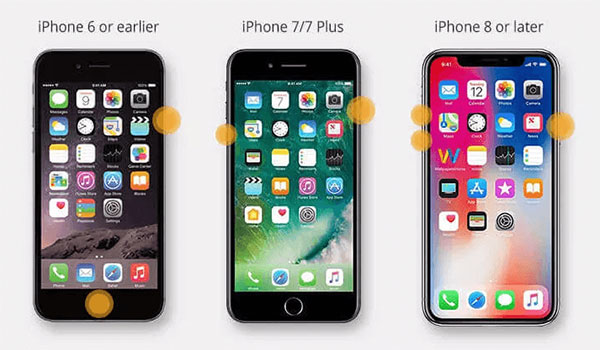
Restarting your iOS device is often the easiest and quickest way to fix an issue. Before you adjust any settings, give your device a quick restart to see if that fixes the issue.
Here's how to restart your device based on your iPhone model:
For iPhone 8 and earlier:
- Press and hold the power button until you see the "slide to power off" option appear.
- Slide the red bar to turn off your device.
- Wait a few seconds, then press and hold the power button again to turn your iPhone back on.
For iPhone X and later:
- Press and hold either the volume button and the side button at the same time until the "slide to power off" option appears.
- Slide the red bar to shut down your device.
- After a few seconds, press and hold the side button again to restart your iPhone.
Fix 2: Restart FaceTime
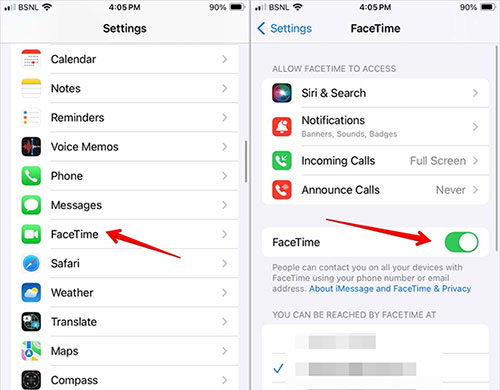
Another fix you can try if your FaceTime photos aren't saving is to restart the FaceTime service. This involves disabling and then re-enabling it, and it can also fix the FaceTime fails to connect problem.
- Open "Settings" on your iPhone and go to "FaceTime".
- Turn off the toggle switch next to "FaceTime" to disable it.
- Restart your iPhone.
- Return to "Settings", repeat these steps, and enable the "FaceTime" toggle switch again.
Fix 3: Re-enable FaceTime Live Photos
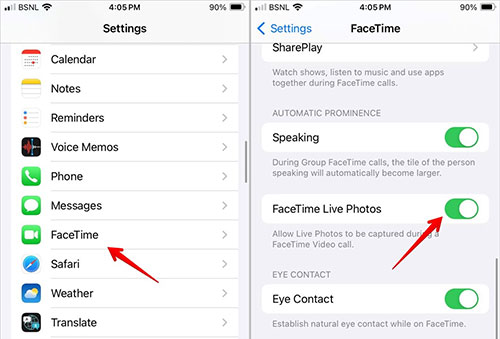
Sometimes, the problem can be caused by a minor software glitch with the feature. You can fix this by turning the "FaceTime Live Photos" option off and back on again.
- Open the "Settings" app on your iPhone.
- Scroll down and select "FaceTime".
- Under FaceTime settings, find the "FaceTime Live Photos" option.
- Turn it off by toggling the switch, then back on again.
- Check if the problem is resolved.
Fix 4: Check Your Network Connection
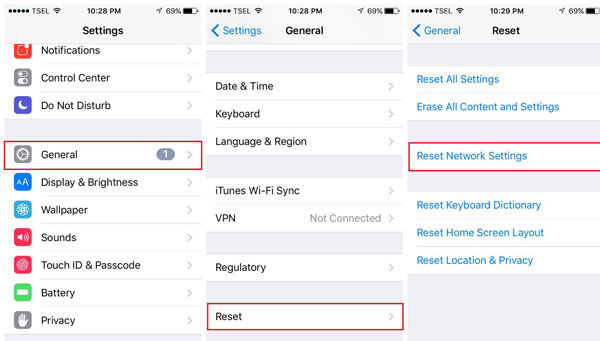
A stable network connection is essential for smooth operation. You can connect to a reliable Wi-Fi network or use 5G cellular data. If the problem persists, try resetting network settings to resolve the issue.
Steps to reset network settings:
- Open "Settings" on your iPhone.
- Navigate to "General" > "Transfer or reset iPhone".
- Tap "Reset" > "Reset Network Settings".
Fix 5: Free Up Storage Space
Since FaceTime Live Photos take up more storage space than regular photos, running out of free space may prevent them from being saved. Here's how to check your storage and free up space if needed:
- Open the "Settings" app on your iPhone or iPad.
- Tap "General".
- Tap "iPhone Storage" (or "iPad Storage").
- You'll see a breakdown of your storage usage, categorized by Apps, Photos, System, and more.
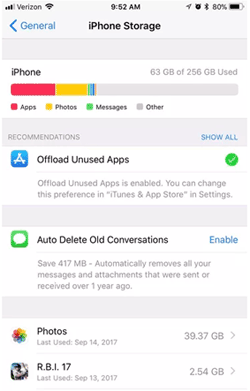
Tips to free up storage space:
- Identify the categories that are taking up a lot of space.
- Offload apps you don't use often. This deletes the app but keeps its data for future use. To offload, tap the app in the storage list and select "Offload App".
- Delete large videos or photos you no longer need.
- Enable "iCloud Photos" if it isn't already enabled. This will upload your photos and videos to iCloud, freeing up space on your device. However, keep in mind that iCloud storage has limits, too.
Fix 6: Remove Privacy Restrictions
The default settings usually allow FaceTime Live Photos to work, but there are exceptions. To ensure that privacy restrictions are not causing issues, follow these steps:
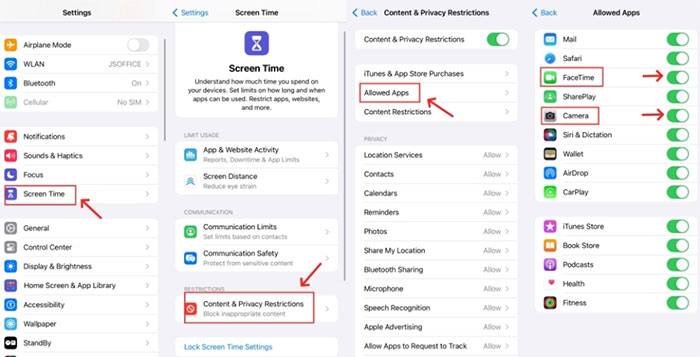
- Open "Settings" and navigate to "Screen Time".
- Scroll down and select "Content & Privacy Restrictions".
- Tap "Allowed Apps" and verify that "FaceTime" and "Camera" are both enabled.
Fix 7: Re-enable iCloud Photos
Even if FaceTime photos are saved to your Camera Roll, re-enabling iCloud Photos may fix the problem and help FaceTime work properly again. Keep in mind that resetting photo syncing may take some time. Here's how:
On an iPhone or iPad:
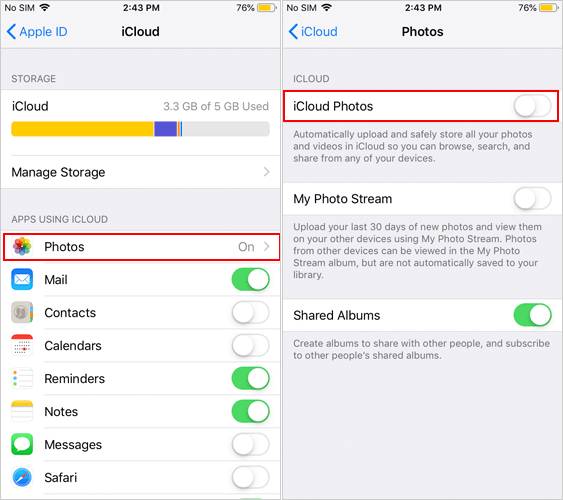
- Open the "Settings" app and tap "Photos".
- Find the "iCloud Photos" switch, turn it off, wait a few minutes, and then turn it back on.
On a Mac:
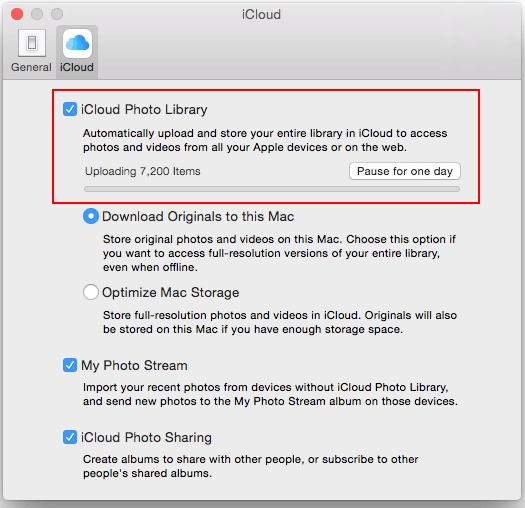
- Open the "Photos" app on your Mac and tap "Preferences" in the menu bar.
- Navigate to the "iCloud" tab, uncheck "iCloud Photos", and then re-enable it after a brief pause.
Fix 8: Check for Software Update
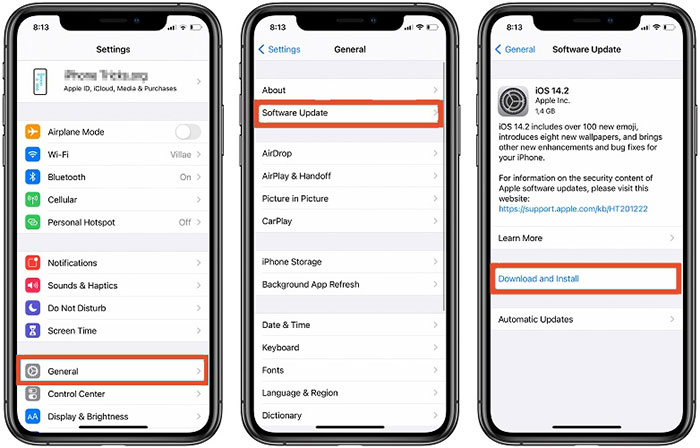
If your FaceTime photos aren't saving, checking for software updates is a good troubleshooting step. Software updates can often fix glitches and improve performance. Here's how:
- Open the "Settings" app on your device.
- Tap "General" and select "Software Update".
- If an update is available, tap "Install Now" to download and install it. (iPhone Software Update Failed?)
Fix 9: Reset All Settings on iPhone
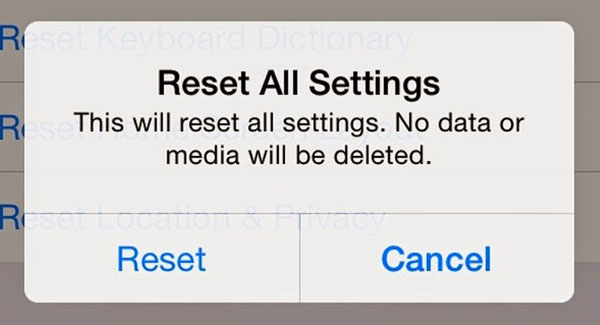
If FaceTime photos still aren't being saved, you can try resetting all settings on your iPhone. Keep in mind that this will return all settings to default, so you'll need to reconfigure them later.
Here's how to reset your iPhone's settings:
- Open the "Settings" app.
- Tap "General" and select "Transfer or reset iPhone".
- Select "Reset" and tap "Reset all settings".
Part 4: How to Recover FaceTime Photos that Didn't Save?
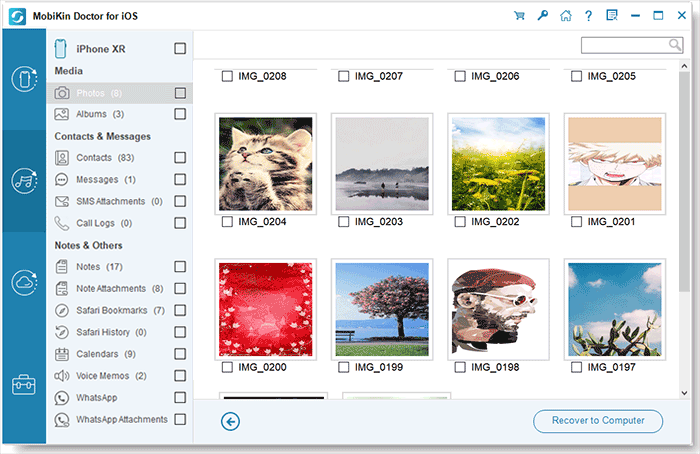
We have covered various troubleshooting steps to resolve and prevent the FaceTime photos not saving issue. But what if you have already lost some valuable FaceTime photos due to this issue? Don't worry – there is a reliable solution to recover lost photos on your iPhone or iPad: MobiKin Doctor for iOS.
Doctor for iOS is a powerful iOS data recovery tool designed to help you retrieve all kinds of data, including photos, videos, messages, contacts, notes, and more. It has several key advantages:
What Can Doctor for iOS Do:
- Recover lost and deleted photos on iPhone from iTunes or iCloud backup.
- Recover deleted contacts and text messages from iPhone, even without any backup.
- In addition to photos, you can also restore music, videos, contacts, messages, call history, books, voice memos, and many more.
- The user-friendly interface guides you through the step-by-step recovery process.
- Allows you to preview data before recovery so that you can select only the data you want to recover.
How to recover your lost iPhone photos with Doctor for iOS?
Step 1. Launch Doctor for iOS on a computer
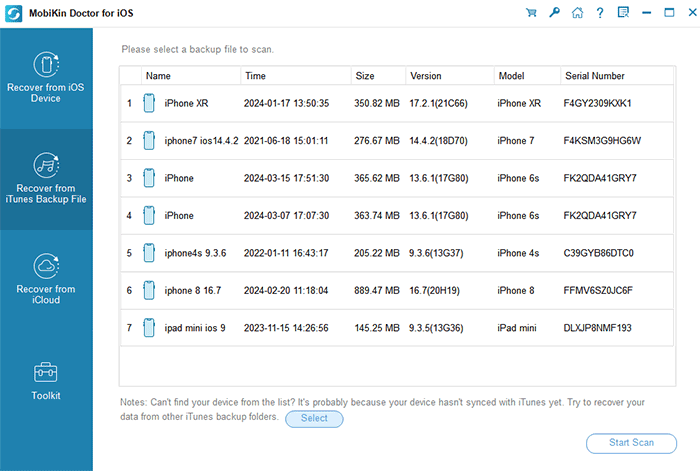
First download and install Doctor for iOS. Open the program and select the recovery mode labeled "Recover from iTunes Backup File" from the left menu. The tool will automatically detect all iTunes backup files stored on your computer. This process may take several minutes.
Step 2. Scan for photos from iTunes backup
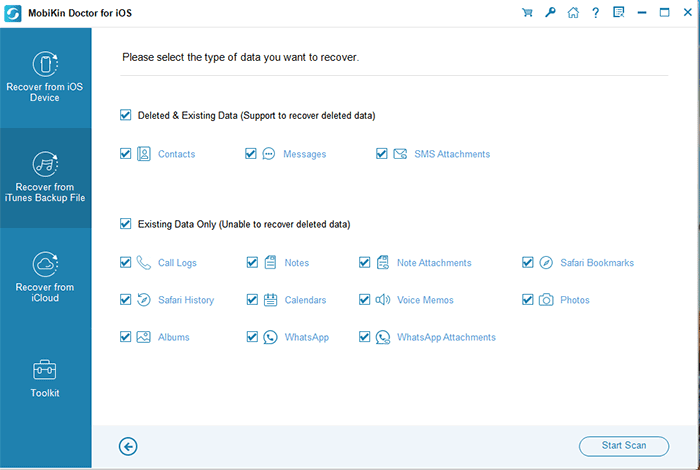
Select the iTunes backup that may contain your lost photos and click "Start Scan" on the bottom right corner. The tool will display all recoverable data types. To narrow down the results, select "Camera Roll" or "Photos" and click "Start Scan" again.
Step 3. Start to extract photos from iTunes backup
After the scan is complete, you will see a preview of the recoverable photos. Select the photos you want to recover and click "Recover to Computer" to save the selected photos from the backup to your computer.
Video Guide:
Conclusion
This article explains how to fix the issue of FaceTime photos not saving on iPhone. It can be frustrating to encounter this problem, but by following the steps outlined here, you can identify the cause and solve it effectively. Start with the basic troubleshooting methods mentioned in this guide. If these methods don't work, you can rely on MobiKin Doctor for iOS as a powerful solution to recover photos on iPhone or iPad.
If you have any additional questions on this topic, feel free to leave a comment below and we'll respond promptly!
FAQs on FaceTime Photos Not Saving on iPhone
Q1. How do I enable FaceTime photos on my device?
To enable FaceTime photos, go to "Settings > FaceTime > FaceTime Live Photos" and turn it on. Make sure the person you're calling has this setting enabled on their device as well.
Q2. How do I view or edit my FaceTime photos?
Open the "Photos" app and tap the "Albums" tab. Look for the "FaceTime Photos" folder, where all your FaceTime photos are stored. You can view or edit them there.
Q3. How do I share or delete my FaceTime photos?
To share or delete FaceTime photos, open the Photos app, select the photos you want, and tap the "Share" or "Delete" icons at the bottom of the screen. Then, follow the prompts to complete the action.
Q4. How do I take a screenshot during a FaceTime call?
During a FaceTime call, you can take a screenshot by pressing the Power and Home buttons (on devices with a Home button) or the Power and Volume Up buttons (on devices without a Home button) at the same time. A shutter sound and a flashing screen will confirm that the screenshot has been taken.
Q5. How do I record a FaceTime call?
To record a FaceTime call, use your device's screen recording feature. Swipe up from the bottom of the screen or swipe down from the top right corner (depending on your device) to access the "Control Center". Tap the "Screen Recording" icon to start recording the call.
Related Articles:
[Full Answer 2025] Does iCloud Backup Include Photos
[2025 Updated] How to Recover iPhone Photos without Backup


