Unable to Check for iOS 18 Update on iPhone/iPad? Check 7 Real Fixes
"Every time I try to update my software I get this pop up message 'unable to check for update, an error occurred while checking for upgrades'. I have tried restarting the device, but it didn't work. Please help me."
- From discussions.apple.com
The latest iOS 18 update is out, and you're eager to enjoy its new features. However, when you try to download it, an error message pops up on your iPhone saying "Unable to Check for Updates". Despite trying multiple times, you're unable to install the new software. So, why does this happen, and how can you fix it? In this article, we'll walk you through the possible reasons behind the issue and provide step-by-step solutions to help you successfully download and install the latest iOS update on your iPhone or iPad.
- Part 1: Why Does My Phone Say Unable to Check for Update iOS 18/17?
- Part 2: How to Fix "Unable to Check for Update" Error on iPhone?
> Way 1: Restart Your iPhone/iPad
> Way 2: Reopen the Settings App
> Way 3: Try a Different Wi-Fi Network
> Way 4: Reset Network Settings
> Way 5: Delete iOS Beta Version Profile
> Way 6: Update iOS and iPadOS via iTunes
> Way 7: Change the Wi-Fi DNS Setting
> Way 8: Check Apple Servers
> Way 9: Fix with iOS System Recovery [No Data Loss]
Part 1: Why Does My Phone Say Unable to Check for Update iOS 18/17?
Are you wondering why your iPhone or iPad says "iOS unable to check for update"? Many users encounter this error when trying to upgrade to the latest iOS version. If you're part of the iOS 18/17 Beta program, you should be able to update without a problem. The solution is simple: install the update directly from your device's settings.
There are a variety of reasons for the "stuck on checking for updates on iPhone" error, many of which are easy to fix. For example, Apple's servers may be overloaded due to heavy traffic, which can be fixed by trying again later. A poor internet connection is another common cause, so make sure your connection is stable and fast. Check your device's settings to confirm that it's set to allow software updates, and switch to a different network if needed.
Related:
Part 2: How to Fix "Unable to Check for Update" Error on iPhone?
Below are the top 9 solutions on how to fix the "unable to check for update on iPhone" issue:
Way 1: Restart Your iDevice
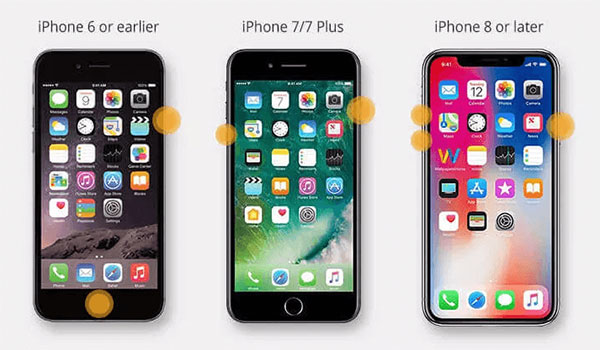
You can restart your iPhone or iPad to resolve the issue. This means shutting down and starting your device again. This is a very common method for resolving most issues related to iDevice. Just do the following steps:
- Long press the sleep/wake button until the Slide Power Off option disappears from your device's screen.
- Then, slide the slider to turn it off.
- After waiting a few seconds, press and hold the sleep/wake button once more to restart your device. (iPhone keeps restarting?)
Way 2: Reopen the Settings app
Software glitches can happen, and they can be unpredictable. A bug in the Settings app could be the culprit. To fix this, simply force quit and reopen the app.
For iPhones with a Home Button:
- Press the Home Button twice to bring up the multitasking menu (app switcher).
- Locate the Settings app in the list and swipe it up to close.
- Reopen the Settings app to start a fresh instance, then check for updates.
For iPhones without a Home Button: The process is similar, but the app switcher is accessed differently:
- Swipe up from the bottom and hold to activate the app switcher.
- Alternatively, swipe up and move your finger to the right for quicker access.
- Close and reopen the Settings app to check for updates.
Way 3: Try a Different Wi-Fi Network
Switching to a different Wi-Fi network or restarting your router can sometimes fix the problem. If the previous solutions don't work, try connecting to a different Wi-Fi network and check for the latest iOS update again. (iPhone won't connect to WiFi?)
Way 4: Reset Network Settings
You may need to reset your device network settings for the best performance. An issue with your network settings can lead to an error - unable to check for updates. Below are steps on how to do this.
- Go to your device's "Settings".
- Choose the option "General" and scroll down.
- Tap on "Reset" and then "Reset Network Settings."
- Confirm the Network resetting process by entering your device passcode.
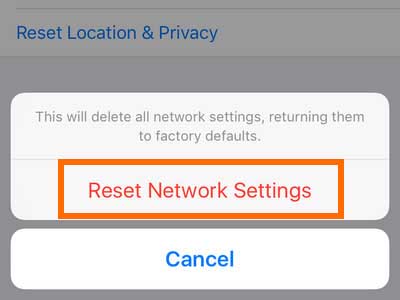
Once you have done these steps, your current network settings will be wiped out, and you will get the default one. It will help you resolve any issue related to update checks and other network problems.
Way 5: Delete iOS Beta Version Profile
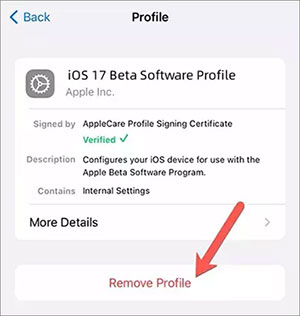
iOS files are always stored in your iDevice. If you have installed the Beta profile, it may be causing an issue when you try to update the new iOS version. The best solution is to delete that profile.
- Go to "Settings" and then "General."
- Tap on "VPN & Device Management."
- Under Configuration Profile, tap iOS Beta Software Profile.
- Select "Remove Profile". This will delete the beta update profile.
Way 6: Update iOS and iPadOS via iTunes
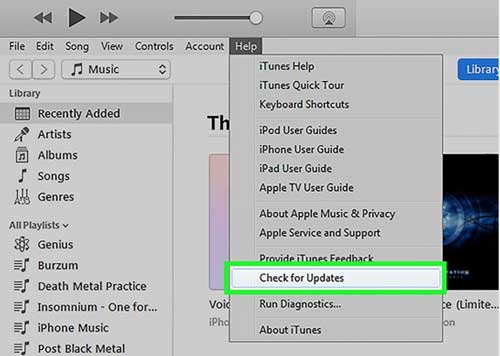
The easiest method to update your system is by using iTunes. You will need a computer connected to a stable network. Then follow these steps:
- On your computer, open iTunes and connect your iPhone/iPad to the computer using a USB cable.
- Once your device is connected, select it from the left menu in iTunes.
- Select Summary and then click on the "Check for Update" button.
- You will get the available update. Please choose Download and Update.
- If prompted for the device passcode, enter the passcode to proceed.
Way 7: Change the Wi-Fi DNS Setting
After prolonged usage of your iPhone device, you may have noticed that the connection to the Wi-Fi service becomes slower and less reliable. To improve the connection, you can change your Wi-Fi DNS setting in the Settings app. Depending on your network provider, this process may vary. To begin with:
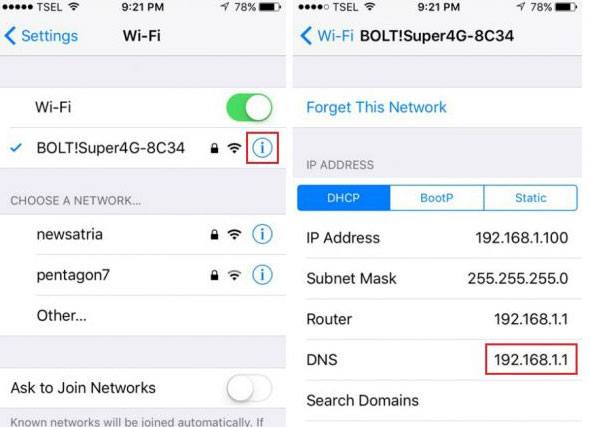
- Go to the "Settings" menu of your iPhone device and select Wi-Fi from the list.
- Under this tab, select the Wi-Fi network to which your iPhone device is connected.
- Select the DNS field, which will take you to the DNS server.
- Here, you can enter the details of the new DNS. You can enter Google Public DNS, which is 8.8.8.8, 8.8.4.4.
- Try to update your system from the Check Update page.
Way 8: Check Apple Servers
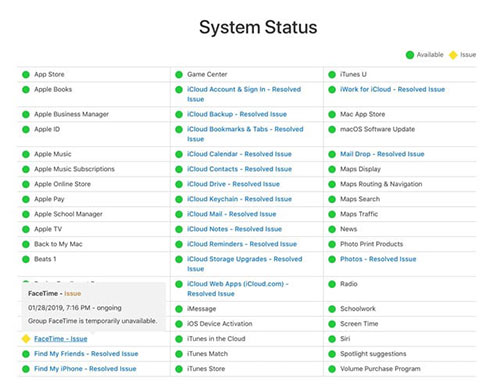
Before checking if Apple's servers are working properly, it's important to make sure your network setup and connection strength are stable. Unfortunately, servers do go down from time to time. In this case, you'll need to wait and try the update again later.
To verify Apple's servers, visit the Apple System Status website. If the server status is yellow, there's a problem and the update won't appear. However, if the status symbol is green, everything is fine on Apple's end.
Way 9: Fix with iOS System Recovery
A reliable and effective way to fix iPhone problems is to use a specialized iOS system repair tool, such as iOS System Recovery. This all-in-one solution can quickly fix a variety of issues related to iTunes, iOS, and iPadOS. Whether it's a common problem like unable to check for iOS 18/17 update, or a more complex unresolved error, this tool can restore your Apple device to normal without any data loss.
Main Features of iOS System Recovery:
- Fix the iPhone unable to check for update issue without data loss.
- Fix various iOS problems like iPhone volume problems, charge issues, black screens, iTunes errors, white screen of death, restart loops, and more.
- Easy to use and gets the job done in no time. Offers multiple repair modes for different iOS system issues.
- No data leakage, thus protecting your privacy.
- Compatible with many iOS devices, including iPhone 16/15/14/13/12/11/X/8/7/6, iPod touch, iPad, etc.
Steps to Fix iPhone Unable to Check for Update via iOS System Recovery.
Step 1: Download and Install the Software
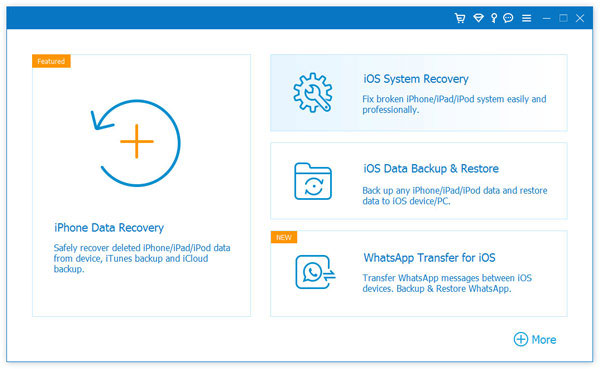
Launch the iOS System Recovery software after you install it. Head to "More Tools" and then select "iOS System Recovery."
Step 2: Put iPhone into recovery mode
Use the iPhone's light cable to connect it to your PC. Wait for some minutes for the connection to establish. Select "Standard Mode" and tap "Start" to continue.
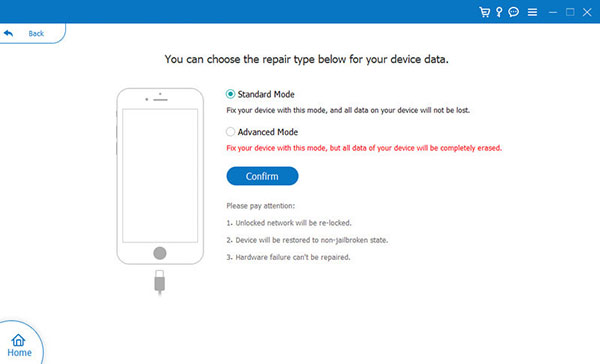
Step 3: Fix iPhone unable to check for update
The program will detect the device automatically and download the appropriate iOS 18 firmware. Click "Repair" and give the process some minutes to complete.
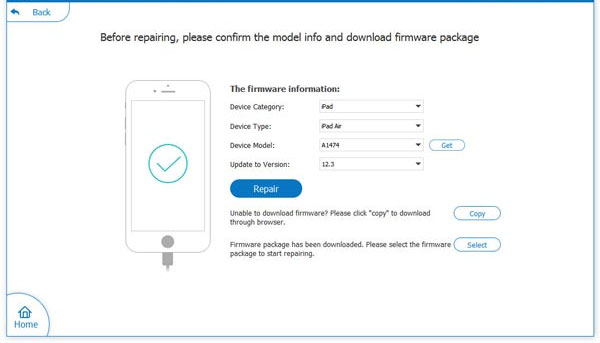
Step 4: Restart Your Device
Once the repair process is complete, restart your iPhone/iPad. You should now be able to check for updates on your device.
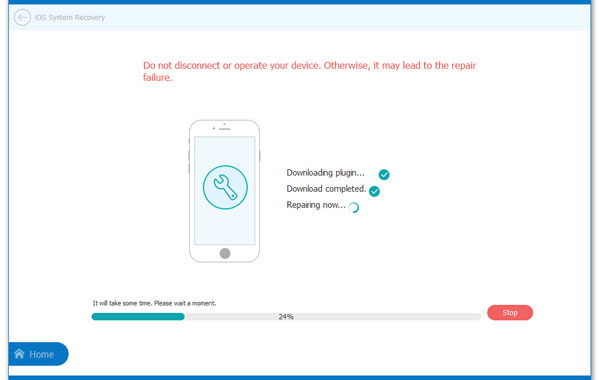
In Conclusion
Regular iOS updates roll out necessary patches and new features. Therefore, the iPhone can't find update issue can disrupt the smooth functioning of your device. It is important to resolve this issue promptly to maintain the performance and security of your device. The methods discussed above should allow you to successfully fix the iOS 18/17 unable to check for update issue. iOS System Recovery, in particular, is the ideal solution as it can fix more than a hundred iOS system issues without causing any data loss.
Finally, please share this post on social media if you find it is of great help.
Related Articles:
[Solved 2024] How to Fix iPhone Deleted Contacts Randomly?
3 Methods to Update iPhone without iTunes [iOS 18/17 Supported]
Want to Downgrade iOS 18 to iOS 17 without iTunes? 3 Simple Ways are Here!
[Full Guide] How to Erase iPhone without Password Permanently?


