How to Back Up iPhone Music Efficiently? (with Clear Steps and Pics)
iPhone backup is an actual topic. For many users, songs are just as important as contacts on their handsets. In order not to worry about the loss or damage of the local tracks and save the trouble of re-purchasing and re-adding music lists, it is a vital measure to create a copy for your iPhone songs. Well, do you know how to back up music on iPhone?
If you're a veteran Apple user, you might think of iTunes. Yet it can only back up the songs you've purchased and would automatically delete the content from your phone while performing music restore. Thus, to let you get more choices, we'll provide you with 4 representative methods in the following.
Option 1: How to Back Up Music on iPhone to Computer with Assistant for iOS
Is there a program that can back up all kinds of music on an iPhone to a computer, and restore them without damage to the existing music on the mobile? Yes, of course! MobiKin Assistant for iOS (Win and Mac) is a fully qualified tool.
It offers two ways to back up iPhone music and other data. You can select any songs you want and get them to your computer in one tap. And you're also allowed to choose to back up the iPhone contents to the default directory of iTunes or customize the backups to any folder on your computer.
Some highlights of MobiKin Assistant for iOS:
- Back up various music from iPhone to computer selectively or in batches.
- Allow you to move other data to PC/Mac, containing ringtones, playlists, voice memos, photos, eBooks, messages, contacts, etc.
- Transfer files from PC or Mac to iPhone with no data loss.
- Back up and restore files between iOS devices and iTunes in a direct manner.
- User-friendly UI, easy to use, and fast backup.
- Get along well with various PC and Mac computers.
- Well compatible with overall iOS devices, including iPhone 12, iPhone 11/11 Pro/11 Pro Max, iPhone X/XR/XS/XS Max, iPhone 8/8 Plus, iPhone 7/7 Plus, iPhone 6/6S/6 Plus, iPod, iPad, etc.
- It never tracks any behavior of its users.
How to back up music from iPhone to PC/Mac via Assistant for iOS? (B.T.W. The following also applies to those with a Mac computer)
Step 1. Run the Program and connect iPhone to computer
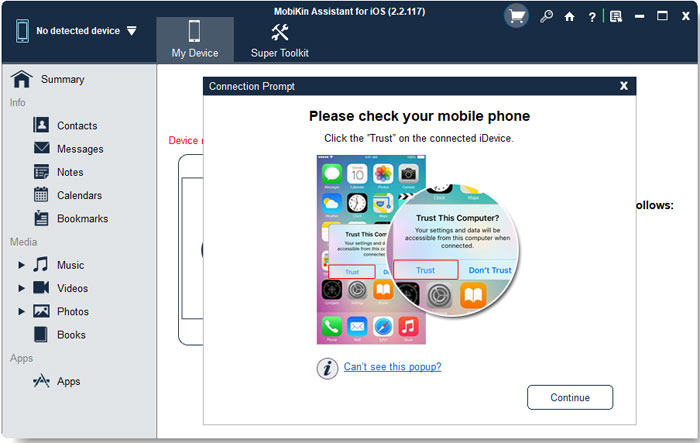
Have the downloaded software installed and open it on your computer. Connect your iPhone to the computer via a USB cable. After the phone is detected automatically, open your mobile to tap Trust as prompted. Then touch Continue on the interface to get your iPhone recognized.
Step 2. Choose the music you like for backup
After that, simply click Music from the left sidebar and preview all the items from the song list on your iPhone. Next, tick on your wanted songs or the whole music folder on the interface as needed.

Step 3. Start to back up your iPhone music
Now, simply click Export from the top menu to save the selected music on any folder of your PC/Mac.
It also provides the other way to back up your music and other content on your iPhone, and you can restore them when needed. To learn more, just click here to get how to back up and restore iPhone data within one click.
Option 2: How to Back Up Music to iCloud
iCloud, a cloud service provided by Apple, empowers you to sync your iPhone data (including music) to its server. Or you can back up music to iCloud by turning on iCloud Music Library. However, the songs to be synced must be purchased from the iTunes library.
Again, this service offers only 5GB of free storage, and you can get more by putting in some subscription fee.
- Back Up iPhone Music and Other Data to iCloud
Step 1. On your iPhone, go to its Settings > [your name] > iCloud.
Step 2. Switch on the "iCloud Backup" option.
Step 3. Tap on the "Back Up Now" button and wait for the task to complete.
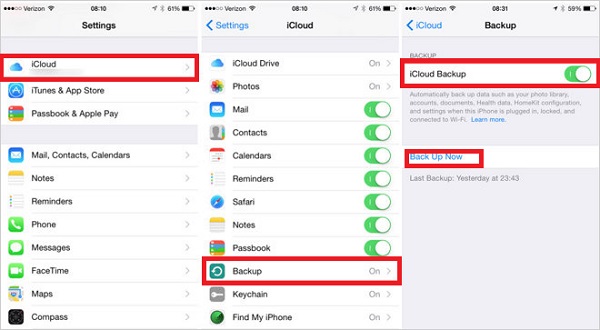
Assume your iPhone is running on iOS 10.2 or older, just go to Settings > iCloud > Backup > enable iCloud Backup. (P.S. If iCloud backup failed, click here for fixes.)
- Sync iPhone Songs by Enabling iCloud Music Library
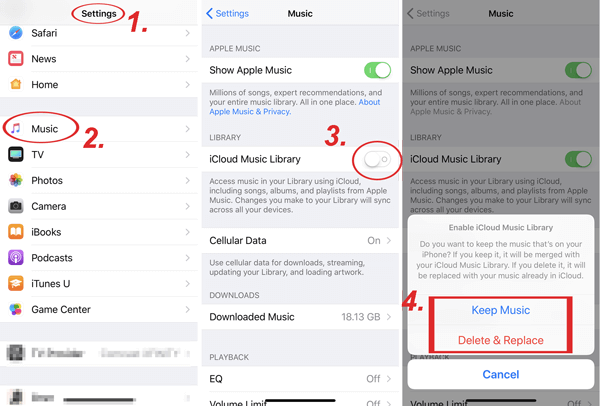
Step 1. Head to the "Settings" app to touch Music. Then turn on "iCloud Music Library" under the LIBRARY section.
Step 2. A message should then pop up, asking you to choose "Keep Music" or "Delete & Replace". To back up your iPhone music to iCloud and keep the stuff on your iPhone too, just press the former to proceed.
Can't Miss:
- 10 Best iPhone Backup Software in 2020 for Windows PC/Mac
- Top 3 Ways to Transfer Music from iPhone to Computer for Free
Option 3: How to Back Up Music on iPhone to iTunes
As a traditional tool of Apple, iTunes enables you to sync purchased music on your iPhone as well. Nevertheless, when you intend to restore the data from the backups, it will erase all the existing tracks on your iPhone. Further, it doesn't perform tasks efficiently.
Anyway, if those won't get you down, just follow us to learn how to back up music on iPhone to iTunes:
Step 1. Install and run iTunes on your computer and connect your iPhone to the computer via an applicable USB cable. Then the tool will recognize your device soon.
Step 2. You'll see the icon of your iPhone on the interface of iTunes. Here, you should click File > Add File to Library to add new songs from your device.
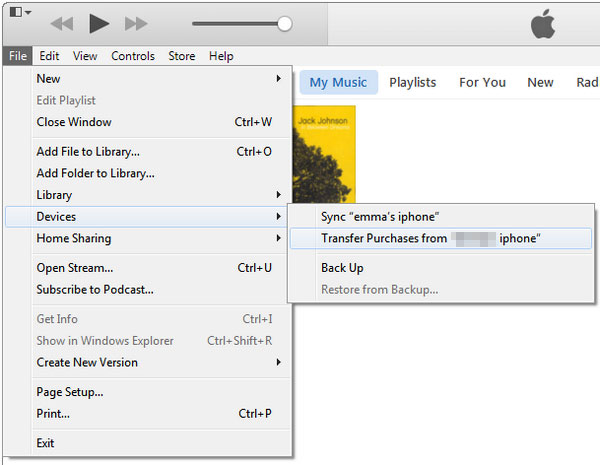
Note: If there have been all the songs you need in your iTunes library, please skip this step.
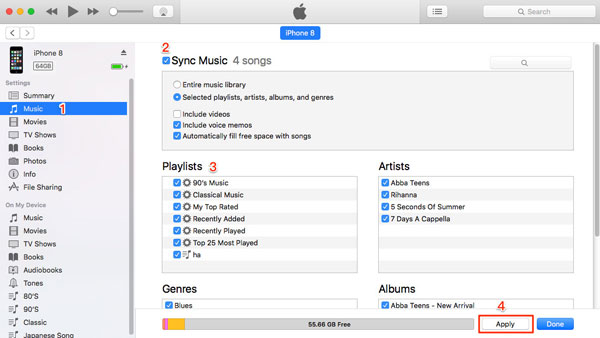
Step 3. Click on the "Music" tab from the left menu. Then you should mark the box nearby "Sync Music" and select the desired option(s) as needed. Next, tap on "Apply" at the bottom right to complete the task.
You May Also Need:
- How to Delete Songs from iPhone But Keep Them on iTunes?
- How to Transfer Music from iPod to iPhone 12/11/XR/XS/8?
Option 4: How to Back Up Music from iPhone to Google Drive
Google Drive, currently, also offers the backup service for iPhones besides Android devices. It provides 5GB of free space for each new user. Before the backup, you ought to log in to your Google account on the webpage and select the iPhone music to upload to the Google server. Or you can run this application on your iPhone to accomplish the task in a similar way.
How can I back up music from iPhone 12/11/XR/XS/X/SE/8/7/6 to Google Drive from the webpage?
Step 1. Visit the website of Google Drive on your computer and sign in to your Google account.
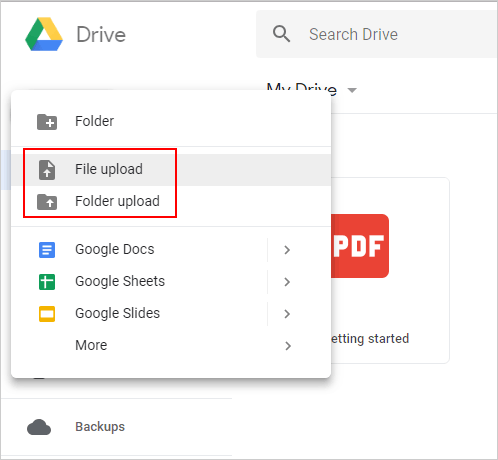
Step 2. Click on the "My Drive" section from the top left and then tap on "New".
Step 3. Choose either "File upload " or "Folder upload" as required to upload your desired songs to the Google server, and that's it!
Last Words
The ultimate goal of backing up iPhone music is to restore it when necessary. Therefore, all things considered, we would say that the way using MobiKin Assistant for iOS is the most recommended.
First, backing up the songs on iPhone to a computer is more secure and unrestricted than getting them to cloud storage like Google Drive or iCloud. Next, MobiKin, unlike iTunes, helps to quickly back up iPhone music from various sources to your computer and won't cover your phone's existing data when you're to get them restored.
Related Articles:
6 Effective Ways to View and Access iPhone Files on PC/Windows
3 Ways to Manage Music on iPhone Easily
5 Ways to Transfer Music to iPhone from Computer without iTunes
How to Retrieve Deleted Music from iPhone 12/12 Pro/11XS/XR/X?
iPhone Music Transfer: How to Transfer Music from iPhone to iCloud?
Android Music Backup: Different Ways to Back Up Android Songs


