4 Most Efficient Means to Create a Contact Group on iPhone 14/13/12/11/X/8/7
Adding a group in iPhone contacts empowers you to text multiple people when required. For instance, if you're planning a vacation with a crowd of people or attending a group event, it's vital to share info timely with others. Therefore, any idea on how to create a contact group on iPhone to establish effective communication? OK, this page will guide you through several proven ways to make exchange incredibly easy.
- Part 1: How to Create Contact Group on iPhone Manually for Email
- Part 2: How to Create a Contact Group on iPhone via Assistant for iOS [Easy]
- Part 3: How to Make Contact Groups on iPhone with Groups App
- Part 4: How to Create a Group in iPhone Contacts via iCloud
- Extra Tips for Contact Group on iPhone
Part 1: How to Create Contact Group on iPhone Manually for Email
Requirements:
- Be sure to update your iPhone to the current iOS 16.
- Each contact you plan to add to the group has an email address on the contact card.
- You enabled "Contacts" in iCloud.
How do you create a group on iPhone for Email?
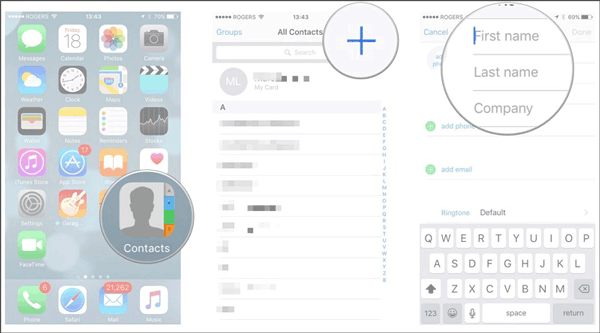
- Run the Contacts app and tap "All Contacts" at the top-left corner of the screen.
- Click the "+" icon from the bottom and select "New Group".
- Name your group and press "Return" on your keyboard.
- Press "All Contacts" again to add contacts to your group.
- Drag and drop the contacts you want to add to your new group.
- Click that group to ensure the right contacts were added.
- To check your new groups on your iPhone, launch the Phone app.
- Click "Contacts" and choose "Groups".
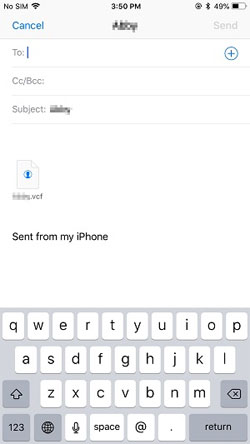
- Run the Mail app and tap the new email icon at the lower right.
- Enter the contact group name in the "To:" field.
- Hit the group name when prompted before writing and sending an Email.
You May Also Want to Know:
- How to Troubleshoot Contacts Not Showing Up on iPhone? [Must-read]
- 4 Simplest Ways to Sync Outlook Contacts with iPhone 14/13/12/11/X/8/7
Part 2: How to Create a Contact Group on iPhone via Assistant for iOS
Wonder how to add groups on iPhone without any prerequisites? Try the most recommendable MobiKin Assistant for iOS (Win and Mac). To use this smart program, you just need to connect your iPhone and computer with a USB cable available before downloading and installing it. And afterward, it'll display the data types in your iPhone according to different items. Next, it lets you create contact groups or manipulate iOS content as you like.
Outstanding features of Assistant for iOS:
- Easily create a contact group on iPhone on a computer.
- Edit/manage iPhone contacts and other files directly on a PC/Mac.
- Transfer files between iOS devices and computers/iTunes.
- Support such file types as Video, Photo, Music, eBooks, Contacts, SMS, Notes, Safari Bookmarks, Voice Memo, Playlist, Podcasts, Ringtone, and more.
- One-click to back up and restore iDevices.
- Apply to almost all iDevices, covering iPhone 14/14 Plus/14 Pro (Max), iPhone 13/13 Pro (Max)/13 mini/12/12 Pro (Max)/12 mini, iPhone 11/11 Pro/11 Pro Max, iPhone X/XR/Xs/Xs Max, iPhone 8/8 Plus, iPhone 7/7 Plus, iPhone 6/6S/6 Plus, iPod touch, iPad, etc.
- It won't let out your privacy.
How do I create a group on my iPhone with Assistant for iOS?
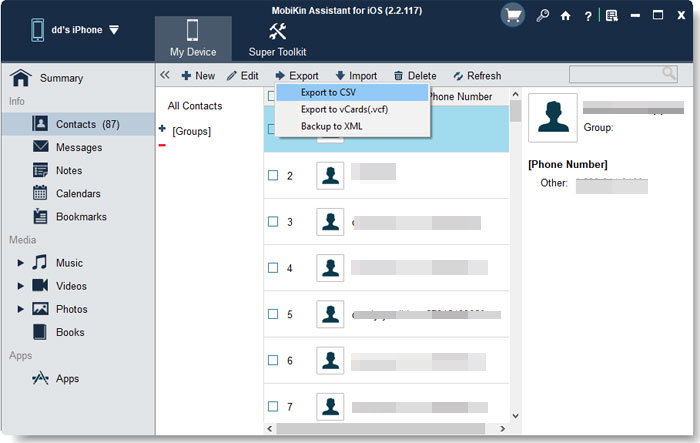
Step 1. Free download the program and install it on a computer. Launch it and connect your iPhone to the computer with USB.
Step 2. Follow the on-screen prompt to let the utility detect the device automatically. Soon, it'll scan out your iOS files and display them on its main screen.

Step 3. Click the "Contacts" section from the left menu of the interface. Tap the "+" button nearby the "[Groups]" icon to add new groups of your contacts to this iPhone. Finally, choose and put your wanted contacts into the group.
Part 3: How to Make Contact Groups on iPhone with Groups App
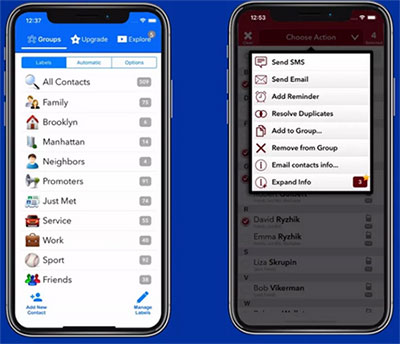
There are an array of applications on the App Store out there enabling you to generate a group of contacts on your iPhone without a PC. (Want to delete duplicate contacts on your iPhone?) Here, we will use the Groups app to make the drill a breeze. See how to set up groups on iPhone with the Groups app:
- Install the Groups app on your iPhone after the download.
- Start the app and give permission to contacts.
- Skip the steps when a pop-up opens for newsletter subscriptions.
- Go to the "All Contacts" section and pick the contacts you will add to your new group.
- Tap "Choose Action", followed by the "Add to Group" option.
- Press "Copy Contact" from the incoming screen and name your group.
- Tap "Done", and you can select the contacts in the new group to further manage the items within.
Further Reading:
- Top 4 Solutions to Fix iPhone Unavailable without Data Loss
- [Full Guide] How to Get Contacts from iCloud to iPhone 14/13/12/11/X/8/7?
Part 4: How to Create a Group in iPhone Contacts via iCloud
iCloud saves users' data on the Apple server, using two-step verification to protect their security. iPhone operators can do many different activities with it, including making a group of contacts.
How to create a group on iPhone 6/7/8/X/11/12/13/14 with iCloud?
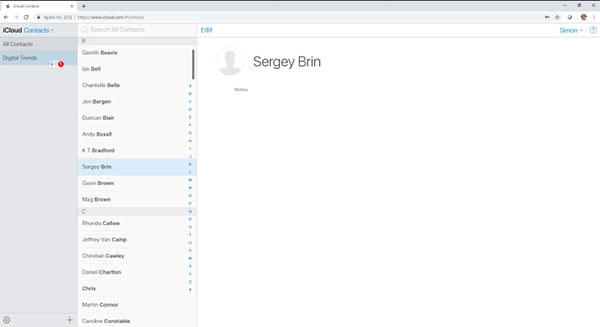
- Go to iCloud.com on a computer and sign in to your iCloud account with your Apple credentials.
- Select "Contacts" to preview a list of your existing contacts.
- Select the "Plus" icon and tap "New Group" from the pop-up menu.
- Name the group and save it by clicking anywhere outside the text box.
- If you wish to change the name, double-click it and enter your new group name.
- Pick "All Contacts" at the top of the list to add contacts to a specific group.
- Click and drag your wanted contacts to the proper group.
- Your group will sync with the contact list of your iPhone.
- To use the new group, tap the "Contacts" sign on your device.
- Choose "Groups" from the contacts page and check the group you'd like to use.
![]()
Accidentally delete a group after creating it? Try to restore iPhone from iCloud if there's a backup available. To accomplish it, sign in to your Apple ID details on the web; click "Settings"; you'll find options for restoring contacts, reminders, calendars, bookmarks, etc., under the "Advanced" tab; lastly, choose the first section to restore your deleted contact group.
Extra Tips for Contact Group on iPhone
Tip 1: How to use contact groups on iPhone?
- Run the Phone app on your iPhone and visit "Contacts".
- Tap "Groups" in the upper-right corner.
- You will see all the groups you generate.
- Check and use the group you created in the Phone app.
Tip 2: How to delete groups or contacts from iCloud?
We just discussed how to create groups in iPhone with iCloud which can also be used for iPhone contacts backup. Now, if you want to delete something useless from there, check out the following steps:
- Select the group or contact you want to remove.
- Go to the "Actions" menu at the bottom-left corner.
- Choose "Delete" from the menu.
- When a menu pops up, tap "Delete" to confirm.
Tip 3: How to create contact groups from texting?
- Open a new text from the Messages app.
- Add all the contacts you intend to include by entering info in the "To:" field.
- Write and send the text and name the group chat.
- Type your group name in the "To:" field.
Tip 4: How to create a contact group on Android?
- Open the Contacts app.
- Press the "Groups" tab.
- Tab "ADD" toward the top-right corner.
- Name your "Contact Group" and hit "Save".
- Press "ADD" again near the right corner of your screen.
- Choose your desired contacts and tap "Done".
Words in the End
Today, we described how to create groups on iPhone in multiple ways. As mentioned above, with iOS 16, your iPhone's Contacts app lets you make contact groups without a computer. Plus, the other two tools are also somewhat inconvenient to varying degrees. However, MobiKin Assistant for iOS (Win and Mac) comes in great handy, making the exchange of information less stressful while you're at a party or trip. Further, this utility gives you the opportunity to back up, restore, and control your iPhone with minimum effort.
Related Articles:
[Beginners Guide] How to Fix Contacts Not Syncing to Mac in 13 Hot Tips?
Top 6 Methods to Recover Deleted Contacts from iPhone with/without Backup
Best Android Contact Editor: How to Edit Android Contacts on PC
How to Transfer Contacts from iPhone to iPhone [7 Easy Ways]
How to Delete All Contacts from iPhone Quickly [with Illustration]
4 Useful Ways to Transfer Contacts to SIM Cards (Android & iPhone)


