[2025] Family Sharing iCloud Storage Not Working? Here Is the Fix!
"My wife and my 8-year-old son accessed shared storage, but my 10-year-old daughter is listed as "not using". When I look her up in "Family Sharing" on her device, she is not listed in "iCloud Storage". How to fix family sharing iCloud storage not working?"
-- from Apple Support Community
Apple device makes it a breeze for its owners to upgrade their iCloud storage plan to 200GB or even 2TB. (Not enough iCloud storage?) Meanwhile, its products running iOS 11 or above came with a Family Sharing feature, through which you can share iCloud storage with your family, choosing from 50GB, 200GB, or 2TB plans. It also includes features like Apple Music, Apple TV+, Hide My Email, HomeKit Secure Video, and more.
However, the iCloud family sharing not working might occur unexpectedly. Now, check out this post to know the fixes when you are up against this puzzling question.

Part 1: Why is iCloud Storage Shared with Family Not Working?
If iCloud Family Sharing isn't working, here are some common reasons:
- Setup issues: Make sure Family Sharing is set up correctly and all members have accepted the invitation.
- Software compatibility: Check that everyone's devices are running compatible and updated software.
- Internet issues: Make sure all devices have a stable Internet connection, as Family Sharing requires it to work properly.
- Apple ID issues: Verify that everyone is signed in with the correct Apple ID and has iCloud set up correctly.
- Payment issues: Issues with the organizer's payment method can prevent shared purchases and subscriptions.
- Invitation not accepted: Confirm that the family member has accepted the invitation to join.
Click to Learn:
Part 2: How to Share iCloud Storage with Family Correctly?
With Family Sharing, you have the ability to share a subscription to iCloud+ with everybody in the entire family group. To make your family members access your shared iCloud storage, please add them to the "Family Sharing" and put them to your iCloud storage plan. How do I share iCloud storage with your family?
- Go to your iPhone's "Settings" > [your name].
- Locate and go for the "Family Sharing" option.
- Next, click "Add Family Member"/"Add Member" under your Apple ID name.
- Press "Invite People" at the bottom to send invitations to someone you want.
- Select any of the "AirDrop", "Mail", or "Messages" options to send an invitation link.
- Ask the recipient to accept the link.
- Once accepted sharing request, navigate to "Family Sharing" and press "iCloud+" under the "More to Share" tab.
- Now you'll know how much storage the other person is using. And you have the option to delete it from the plan.
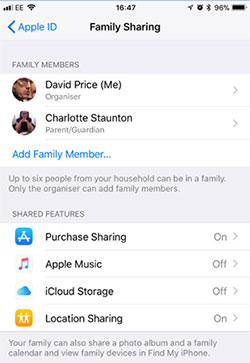
Part 3: Family Sharing iCloud Storage Not Working? 7 Fixes
Way 1: Set Up Family Sharing Properly
Primarily, do not be thrown off by the word "family". The first method to fix iCloud storage family sharing not working is setting up Family Sharing to share iCloud+ storage with others. To make it, you can:
- For an iPhone, open the "Settings" app and tap your name at the top screen; touch "Family Sharing" > "Set Up Your Family".
- For a Mac, run the "System Settings" app and click "Family"; tap "Set up Family Sharing"; follow the on-screen guide to add members.
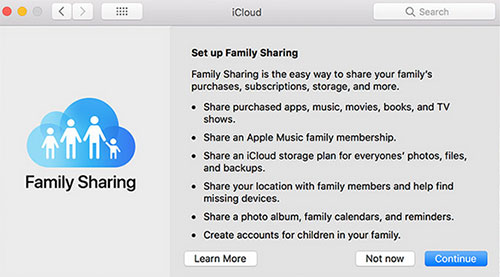
Way 2: Update Your iOS
If your iPhone system is not the latest, try to fix iCloud family sharing storage not working by updating it to the latest one:
- Go to your phone's "Settings" > "Software Updates".
- Tap "Download and Install" if there is an update available.
- Touch "Install Now" and provide your device passcode. (Want to unlock your iPhone passcode if you forgot it?)
- Agree to the given terms and conditions.
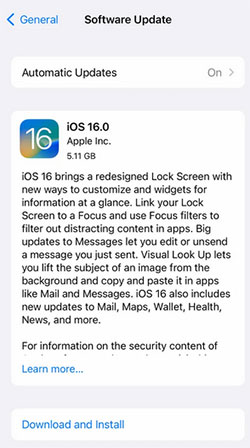
Way 3: Check iCloud Storage Each Family Member Uses
Apple would notify all family members about insufficient storage space. If it happens, check out the specific storage on your device:
- On macOS 13 Ventura or newer, tap the "Apple" menu > "System Settings" > "Family" > "Subscriptions" > "iCloud+".
- On macOS 12 Monterey or older, click the "Apple" menu > "System Preferences" > "Family Sharing" > "iCloud Storage".
- On iOS 16/iPadOS 16 or later, open the "Settings" app > "Family" > "Subscriptions" > "iCloud+".
- On iOS 15/iPadOS 15 or older, run the "Settings" app > [your profile] > "Family Sharing" > "iCloud+".
Way 4: Log Out & Log in to Your iCloud Account
- Open your iPhone "Settings" > [your name] > "Sign Out".
- Input your Apple ID details and tap "Turn Off".
- Choose what data types you want to maintain a copy of on this iPhone.
- Click "Sign Out" again.
- Wait for a while and sign in to your account back. (Can't sign into your Apple ID?)
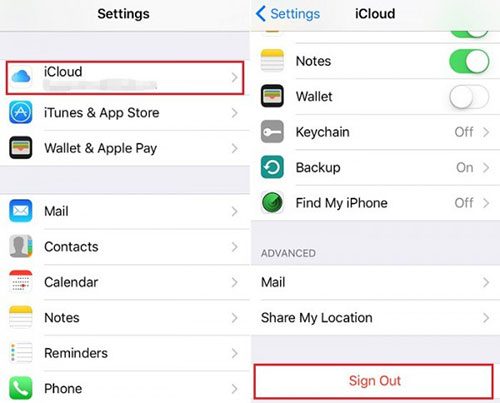
If "share iCloud storage" still doesn't work, please make action on your Mac. To do so, open the "System Settings" app > [your profile] > "Sign Out"; confirm the choice and sign in to your account again.
Way 5: Remove & Add Back Family Members
By resetting some settings and eliminating minor errors, you can potentially repair family share iCloud storage not working. To make it, try removing and adding back family members:
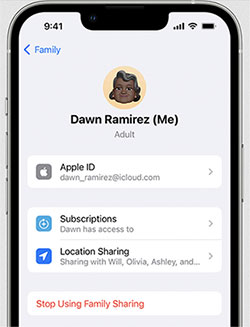
- Proceed to your iPhone "Settings" > [your name] > "Family Sharing".
- Then, choose the "Stop Using Family Sharing" option.
- Re-join the plan by obtaining an invitation from one of your family members.
- Head to "Family Sharing" and pick the "Add Member" option.
Way 6: Add a Valid Payment
Assuming the payment method is expired, which leads to iCloud share storage not working, remember to add a payment again:
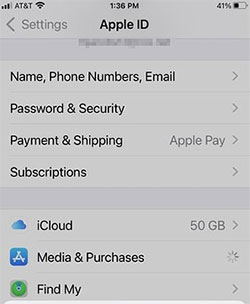
- On an iOS device, go to the "Settings" app -> [your name] > "Payment & Shipping" > "Add Payment Method"; then follow the tutorial on the page to do the rest.
- On a Mac, head to the "System Settings" app -> [your name] > "Payment & Shipping" -> "Add Payment Method" and add it by following the given instructions.
Way 7: Force Restart iPhone
Force rebooting your iPhone will fix the minor glitch on the device. And in doing so, you may have the opportunity to fix iCloud storage family sharing not working. Here's the guide:
- For iPhone 8/8 Plus/X and later, press the "Volume Up" and "Volume Down" buttons altogether; hold the "Side" button until you get the Apple logo.
- For iPhone 7/7 Plus, press the "Sleep"/"Wake" and "Volume Down" buttons simultaneously; your iPhone will restart after the Apple logo appears.
- For iPhone 6/6S and earlier, press the "Sleep"/"Wake" and "Home" buttons until you see the Apple logo.
Part 4: Utilize iCloud Alternative to Back Up iOS Data Smoothly
If you want to back up your iPhone or share files with another Apple device, it is not smart to use the iCloud storage sharing feature. On the one hand, it protects your personal info greatly by not letting your family members spy on your iOS content. On the other hand, it hardly ever fails to work. So, many users would back up iPhone data to a computer via an iCloud alternative like MobiKin Assistant for iOS (Win and Mac). Next, let's get to know it briefly.
What can Assistant for iOS do for you?
- Selectively transfer data between iPhone and PC/Mac.
- Bulk back up and restore iPhone in just one single click.
- Work for such files as Contacts, Text Messages, Video, Photo, Music, eBook, Notes, Safari Bookmarks, Voice Memo, etc.
- Best iOS file manager to manage Apple content on a computer without iTunes.
- Work well with almost all iOS devices, covering iPhone 16/15/14/13/12/11/X/9/8/7/6, and all generations of iPad.
- It won't disclose your privacy.
How to back up your iPhone with MobiKin Assistant for iOS?
Step 1. Let the tool recognize your iPhone
Firstly, install and run this program on a computer after the free download. Use a USB cord available to link your iPhone to this computer. Next, have your device identified by the tool following the on-screen hints.

Step 2. View and pick what you want to back up
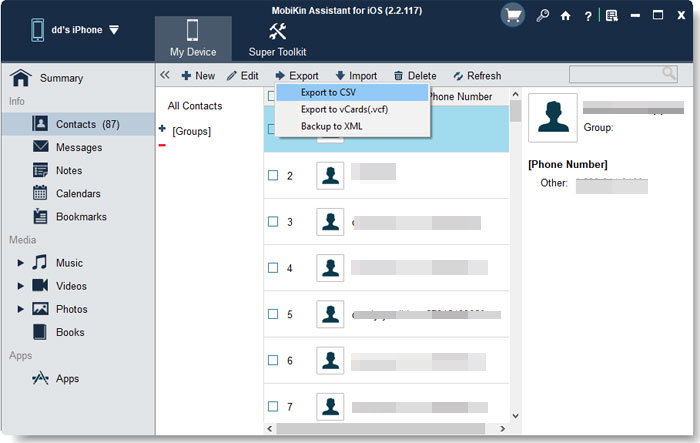
Once recognized, choose any data types from the left sidebar of the software and preview the specific files on the right. Next, select whatever you need to back up to this computer.
Step 3. Back up iPhone to the computer
Finally, click the "Export" button from the top screen to transfer the selected files from your iPhone to this PC/Mac at once.
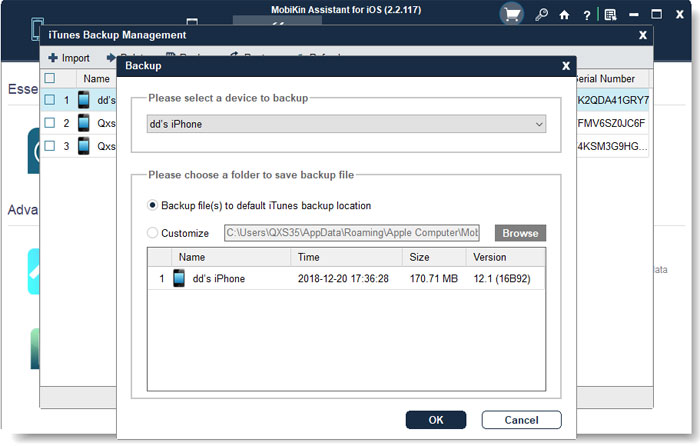
Moreover, this tool is shipped with a one-click backup and restore feature, through which you can quickly back up your iPhone to the computer in batches. To accomplish it, go to its "Super Toolkit" > "iTunes Backup & Restore" > "Backup" > select your iPhone > choose a location to save the backup > click "OK".
Part 5: iCloud Family Sharing FAQs
Q1: What if I didn't receive a Family Sharing invitation?
Check that you entered the correct email address, ask them to check their spam or junk folders, and make sure their email settings are correct. Also, confirm that your devices have a stable internet connection.
Q2: Why isn't the shared calendar syncing?
Make sure everyone has calendar sharing turned on in iCloud Family Sharing settings, and that the Calendar app is set to show shared calendars on each device.
Q3: How do I manage family app purchases?
As the family organizer, you can turn on Ask to Buy so purchases require your approval. Manage requests on your device or through Screen Time settings.
Q4: Why can't my family access shared purchases?
Make sure Family Sharing is turned on for a specific category, such as Apps, Music, or Books. Also, check that everyone is signed in with the correct Apple ID and has Family Sharing set up correctly.
Wrapping Up
Well, we just outlined a stepwise guide on how to share iCloud storage and quick solutions to fix the family sharing iCloud not working. Even if the matter is settled properly, with Location Sharing enabled, each family member is empowered to wipe out every other Apple iPhone and Mac in the family group. That means your iOS content might fall into the wrong hands in some instances. Therefore, it's advisable to pick MobiKin Assistant for iOS for replacement when you intend to back up and manage your iOS files securely and comfortably.
Related Articles:
Top 4 Methods to Stop My iPhone Photos from Syncing to My iPad
5 Brilliant Ways to Recover iCloud Password? [Must-read]
Why Can't I Share My Screen on FaceTime? 11 Possible Solutions to Fix It


