How to Transfer Non-Purchased Music from iPod to iTunes
As the supreme headquarters of Apple Music, iTunes provides a good way for users to organize and enjoy the existing music and purchased more wonderful music. Also you can listen to millions of music on different styles of radio with iTunes on Mac or PC. However, Apple does not allow to transfer non-purchased music from iPod to iTunes library due to the Apple's copyright infringement issue and concerns of profit generated from purchasing music on iTunes. So what should you do to transfer non-purchased music from iPod to iTunes? There are two methods for you to realize it.
1. Transfer Non-Purchased Music from iPod to iTunes with iPod Transfer Tool
2. Manually Transfer Non-Purchased Music from iPod to iTunes
1. Transfer Non-Purchased Music from iPod to iTunes with iPod Transfer Tool
MobiKin Assistant for iOS is considered as a great iPod transfer tool, which allows users to transfer non-purchased music from iPod to iTunes with easy steps. Also you are allowed to transfer songs from iPod nano, iPod classic, iPod shuffle and iPod touch to iTunes quickly.
MobiKin Assistant for iOS - iPod Transfer Tool
* Transfer or backup your files on iPhone, iPad or iPod to computer and then synchronize to iTunes, including Music, Videos, Photos, eBooks, Contacts, Text Messages, Notes and etc.
* Backed up SMS on your iPhone, iPad or iPod and save as CSV, HTML, Text and DB format without hassle.
* Import Calendars, Contacts and Bookmarks in XML format from PC to iPhone, iPad or iPod.
* Uninstall or remove unwanted Apps from iDevice.
* Preview all contents of iOS devices on PC directly, like Music, Contacts, SMS, Notes, Calendars, Photos, Apps and etc.
* Add new contacts, delete unwanted numbers or edit the existing information on computer directly. (Coming Soon)
Step 1. To transfer music from iPod to iTunes, please download and install the iPod Transfer Tool on your computer first.
Note: Please ensure that the latest iTunes has been installed and run on your PC before the process.
Step 2. Run the iPod Transfer Tool on your computer and connect your iPod to PC. Generally, your iPod will be detected automatically by this tool and then a popup shows on your computer to alert you to trust your computer on your iDevice. Then click "Continue" button to finish the connection process and later you might get an interface as below.

Step 3. Visit the "Music" section on the left panel and preview all the music in the right panel. Then select the target songs and click "Export" button to save them on computer.
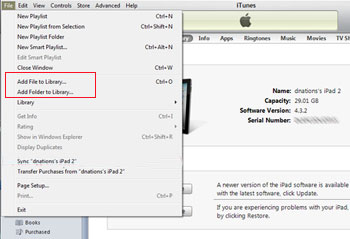
Step 4. Run iTunes on your computer and click "File" > "Add File to Library..." or "Add Folder to Library..." to import the selected music from where you saved the music on PC to iTunes. Thus you have transferred successfully the non-purchased music from iPod to iTunes.

Besides, you might also use the MobiKin Assistant for iOS - iPod Transfer Tool to sync the iTunes music to iPhone, iPad or iPod without restrictions and manage your iDevice music and other files effectively.
Can't Miss:
How to Transfer Videos from iPhone to iTunes?
2. Manually Transfer Non-Purchased Music from iPod to iTunes
There is another method for you to transfer non-purchased music from iPod to iTunes. All you need is your iPod, an iPod USB cable and a computer with available network. However, it is a little bit more complicated comparing to the last method and is recommended for some technicians.
Step 1. Connect your iPod to computer with a USB cable and your iPod will show on "My Computer" as below.

Step 2. Click "Tools" under the Windows explorer and select "Folder Options" > "View", then tick "Show hidden hidden files and folders" button to show the hidden files and folders.

Step 3. Double-click the iPod icon under "My Computer" to open it, then find and open the "iPod_Control" folder to copy the whole "Music" folder to your computer.

Step 4. Launch iTunes and click "File" > "Add Folder to Library..." to add the music folder to the iTunes Music Library.

Step 5. Afterwards, click "Edit" > "Preferences" > "Advanced" and tick "Keep iTunes Media Folder Organized" to keep the media file in order.

Related Articles:
Everything You Should Know about iTunes WiFi Sync
iPhone Won't Connect to WiFi, How to Fix It? [Solved]
How to Transfer Samsung/Android Data Wirelessly
How to Remove iCloud Account from iPhone/iPad without Password? [Fixed]
How to Transfer iPhone Files to PC without iTunes Easily?
[Easy Guide] How to Transfer Data from iPhone to iPhone without iCloud?


