How to Recover Photos from Disabled iPhone with or without Backup?
Have you ever found yourself in a predicament where your screen is shattered, rendering your iPhone inaccessible, or perhaps entered an incorrect passcode on your iOS device ten times, resulting in it being disabled? To compound the issue, what if you forgot to create a backup of your precious photos and files? In such a scenario, the question arises: Can photos be recovered from a disabled iPhone? This article guides you through the methods to retrieve pictures from a disabled phone, whether or not a backup is available.
Part 1: Can You Get Photos off a Disabled iPhone?
Indeed, it is possible to back up a disabled iPhone even without the option for restoration. If you've previously synced your iPhone with a Mac/PC, you can use iTunes for backup without the need to establish trust. Furthermore, iPhones can automatically sync with iCloud while connected to Wi-Fi and charging, a feature often overlooked.
For those who haven't backed up through iTunes, is there a way to recover photos from an iPhone that won't turn on? Check for iCloud backups by logging into iCloud.com. Keep in mind that Two-factor Authentication may pose a hurdle to accessing the account and backup.
In cases where your disabled iPhone can't connect to iTunes for photo backup, an alternative solution is to connect it to a computer and use an iPhone photo data recovery tool. This tool helps in extracting photos from the iPhone to either the computer or a new iPhone. For a detailed guide on recovering photos from a disabled iPhone, continue reading.
Related Passages:
- [Fixed] How to Recover iPhone Data after iOS Update?
- How to Fix Contacts Disappeared from Android? [Definitive Guide]
Part 2: How to Recover Photos from Disabled iPhone without Backup
If your iPhone is disabled yet still functional, there is a higher likelihood of successfully recovering photos from it. However, this requires the assistance of a specialized tool capable of scanning and retrieving photos stored on your iPhone. This is where software like MobiKin Doctor for iOS becomes invaluable.
Among the myriad tools claiming to recover iPhone photos, Doctor for iOS stands out as a particularly promising option. It excels in scanning for available data and boasts an exceptionally high success rate in data recovery. When dealing with a disabled but operational iPhone, this tool can efficiently retrieve data. Let's delve into the notable features of Doctor for iOS software.
Key Features of Doctor for iOS:
- It can recover photos without an iPhone backup and without affecting your existing data.
- The software is capable of retrieving photos from both iTunes and iCloud backups.
- Beyond photos, it supports the recovery of 14+ data types, including Call history, SMS, Contacts, WhatsApp, and more.
- Thanks to advanced technology, it achieves an impressive success rate in data recovery.
- Compatibility extends to all iOS devices and iOS versions, including the latest releases.
In the event that your iOS device is disabled but still operational, and your computer has previously trusted your iPhone, you can easily recover photos by following these steps.
Step 1: Choose the Recovery Mode
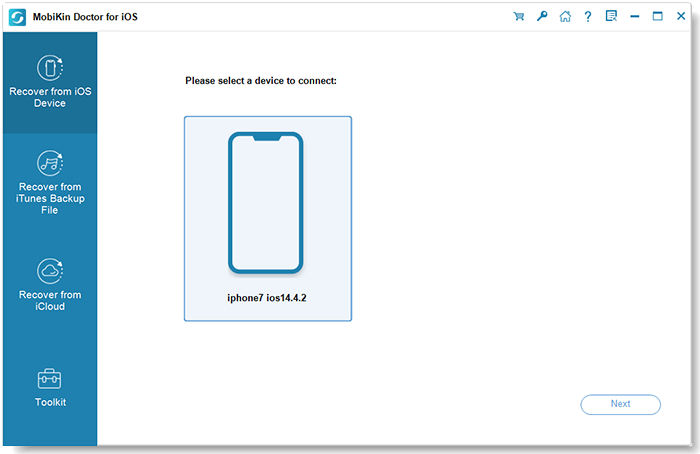
Initiate Doctor for iOS on your computer and select the "Recover from iOS Device" option. Connect your disabled iOS device to the computer, ensuring successful detection by Doctor for iOS. Click "Next" to proceed.
Step 2: Commence Scanning
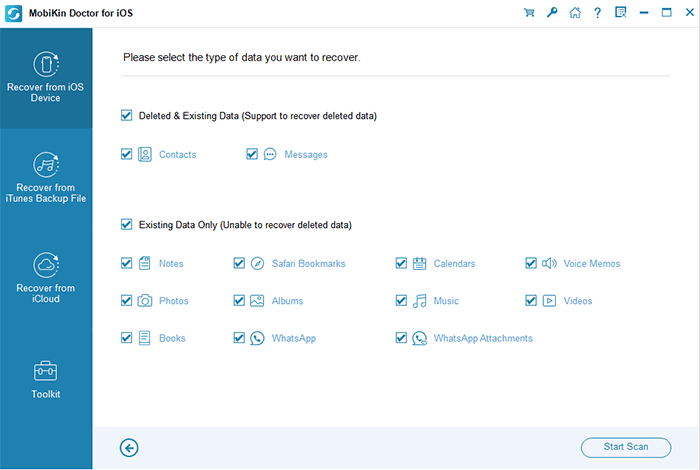
For this scenario, focus on recovering images. Select "Photos" and click "Start Scan" to initiate the scanning process. Doctor for iOS will conduct a thorough scan to locate photos on your device.
Step 3: Retrieve Photos
Once the scan is complete, you'll see all recoverable files from your disabled iPhone. Choose the photo files you wish to recover and click "Recover to Computer." A pop-up window will appear, allowing you to specify the storage location for the recovered files. Wait for the recovery process to finish.

Further Reading:
Part 3: How to Recover Photos from Disabled iPhone with Backup
While you may be unable to access or utilize your device, MobiKin Doctor for iOS offers a solution to retrieve deleted photos from your iTunes and iCloud backups. It's important to note that this method is limited to recovering photos included in a backup.
Given the challenge of restoring an iCloud or iTunes backup to a disabled iPhone, using Doctor for iOS becomes crucial. Here's a step-by-step guide on how to recover photos from both iTunes and iCloud backups.
Recovering Photos from iTunes Backup on a Disabled iPhone:
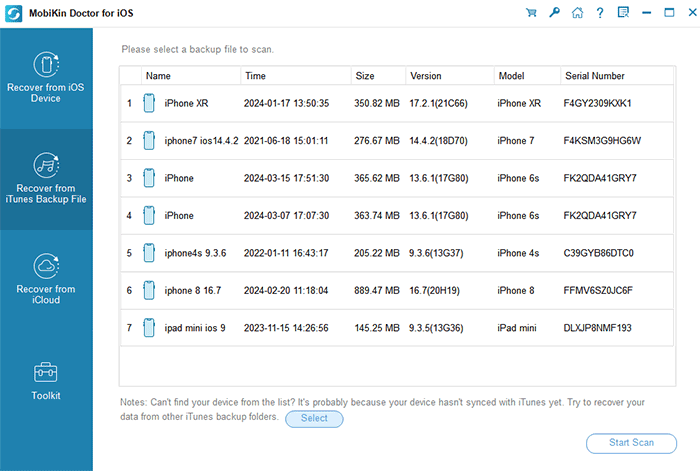
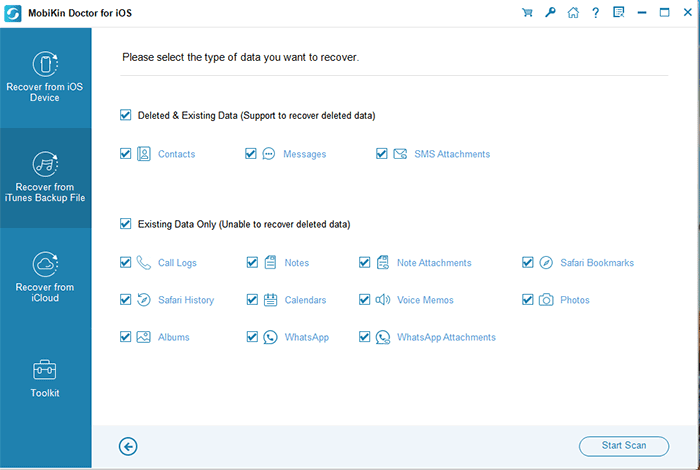
- Install the program on your computer and launch it. On the main interface, select "Recover from iTunes Backup File" to display a list of all iTunes backups on your computer.
- Choose a backup containing the photos you wish to recover and click "Start Scan."
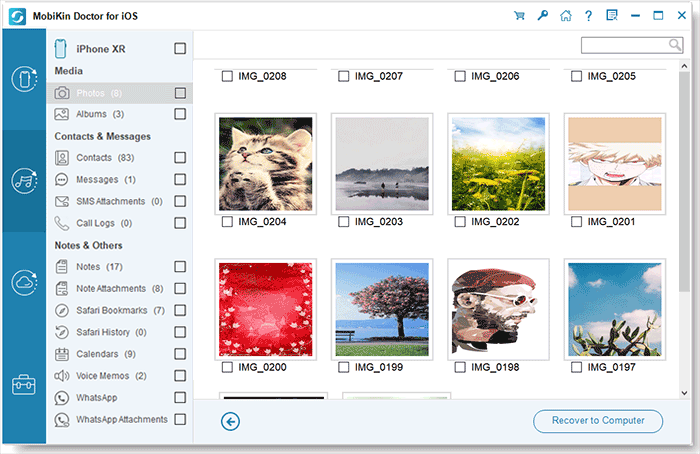
- The program will initiate a scan of the selected backup. After the scan is complete, you'll see all the data from that backup on the next window. Select the photos for recovery and click "Recover to Computer."
Recovering Pictures from a Disabled iPhone using iCloud Backup:
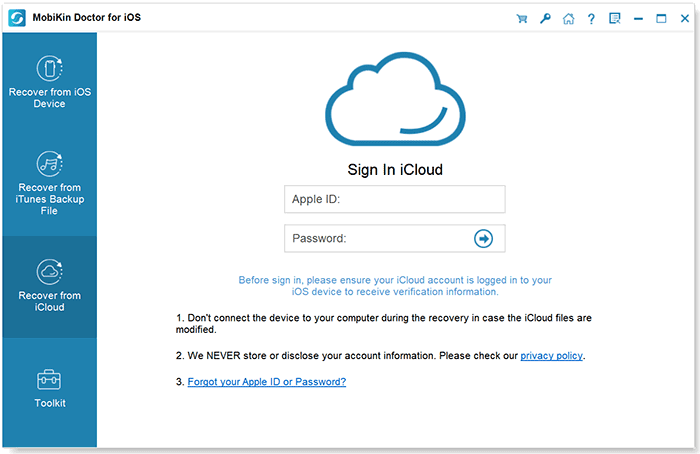
- Within the main window, click on "Recover from iCloud" and proceed to sign in to your iCloud account to access your iCloud backup files.
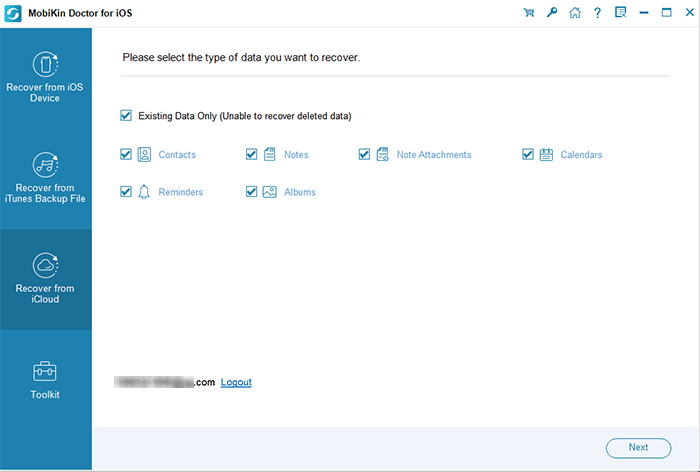
- Choose one of the backups and click "Start Scan" to initiate the download. Subsequently, click "Start Scan" to scan the selected backup file.
- In the resulting window, all the data from that backup file will be displayed. Select the photos you wish to recover, then click "Recover to Computer" to save them to your computer.

Part 4: Tips on How to Fix a Disabled iPhone
How to Fix a Disabled iPhone with iTunes
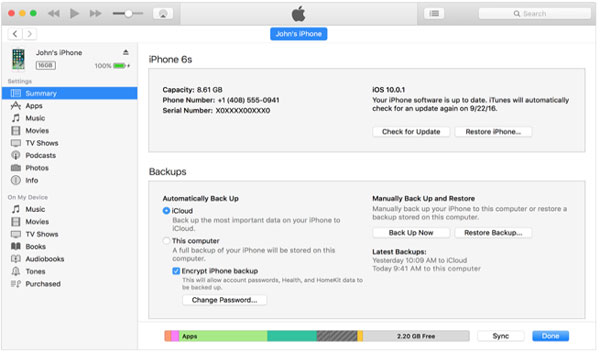
If you're looking for a solution to fix a disabled iPhone and regain access to transfer photos onto the device, iTunes can be a valuable tool. It's important to note that this method is effective only if you know your passcode and have recently backed up your iPhone to iTunes.
Follow these straightforward steps to fix your iPhone using iTunes:
- Connect your iPhone to the computer and launch iTunes if it doesn't open automatically.
- Click on "Sync" and input the passcode when prompted. This action will back up the iPhone data to the computer.
- Select "Restore iPhone" and patiently wait for the process to reach completion.
In case you are unaware of your passcode, resolving the issue may involve erasing all data through recovery mode before proceeding with the fix.
How to Fix a Disabled iPhone with Siri
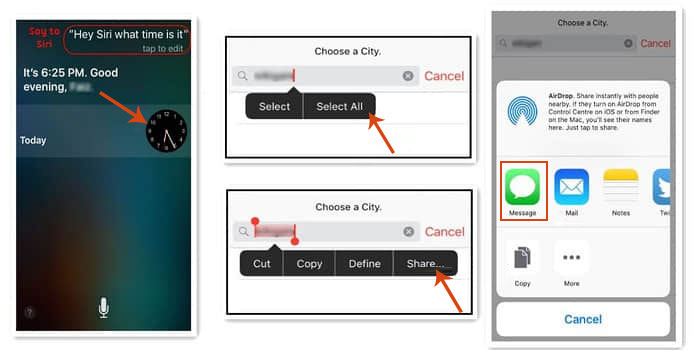
Many iOS users have reported success in unlocking their disabled iPhones by leveraging Siri. This method provides an avenue to bypass the lock screen, granting an opportunity to back up data and reset the passcode.
It's important to note that while this approach has worked for numerous iPhones, its effectiveness may vary based on the device model. Nevertheless, it's worth attempting, provided Siri was enabled and activated beforehand. Follow these steps:
- Activate Siri by calling and asking for the time. Siri will display the current time on your screen.
- Tap the clock app once it appears on your screen with the local time.
- Locate and tap the Plus (+) icon in the upper right corner within the World Clock menu.
- A search box will emerge. Enter any text and select all characters.
- Choose "Share" on the screen, disregarding the displayed results.
- Select the messaging app and enter the recipient field. Press the return key.
- After a brief wait, press the home button.
- This action should temporarily unlock your iPhone. To ensure continued access, disable or reset the passcode:
- In your Settings, locate and tap "Touch ID & Passcode."
- Toggle off "Touch ID for iPhone Unlock."
Conclusion
This comprehensive page has gathered a variety of effective methods to restore photos from a disabled iPhone, offering solutions with or without backups. Additionally, it provides valuable tips for unlocking a disabled iPhone. Whether you're facing this situation for the first time or seeking preventive measures for the future, the outlined suggestions on this page are designed to be immensely helpful. Feel free to explore and try these methods!
Related Articles:
[2024] How to Recover Deleted Videos from iPhone with/without Backup?
How to Recover Data from Water Damaged iPhone
Definitive Guide: How to Back Up iPhone with Broken Screen?
Top 7 iPhone Backup Extractors Review for Windows/Mac


