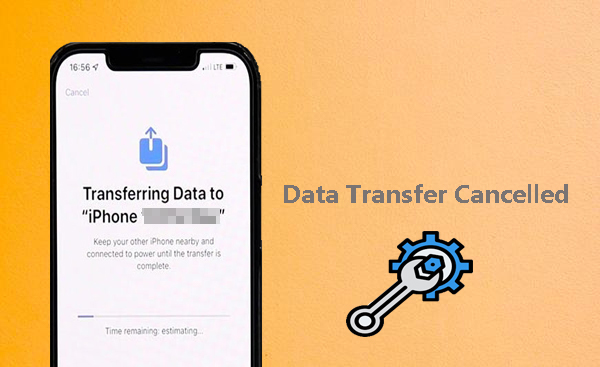
How to Fix the Data Transfer Cancelled iPhone 15 Error in 10 Ways?
"I bought a new iPhone 15 Pro and was trying to set it up using my old iPhone. After setting up the wallet, data transfer just gets cancelled and only gives me the option to reset it." -- from Apple Support Community
Transferring data to a new iPhone 15 running iOS 17 or iOS 17.0.1 should be a seamless process, but many users encounter a tough challenge - data transfer is cancelled on iPhone. This can create unexpected trouble when setting up a new device, leading to delays and confusion.
Fret not! This page details the common reasons why it happens and provides 10 flexible solutions to resolve the problem. Whether you’re a tech novice or a seasoned user, these techniques will help you complete the transfer smoothly.
- Part 1: Why You're Unable to Complete Data Transfer for iPhone 15
- Part 2: Fix Data Transfer Cancelled on iPhone in 9 Easy Ways
> Way 1: Insert SIM card to source phone
> Way 2: Charge both devices
> Way 3: Toggle on Bluetooth
> Way 4: Connect to a stable WiFi network
> Way 5: Update iOS
> Way 6: Boot iPhone into DFU mode
> Way 7: Restart your devices
> Way 8: Restore data from iCloud backup
> Way 9: Get files from iTunes backup - Part 3: iPhone Transfer Not Working? Try a Professional Tool [Trouble-free]
Part 1: Why You're Unable to Complete Data Transfer for iPhone 15
There are several reasons why you might be unable to complete a data transfer to your iPhone 15 after upgrading to iOS 17:
- Unstable Network Connection: A weak or unstable WiFi connection can interrupt the transfer process.
- Insufficient Storage: If either the source or target iPhone lacks enough storage space, the transfer may fail.
- Low Battery: Ensure both iPhones are sufficiently charged during the transfer.
- Outdated Software: Make sure both iPhones are running the latest iOS version.
- Data Issues: Large, incompatible, or corrupted files can cause the migration to fail.
- Transmission Interruption: Data transfer errors can occur unexpectedly.
Good News: It's said that Apple has fixed the "data transfer cancelled" bug in iOS 17.0.2. The latest update includes several improvements aimed at resolving issues encountered during data transfers12. If you're still experiencing problems, make sure both devices are updated to the latest iOS version and follow the recommended steps for a smooth transfer.
Part 2: Fix Data Transfer Cancelled on iPhone in 9 Easy Ways
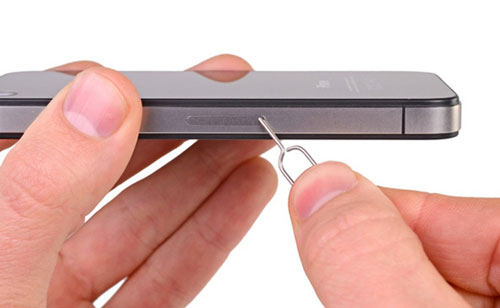
> Way 1: Insert SIM card to source phone
In the event that the source iPhone is new and has yet to be activated, please insert a SIM card to facilitate its activation. This action may assist in restarting the iPhone migration process following the initial setup.
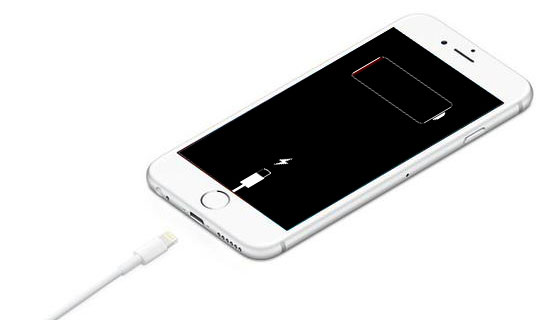
> Way 2: Charge both devices
Data transfer between phones can take time. Ensure both phones have at least 80% battery to avoid the iPhone data transfer cancelled. Keep them at least 50% charged during the transfer and ideally plugged into power for the best results.
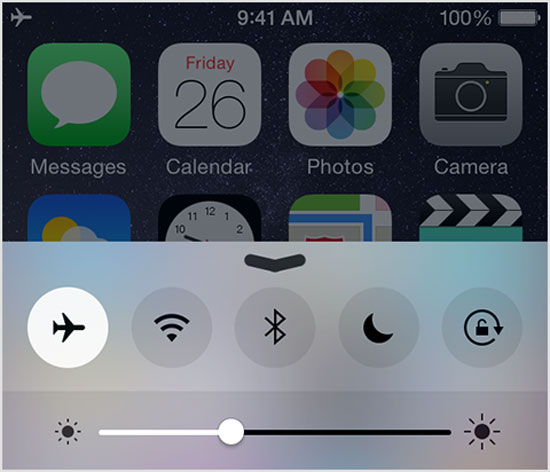
> Way 3: Toggle on Bluetooth
To use Quick Start for data transfer between iPhones seamlessly, ensure Bluetooth is activated on both Apple devices. Access the "Control Center" and tap the Bluetooth icon if it's grayed out.
> Way 4: Connect to a stable WiFi network
Check if the network is working. A poor internet connection can cause the iPhone to be unable to complete data transfer. Use another device to test the connection and speed. If you have an unstable Wi-Fi network, switch to a more stable one.
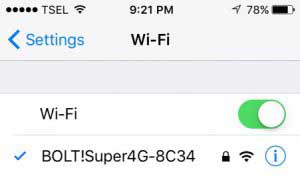
- Open "Settings" and tap on Wi-Fi.
- Select a new Wi-Fi network and connect to it.
- Restart the data transfer now.
Optionally, you can reset your iPhone's network settings, which differs from resetting all settings, to fix connectivity issues. This will clear saved Wi-Fi networks, cellular settings, and APN configurations. Quick Navigation: Open "Settings" and go to "General". Tap "Transfer or Reset iPhone", then select "Reset". Choose "Reset Network Settings", enter your passcode, and confirm.

> Way 5: Update iOS
Updating your iOS version to the latest iOS version can resolve compatibility issues to a large extent, especially when transitioning to a new iPhone 15 with iOS 17.0.2. (Ensure your device has enough battery and a stable internet connection.) Here's how to update your iPhone firmware:
- Open "Settings", go to "General", and select "Software Update".
- If an update is available, tap "Update Now"/"Download and Install".
> Way 6: Boot iPhone into DFU mode
- Connect your iPhone to a computer using a Lightning cable.
- Open Finder (on macOS Catalina or later) or iTunes (on older macOS or Windows).
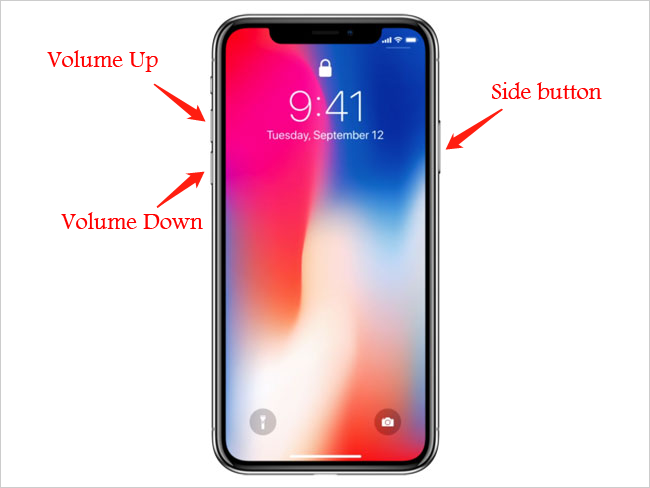
- Press and release the "Volume Up" button.
- Press and release the "Volume Down" button.
- Press and hold the Side button until the screen goes black.
- Press and hold both the "Side and Volume Down" buttons for 5 seconds.
- Release the "Side" button but continue holding the Volume Down button for another 10 seconds.
- The screen will remain black, and Finder or iTunes will detect your iPhone in the Device Firmware Update mode.
- You can then restore your iPhone to fix the data transfer issue. Afterward, exit the DFU mode manually as needed.
> Way 7: Restart your devices
Restarting your phone can often fix various issues, including data transfer errors. If you're encountering a data transfer canceled error, try restarting both phones to see if it resolves the problem.
To fix the new iPhone transfer not working with a deep fresh restart when the simple reboot doesn't work, you can hard reset your iPhone 15 as follows. Quickly press and release the "Volume Up" button. Quickly press and release the "Volume Down" button. Press and hold the "Side" button until the Apple logo appears, then release it.
> Way 8: Restore data from iCloud backup
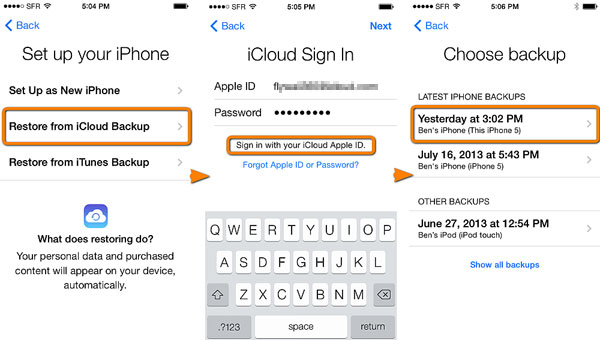
If your old iPhone is backed up to iCloud and both Apple devices use the same iCloud account, you can restore data during setup. Connect to Wi-Fi, follow the setup steps to the Apps & Data screen, choose "Restore from iCloud Backup", sign in with your Apple account, and select the backup to restore. After that, complete the setup and re-enter any necessary passwords.
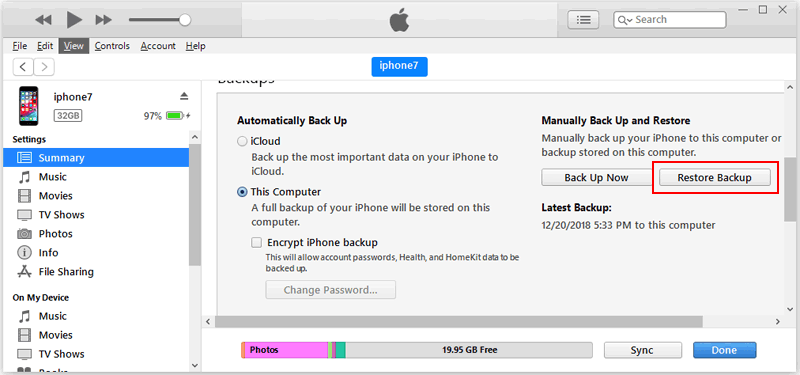
> Way 9: Get files from iTunes backup
Once you have a backup of your iDevice on iTunes, you can directly restore it to your new iPhone. Here's how:
- Turn on your new iPhone and follow the setup steps until you reach "Apps & Data."
- Select "Restore from Mac or PC."
- Connect your iPhone to the computer with your backup.
- Open iTunes, select your device, and click "Restore Backup."
- Choose the backup and enter your password if it's encrypted.
- Wait for the process to finish and complete the setup.
Part 3: iPhone Transfer Not Working? Try a Professional Tool [Trouble-free]
The Quick Start and Move to iOS applications place significant demands on mobile systems. While these tools are user-friendly, the outcomes may not always meet expectations. For reliable and satisfactory transfer results, just utilize MobiKin Transfer for Mobile (Win and Mac).
Endorsed by hundreds of thousands of users, this product has emerged as a standout solution in the mobile tool market. It is compatible with nearly all smartphones, facilitating rapid and lossless data transfers while safeguarding your privacy.
What can MobiKin Transfer for Mobile assist you with?
|
Main Features
|
Detailed Instructions
|
|
Straightforward Transfer |
Transfer data to your new iPhone seamlessly. |
|
Transfer Data between Mobile Phones |
iOS to iOS, Android to Android, Android to iOS, and iOS to Android transfers. |
|
Data Types Supported |
Contacts, messages, phone calls, images, videos, books, apps, calendars, notes, songs, etc. |
|
Widely Compatible |
8000+ Apple/Android devices. |
|
Easy and Quick |
Simple and quick to use after the stable connection. |
|
Privacy-focused |
It doesn't track your privacy. |
Free download this software and adhere to the guide below to learn how to transfer data to your new iPhone smoothly with it:


Step 1: Installation - Begin by downloading, installing, and launching this program on your computer. Connect both iPhones to your computer using USB cables. When prompted by a popup message asking if you trust this computer, select "Trust".
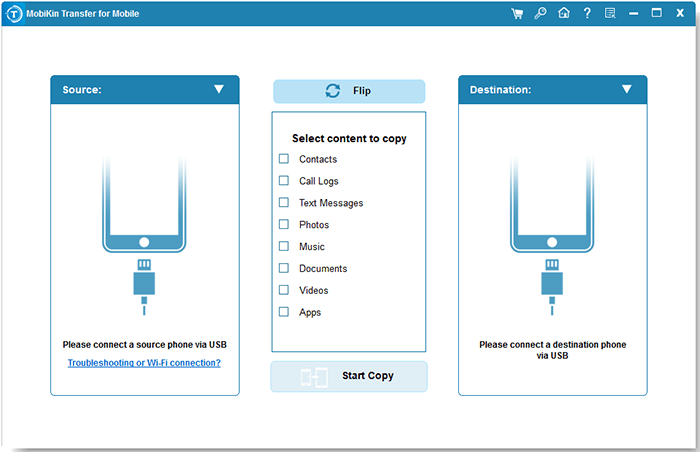
Step 2: Verification - After establishing the connection, the software will automatically identify the two devices, labeling one as "Source iPhone" and the other as "Destination iPhone." You have the option to click "Flip" to designate the new iPhone as the Destination device.
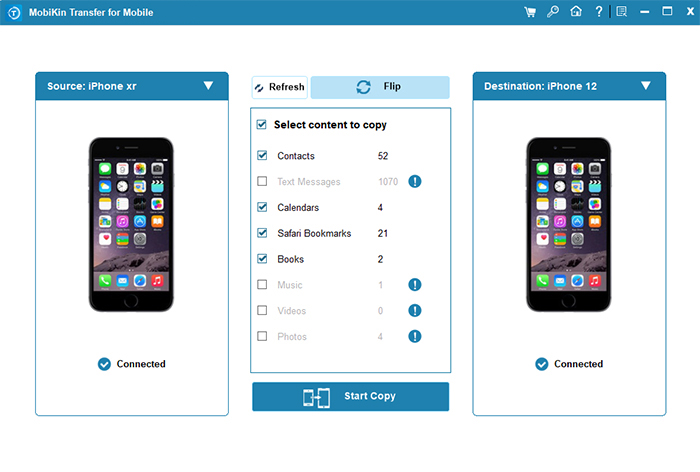
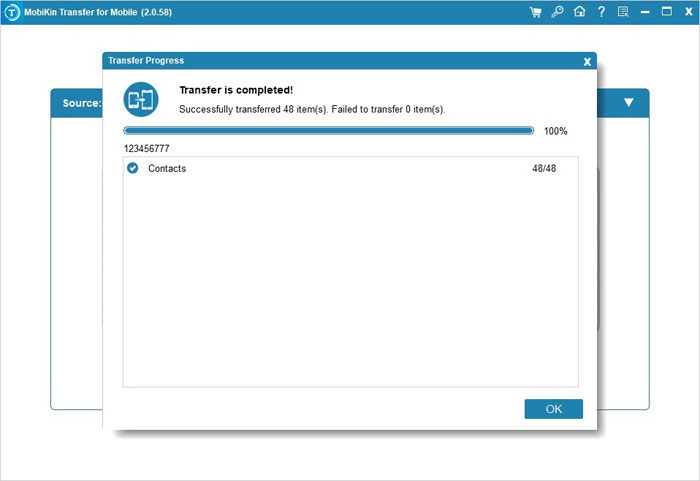
Step 3: Transmission - In the center of the interface, select the desired data types and then click on "Start Copy" to initiate the data to the recipient right now.
Video Instructions:
Summing Up
By understanding the common causes of data transfer issues and applying the solutions discussed, you can thereby overcome the frustration of a cancelled transfer and successfully set up your new iPhone. For an even smoother experience, consider using MobiKin Transfer for Mobile, which ensures a hassle-free transmission without needing to change your iOS version.
Related Articles:
How to Fix "Move to iOS Transfer Interrupted"? 7 Common Methods for You
iPhone 16/15 Quick Start Not Working? - 6 Ways to Fix It Now!
[Top 6 Methods] How to Transfer Files from PC to iPhone without iTunes?