How to Sync iPhone and iPad Easily? 6 Tactics & Additional Tips
It may be beneficial for you to understand the methods for synchronizing your iPhone with your iPad, especially if you wish to safeguard your iOS data and create additional storage space on your source device. You might be wondering how to sync iPhone and iPad with ease.
Fortunately, there are several options available to maintain synchronization of your data across devices, including MobiKin Transfer for Mobile, iTunes, iCloud, AirDrop, Dropbox, and NameDrop. This tutorial will guide you through these methods in a few straightforward steps and their comparison.
- #1: How to Sync iPhone and iPad via Transfer for Mobile [Seamless]
- #2: How to Sync iPad and iPhone Using iTunes
- #3: How to Sync iPhone to iPad Wirelessly via iCloud
- #4: How to Sync iPad with iPhone with AirDrop
- #5: How to Synchronise iPhone with iPad with Dropbox
- #6: How to Connect iPhone to iPad for Syncing via NameDrop
- Summary - Which Method Is the Most Desirable One [Comparison]
#1: How to Sync iPhone and iPad via Transfer for Mobile [Seamless]
How do I link my iPhone to my iPad via USB and then copy data across? MobiKin Transfer for Mobile (Win and Mac) makes it easy for you to have your devices connected before moving files over in one click. This tool is designed for data copying between mobile phones with the same or different OS(es). It's pretty easy to connect and can help you migrate content quickly and securely.
What makes MobiKin Transfer for Mobile standout?
- Synchronise your iPhone to iPad in one click.
- Transfer data from iOS to iOS, Android to Android, Android to iOS, and iOS to Android.
- The supported file categories are contacts, call logs, SMS, music, calendars, photos, videos, notes, documents, apps, etc.
- Work for various iOS and Android devices, including iPhone 16/15/14/13/12/11/X/8, iPod touch, iPad Pro, iPad Air, iPad 4, the new iPad, iPad mini, etc.
- It won't disclose your privacy.
How can I synchronize my iPhone with my iPad with MobiKin Transfer for Mobile?
Step 1. Run - Download and install this utility on your computer. Run it, and you can see the initial window below. Next, connect your iPhone and iPad to this computer with two USB cords.
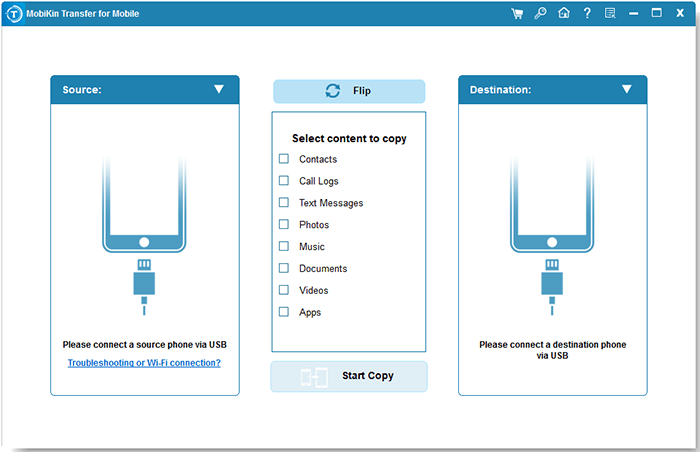
Step 2. Confirm - Once connected, the tool will automatically display the two devices as "Source" and "Destination". So, if they have been allocated in the wrong positions, please click "Flip" to align them properly.
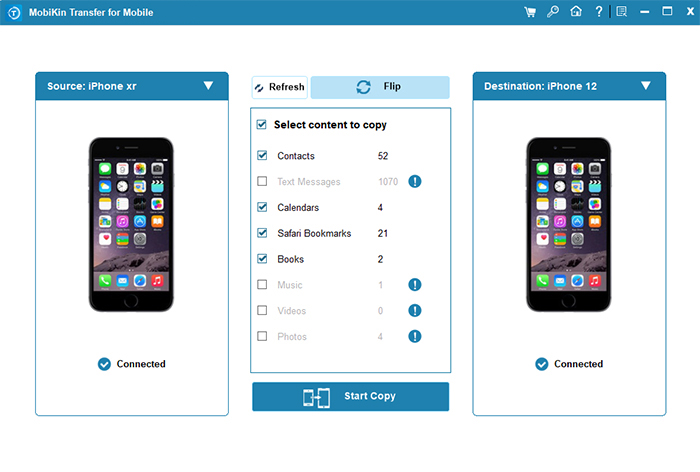
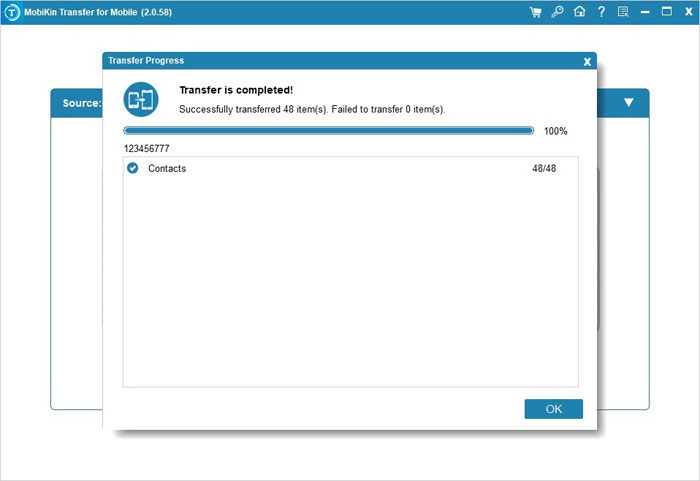
Step 3. Sync - From the file list in the middle of the screen, tick the boxes nearby the data types you wish to transfer and click "Start Copy" to kick off the data transfer.
Video Guide: For a visual reference, please check out the video below.
#2: How to Sync iPad and iPhone Using iTunes
iTunes makes it simple for you to transfer data between Apple devices, including apps, music, TV Shows, podcasts, movies, and photos. After the sync, all data on your iPad will be replaced by the data from the iTunes library.
How do you sync iPhone and iPad via iTunes on PC?
- Connect your iPhone to your computer and run iTunes.
- iTunes will detect your iPhone and list it on its interface.
- Click your iPhone icon from the left.
- Choose the data type > Select "Sync XXX".
- After that, tap "Apply" to sync your iPhone data to the iTunes library.
- Unplug your iPhone and connect your iPad to the same computer.
- Choose the iPad's icon in iTunes and click the corresponding file type.
- Select "Sync XXX" and click "Apply".
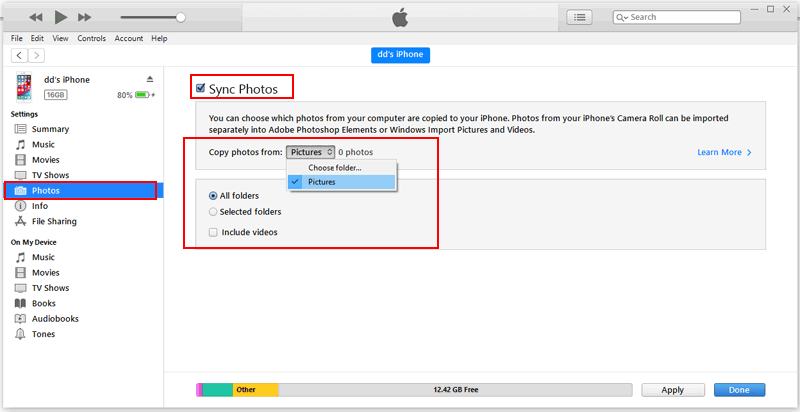
iTunes also lets you sync data across iDevices in bulk. Here's the guide: 1. Install the latest iTunes on your computer and connect your old iPhone via USB. 2. Click the device icon, go to the "Summary" section, and select "Back Up Now." 3. Disconnect the old iPhone, connect the new one, and click "Restore Backup" in the "Summary" tab to transfer the data.
#3: How to Sync iPhone to iPad Wirelessly via iCloud
If you're having trouble using USB cables right now, you may be concerned about how to complete the sync wirelessly. Well, you can use iCloud to fix how to transfer data from iPhone to iPad Air/Pro/mini easily:
- Connect your devices to a well-functioning WiFi network.
- On your iPhone, navigate to its "Settings > [your name] > iCloud".
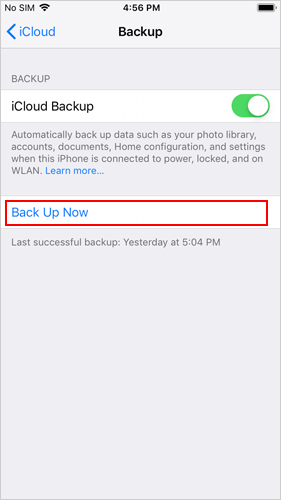
- Tap on "iCloud Backup".
- Choose "Back Up Now" to sync the iPhone to iCloud.
- Open the iPad to start the setup. If it has been set up, you should wipe out your iPad.
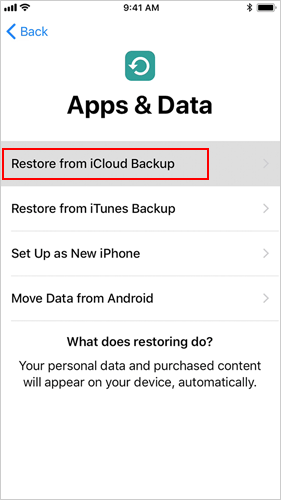
- Follow the on-screen directions until you reach the "Apps & Data Screen".
- Choose "Restore from iCloud Backup".
- Log in to the iCloud with your Apple account.
- Select the correct backup and log in to your account to restore your apps and purchased items when asked.
Note: When you encounter iCloud sync issues between your iPhone and iPad, try these solutions: 1. Check Apple ID: Ensure both devices use the same Apple account. 2. Internet Connection: Confirm both devices are connected to the internet. 3. iCloud Storage: Ensure you have enough iCloud storage. 4. Update Software: Ensure both devices are running the latest iOS/iPadOS. 5. System Status: Check the Apple System Status page for any iCloud issues.
#4: How to Sync iPad with iPhone with AirDrop
Before initiating the task, you merely need to keep the WiFi and Bluetooth enabled on both the sender and receiver. Yet, this feature won't allow you to transfer everything across devices. Next, we will tell you how to pair iPad to iPhone for sync with AirDrop:
- Open "Control Center" by swiping down/up from the top/bottom of the screen of your iPhone and iPad.
- Turn on both Wi-Fi and Bluetooth.
- Then, enable AirDrop and select "Contacts Only" or "Everyone".
- To AirDrop photos/music: Select the photos or songs you want to transfer, tap the "Share" button > choose "AirDrop" and the target iPad. Afterward, tap "Accept" in the prompt on the iPad to start data sharing. (You don't necessarily keep your devices within the same WiFi network, but you're only allowed to transfer one contact at a time.)
- To AirDrop contacts: Pick the contact you want to send, choose "Share Contact" > select the target device's name. Finally, tap "Accept" on the iPad.
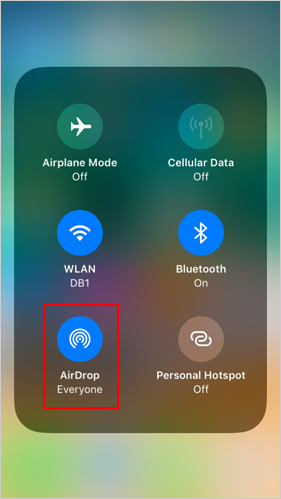
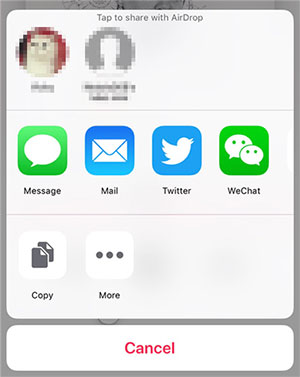
What if AirDrop fails to work? Try these solutions: 1. Re-enable Wi-Fi and Bluetooth. 2. Make sure both iDevices are within close proximity. 3. Check that AirDrop is set to Everyone instead of Contacts Only on both devices. 4. Restart both devices.
#5: How to Synchronise iPhone with iPad with Dropbox
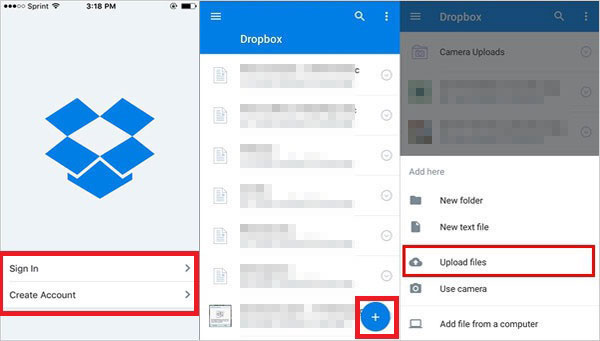
After uploading files from your iPhone to Dropbox, you can easily access and download them on your iPad. It automatically syncs changes across devices, storing files online and accessing them from any device with an internet connection. Here's the drill:
- Download and install the Dropbox app on both your iPhone and iPad.
- Log in with the same Dropbox account on both devices.
- On your iPhone, open the Dropbox app, tap the "+" icon, and upload the files you want to sync.
- Open Dropbox on your iPad, and the uploaded files will automatically appear for access and download.
* For free accounts, the maximum file size for uploads via the Dropbox app is 2 GB. For Dropbox Plus, Family, Professional, and Business accounts, the limit is 50 GB per file.
#6: How to Connect iPhone to iPad for Syncing via NameDrop
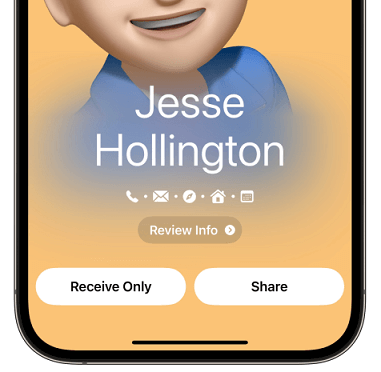
NameDrop is a feature introduced with iOS 17, and it is also compatible with iPadOS 17. This means that any iPad running iPadOS 17 can use NameDrop to easily share contact information by bringing two devices close together. (This method is specifically for contact sharing between Apple devices.)
How to link or hook up iPhone to iPad with NameDrop?
- Ensure both your iPhone and iPad have Bluetooth and Wi-Fi enabled.
- On your iPhone, open the Contacts app and find the contact you want to share.
- Hold your iPhone near your iPad until the NameDrop sharing screen appears.
- Select whether you want to "Share" or "Receive Only" on the iPad.
- Tap "Accept" on your iPad to complete the sync.
Summary - Which Method Is the Most Desirable One [Comparison]
After reviewing the main comparison of the methods below, you may obtain a deeper understanding of their main features. Obviously, if you're a beginner and want to transfer data easily and rapidly, don't hesitate to pick MobiKin Transfer for Mobile. Lastly, assuming you find this guide beneficial, you're welcome to share it with your friends and family.
|
Method |
Efficiency/Error Rate
|
Limitations
|
|
MobiKin Transfer for Mobile
|
High efficiency; low error rate |
Requires a PC; not free |
|
iTunes
|
Moderate efficiency; moderate error rate |
Requires a computer; can be slow; may overwrite existing data |
|
iCloud
|
Low efficiency; moderate error rate |
Dependent on internet connection; limited by iCloud storage capacity |
|
AirDrop
|
Low efficiency; moderate error rate |
Only works for certain file types; strict data limits |
|
Dropbox
|
Moderate efficiency; low error rate |
Requires internet; limited by Dropbox storage capacity; manual syncing |
|
NameDrop
|
Low efficiency; low error rate |
Requires iOS 17/iPadOS 17 or later |
Can you Bluetooth iPhone to iPad? The short answer is No. However, you can still create a Bluetooth connection between two Apple devices. Here are the directions:
- On your iPhone, go to "Settings > General > Network"; on the Network, head to "Cellular > Personal Hotspot"; go back to "General > Bluetooth".
- On your iPad, go to its "Settings > enable Bluetooth"; give the iPad a few minutes to scan for the iPhone; ensure the six-digit number on both devices is the same.
- Lastly, go ahead to pair the devices.
Related Articles:
Full Guide on How to Screen Mirror iPhone to iPad in 2024
10 Best iPhone/iPad Manager Software to Transfer and Manage iOS Files
How to Unlink iPad and iPhone Text Messages? 6 Convenient Strategies 2024
What to Do If iPad Won't Restore or Update? Check the 7 Solutions Here


