How to Transfer Music from One Apple ID to Another? 4 Clever Solutions
"My son, who's now an adult, has been using my iTunes account (I don't use iTunes) that I created for him many years ago and he's accrued a large legal iTunes library. Is it even possible to transfer these thousands of songs from my account to his?" -- from Stack Exchange
* Can You Transfer Apple Music to Another Apple ID?
You cannot directly transfer your Apple Music subscription, playlists, or library content to another Apple ID. Apple Music content is tied to the specific Apple account that you used to subscribe to and save your playlists, music library, and other content. However, there are a few workarounds to manage a transition to a new Apple ID:
- Locally Stored Songs: Transfer music stored on your device to your new Apple ID by adding it to your Music Library.
- Playlists: Share your playlists via a link and open them while switching to a new Apple account.
- Downloaded Purchases: Re-download any purchased music by signing in to your new Apple account and accessing your purchase history in the iTunes Store.
- Expert 3rd-party Tools: Use tools like Phone Transfer to move Apple playlists to another Apple ID.
Below we will elaborate on these methods in detail.
- Part 1: Transfer Music from One iTunes Account to Another by Moving Local Music
- Part 2: Transfer Music to a Different Apple ID by Copying Playlist/Library
- Part 3: Transfer Apple Music to New Apple ID by Adding Downloaded Songs
- Part 4: How to Transfer Music from One Apple ID to Another Expertly
- People Also Ask about Apple ID & Apple Music
Part 1: Transfer Music from One iTunes Account to Another by Moving Local Music
To transfer your local music connections to another Apple ID's library, you ought to first locate the content on your Windows or macOS computer and subsequently add it to your new music library. Here's the manual:
- Launch the iTunes or Music application on your computer and ensure that you are signed in with your original Apple ID. (Unable to sign in your Apple ID?)
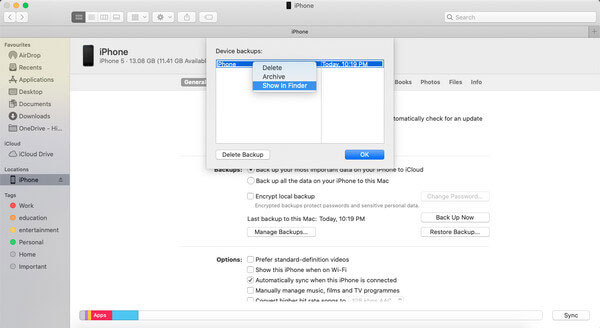
- Go to the "Library" or "Playlists" section locally and right-click on the desired song.
- Select "Show in Windows Explorer" (for Windows) or "Finder" (for macOS).
- Afterward, sign out and log in with a different Apple ID.
- Select "File > Add File/Folder to Library" (on Windows) or "File > Import" (on macOS).
- Navigate to the files you desire and add the chosen music files to the application.
Limitations:
- It doesn't synchronize changes between accounts, so any updates to the library won't be automatically reflected.
- Moving files manually might result in the loss of metadata.
What if you encounter syncing issues when transferring music to another Apple ID in this way? Solutions: 1. Make sure iTunes or the Apple Music app is set to "Manually manage music and videos." 2. Rebuild your music library by renaming the "iTunes Library.itl" file and restarting iTunes. 3. Use the latest versions of macOS, iTunes, and iOS. 4. Restart your computer and devices.
Part 2: Transfer Music to a Different Apple ID by Copying Playlist/Library
It is possible to export your Apple Music playlist from the previous account and subsequently import it into the new account; however, this will solely transfer the playlist information and associated metadata. Unfortunately, due to digital rights restrictions, items such as albums or additional playlists cannot be transferred. See how to transfer music from one Apple ID to another by exporting the playlist:
- Access your previous Apple Music account.
- Select the desired playlist from the left-hand menu.
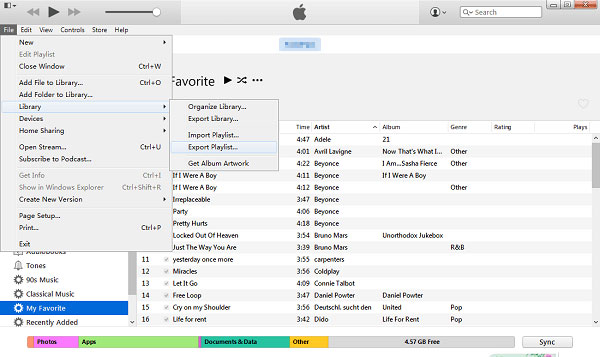
- Navigate to the top menu and choose "File > Library > Export Playlist".
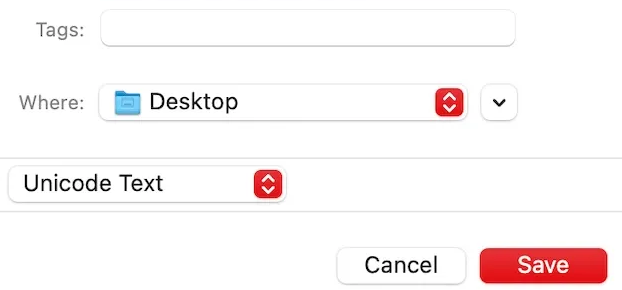
- Click "Save" (consider adjusting the "Where" option to determine the location for saving the playlist file).
- Sign out of your old Apple Music account.
- Sign in to your new account.
- In the top menu, select "File > Library > Import Playlist".
- Locate the .txt file you saved earlier.
- Click "Open" to successfully import the music into your new Apple Music account.
Note: Optionally, you can share the playlist as follows: 1. Open the Apple Music app on your device. 2. Go to the "Library" tab, select "Playlist," and choose the playlist you want to share. 3. Tap the three-dots icon, then select "Share Playlist." 4. Switch to your new Apple account. 5. Access the shared playlist via the 3rd-party app. 6. Save the shared playlist to your new library.
Limitations:
- Different versions of iTunes may have compatibility issues.
- If the library is large, it may take up a significant amount of space on both accounts.
Further Reading: How can you retrieve your Apple Music library when you lose it? Here are the solutions.
Part 3: Transfer Apple Music to New Apple ID by Adding Downloaded Songs
Upon acquiring purchases through the previous Apple ID, all downloaded content is expected to remain accessible in iTunes, even after logging out and switching to a new account. You have the option to download the music you have purchased to your PC or Mac and subsequently transfer it to your new Apple ID by adding the files directly. Here's how:
- Launch the iTunes application on your Windows computer.
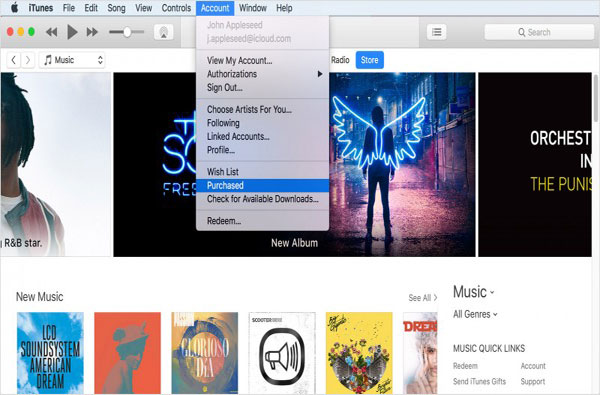
- Next, click on the "Account" option located in the top menu bar.
- Examine the side menu within the iTunes Store and scroll down to select 'Purchased'.
- Proceed to download all the iTunes songs you have previously purchased.
- Remove your old Apple account that is linked to your iOS devices.
- Additionally, download all your purchased songs in iTunes as local AAC files using your old Apple ID.
- Click on the 'File' menu in the iTunes application.
- Select 'Library' followed by 'Export Playlist' to export the desired playlist.
- Choose the 'XML files' option from the 'Save as type' dropdown menu.
- You will then have the XML file saved on your computer.
Limitations:
- Some metadata (like play counts, ratings, etc.) might not transfer properly.
- Transferring purchased or DRM-protected music might violate Apple's terms of service.
Part 4: How to Transfer Music from One Apple ID to Another Expertly
What methods are available for transferring music from one Apple ID to another without utilizing Apple Music or iTunes? If your music is solely stored on your old iPhone associated with an old Apple ID, and you have physical access to the destination iPhone linked to a different Apple ID, you may consider using a specialized tool for efficient music transfer.
Phone Transfer is a highly effective iOS file transfer and management application that allows you to seamlessly copy your music files without compromising data integrity or quality.
Phone Transfer - The Best iOS music transfer:
- Transfer music from one Apple ID to another with great ease.
- Apply to purchased and non-purchased songs.
- Sync without overwriting previous content on your sender.
- Transfer data from Apple device to PC or iTunes, and vice versa.
- Fully compatible with overall iDevices, including the one with the latest iOS 18.
- Easy to use, quick transfer, and worry-free experience.
- Value your privacy.
How to transfer music from one iTunes account to another on the same computer via Phone Transfer?
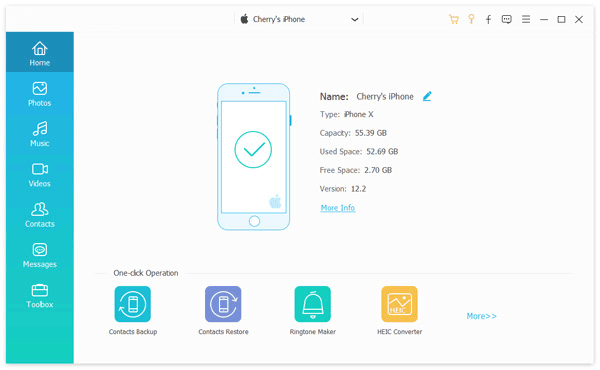
Step 1: To initiate the music transfer for iOS, begin by launching the application on your computer. Connect both of your iPhones or iPads to the computer using USB cables, and the program will recognize the devices. You will then be presented with an interface similar to the one shown below:
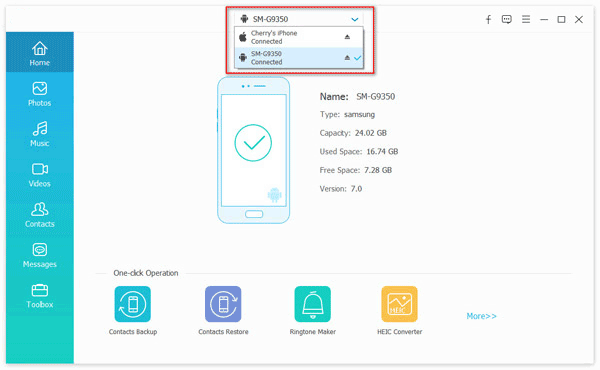
Step 2: Ensure that the old iPhone is designated as the source device while the new one serves as the destination. If this is not the case, you may select the appropriate source device from the dropdown menu.
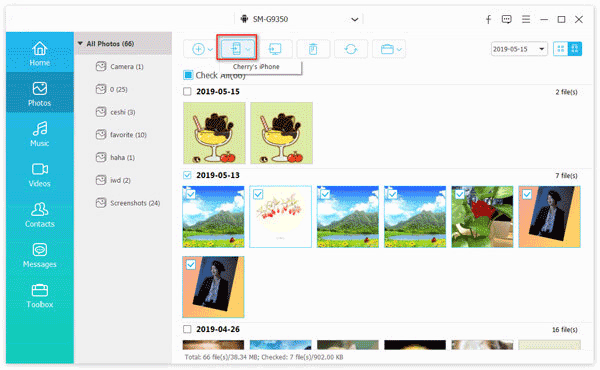
Step 3: Select the "Music" option and click the "Export to Device" button to commence the transfer of music between the two devices associated with different Apple IDs.
Limitations:
- Require a purchase or subscription.
- You should ensure your songs are all kept on your sending device at first.
People Also Ask about Apple ID & Apple Music
Q1: Can I change my Apple ID without losing songs?
- Purchased Music: Music bought with the old Apple ID may not be accessible under the new ID.
- Apple Music Subscription: You’ll need to start a new subscription with the new ID, which may affect your playlists and downloads.
- iCloud Music Library: Download important music locally before changing IDs, as iCloud content might not be accessible.
- Non-DRM Music: Personal music files will remain, but you may need to re-add them to the new ID's library.
Q2: Can I use iCloud Music Library to transfer music between Apple IDs?
No, each Apple ID has its own separate library. You can only access music synced to the specific Apple ID you are signed into.
In the End
Overall, this easy guide has explored four great strategies for transferring your music between iDevices with different Apple IDs, including moving local files, copying playlists, adding downloaded music, and using third-party transfer software.
Honestly, for the most efficient and secure transfer, just try the available options or use the most professional software - Phone Transfer that meets your needs. This ensures that your music is transferred swiftly and safely, preserving your valuable library and listening experience.
Related Articles:
3 Methods to Recover Deleted Songs on iPhone with/without Computer
How to Transfer iTunes Music to Android (5 Proven Ways in 2024)
[Full Guide] How to Factory Reset iPhone without Apple ID Password?
How to Transfer iCloud to New iPhone without Old Phone [Guide 2024]


